
19 minutes read
In this article we’ll create a web component based on Ractive.JS and Office UI Fabric. I’m not going to discuss all the theory behind components because I consider it a waste of time (at least in this case). What’s important to know is that RactiveJS’ components contain style (css), structure (html) and logic (javascript) bundled in a single file. And the goal of this article is to show how to integrate such files in JavaScript projects and compile them with WebPack & Gulp. To make the whole thing more realistic we’ll reuse the PersonaCard-component from Office UI Fabric.
A Live Demo can be found here.
The complete source code is here.
The intention of this article is to show how to:
- create a project structure for building RactiveJS apps
- configure WebPack & Gulp to control build cycles
- create a component
Creating the project structure
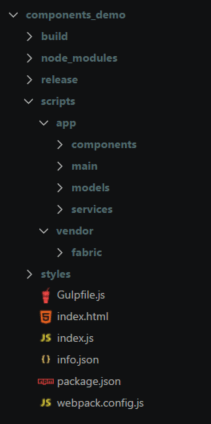
This project is based on NodeJS and utilizes the usual files like package.json, index.js and index.html to boot the initial scripts. Of course, this is not the only possible setup but I prefer to have index.html and index.js so I can quickly test the app just by opening index.html. For some operations this is not possible because browsers block activities when a file was loaded from the file system. In such cases you have to start the app via NodeJS. The project uses HapiJS as its web server and there’s already a simple routing predefined in index.js. To start HapiJS just type “npm start“.
The project structure contains two top level directories: scripts & styles. All JavaScripts, Components etc. go to scripts/app and everything that’s not our code goes to scripts/vendor. Styling like CSS goes to styles without additional separation. Just simple sub-directories with names of their respective frameworks/libraries, for example styles/fabric for Office UI Fabric CSS-files.
The starting point of the app is in scripts/app/main/main.js. In this file the main RactiveJS instance will be created and hooks on <div id=”app-root”></div> element from index.html . A typical RactiveJS instance contains properties named el, template and data. These are used by the RactiveJS library to find the appropriate space within a document (“el”), to inject new structures (“termplate”) and to deliver data to the new instance (“data”).
Parallel DOM
It is also important to know that RactiveJS maintains a dependency graph between document elements it controls and the data related to them. Whenever any part of this data structure changes RactiveJS performs a lookup to reflect those changes in the document. Terms like VirtualDOM, VDOM etc. are very popular these days and in RactiveJS lingo this is called Parallel DOM. But Ractive’s Parallel DOM should not be confused with different Virtual DOM implementations found in other frameworks or libraries. For example, React’s VDOM maintains many “little” Virtual DOM’s for each element in its document hierarchy and updates them continuously while Ractive’s Parallel DOM creates a single abstract representation of the whole document structure and updates only certain parts of it (those affected by a change). However, this is not meant to raise any discussions on “what’s the better approach” to deal with DOM’s state complexities. What’s really important is the fact that RactiveJS offers a solution to state management by using an internal, abstract document structure that reflects the HTML DOM and it’s state changes. There’s no need to manually update parts of the HTML document when a piece of data changes. No DOM trashing, no flickering.
Parallel DOM in Action
A very simple example on how to utilize Parallel DOM is to put a Mustache entry in an HTML document and manipulate a data-structure variable of the same name inside the RactiveJS instance. The template file the script/app/main/main.html, for example, contains an entry named {{ message }} which corresponds to the RactiveJS data-structure in main.js
main.html with mustache-entry

main.js (inside the data object is the “message” property)

When the app starts the generated Component looks like this:

We see the message “Visit Card Demo”. For demonstration purposes there’s a reference to the current Ractive instance available inside the window.App object. To change the message property without reloading the page we open the browser console and type in the following statement:

App._main points to the RactiveJS instance from the above screenshot.

The message has changed without a page refresh! 🙂
Of course, the true power of Parallel DOM comes to light when we deal with more complex DOM structures and many simultaneous changes. In this demo we’ll not only create a component but also update its values by using a remote RESTful service which to receive user-data (text and images).
Mustaches
Many frameworks/libraries support more or less similar Mustache templating languages. With Mustaches we define “sinks” where data from instances has to land. What’s important to know is that Ractive’s mustaches are not logic-less. This means that we can decide when and if some parts of a template should be executed or not. Ractive’s mustaches are therefore similar to Handlebars. We can, for example, put statement like if-else, each and with inside our template definitions. In our component we’ll extensively use mustaches to describe DOM elements as dynamic HTML structures that change according to internal state of the owning RactiveJS instance. For example, the Organization-Chart-List inside the component will contain information related to other people within the company. And because such lists are very dynamic in nature and can change at any time we should not put some hard-coded HTML structure into our component’s template. What’s needed is some logic that dynamically changes this part of the template according to latest data received from the aforementioned RESTful web service. Now, let’s look into the HTML structure of this list:
Dynamic structures with Partials

Our OrgChart-element is basically a List-Item and contains several DIV’s with HTML attribute classes related to the Office UI Fabric Library. For now we can ignore all the classes because they only deal with UI-presentation and don’t affect the logic in any way. The important part are the unusual entries like {{#orgChartList}} and {{>item}}
What do they mean?
In RactiveJS everything put inside of {{ }} delimiters is automatically recognized as a template snippet. The names within delimiters refer to RactiveJS object’s properties whom the HTML template belongs. We call them references. In the above screenshot the RactiveJS-object is the class which defines the properties of the VisitCard and therefore the name orgChartList must be some kind of property belonging to this class or any object inside of it.
Let’s try to find the orgChartList-property in the RactiveJS class:

But here’s no orgChartList-property! Only an object of type model.PersonaModel()! How can RactiveJS know which object we’re referring to? If you scroll up for a little you’ll see this entry:

Now, we see that in this case we’ve put this (still unknown!) object over the whole document structure so that we can directly refer to its properties without explicitly naming it. Of course it would be possible to use persona.orgChartList but there’s no need for that because RactiveJS automatically expands properties to its keypaths. The Keypaths are a very important feature of RactiveJS. With a help from keypaths RactiveJS receives all needed information to update the DOM, adapt to changes in data structures and react to events. Keypath manipulation can be defined as a way to communicate with RactiveJS instances. When I want to change a piece of data inside an instance all I need is a “pointer” to this data, its keypath.
But still we don’t know what this models.PersonaModel() thing is? The answer is easy: it’s just a simple AmpersandJS Data Model, which by itself is based on BackboneModel. RactiveJS, being a pure View-Layer, is not prescribing which backend one has to use. I prefer the AmpersandJS library because it’s philosophy of “little specialized modules” fits perfectly with RactiveJS. Feel free to replace it if it’s not fitting to your preferences. Now let’s look inside the PersonaModel:

This is a clear POJO structure containing fields which we’ll later use in the component to fill in the ‘gaps’ defined by Mustache entries. Almost all of them are strings but one is of type ‘any’. And this is our property orgChartList. Well, to be honest, one should properly define a type of a property but in this case I just wanted to have a structure that can be more complex than a simple string or number. AmpersandJS models are very versatile and offer many powerful options but here I’m not talking about models. Maybe in some other tutorial 😉
In our case orgChartList will contain a list of other PersonaModels collected in a specialized array-like structure based on AmpersandCollection, Its definition is in the same file above the PersonaModel definition: PersonaCollection. We see that it contains only one member called model. There we define that the collection will contain many things of type PersonaModel. Of course, here I’m completely ignoring all the nice RESTful properties like update/save/delete via URL but again, but all this is just for demonstration purposes. 😉
Now when we go back to our components HTML structure a few things have hopefully become more understandable. We see the #persona entry encompassing almost the whole HTML structure (if you scroll down to the last <div> entry you’ll see {{/}} which means “end-of-mustache-entry“.), Inside this two borders are many different properties scattered throughout the document. Our #orgChartList belongs to the model PersonaModel, we now know it, but what does the {{>item}} mean? There’s no property “item” in PersonaModel. Well, RactiveJS not only has templates but also template particles, called Partials. A Partial is a template snippet which depends on some outer template. A partial has a name which distinguishes it from all other templates. This is the reason why our Partial is named “items”. We simply can’t give it a name referring to some known property. Also, partial names are marked with a > sign to help the template parser separate it from normal mustaches. But why do we need a Partial in this case?
Partials
In this demo a PersonaModel can contain a collection of other PersonaModels, a PersonaCollection. And like any other PersonaModel the members of this collection should be properly displayed in an HTML document, too. For example, if I have a list of my colleagues and want to display their photos and telephone numbers in a list I’d need a proper template to achieve the desired result. Of course, I could simply write a hard-coded structure and just throw all the data into some <ul><li><li/></ul> structure but we’re building a reusable component that should dynamically adapt itself to incoming data. Therefore we’d have to create a “template snippet” to handle such changes. This exactly is the reason why we utilize a Partial. We want to dynamically analyze incoming data and adapt our orgChartList accordingly. The resulting list would be similar to this screenshot:

Now, let’s recapitulate this part because dealing with templates and Partials can cause some confusions:
- A mustache in RactiveJS is defined by using {{}} delimiters.
- The names of variables inside delimiters point to data structures inside the owning RactiveJS instances.
- The term “owning” RactiveJS I use in this posting is simply the instance which has loaded the template in the first place.
- A mustache is pointing to a data structure inside a RactiveJS instance by using a keypath (for example: myObj.MyHashTable.myKey)
- A mustache can contain Partials which are, by definition, “template snippets” and can be used for repetitive tasks (for example, iterating over a data-list and each time creating the same structure based on the template particle, only with different entries)
- A mustache can use logic like if, else, with and each statements
- Mustaches must be defined inside the HTML structure they target to manipulate
- Partials must be located outside of their owning HTML-structure
I suppose the last entry is a little bit confusing. Why should a Partial be located outside of the HTML structure while other template parts are located within? This is because templates are treated as HTML snippets and therefore must conform to HTML parsing rules. A Partial is not an HTML structure and therefore not a part of a formatted document. It is worth noting that RactiveJS’ parser is not very forgiving when it comes to HTML parsing. Be prepared to deal with errors like “nor properly closed <div>” and the like.
Now let’s analyze our Partial. What does is look like?

The first difference we notice is the keyword partial before its name item. This is mandatory because RactiveJS has to recognize it as a Partial. Otherwise we’d encounter parsing errors. This template snippet describes an HTML List-Item with three entries referencing to properties of the PersonaModel. Also, we see that it’s possible to put a Mustache inside an HTML-attribute without using double or single quotes. But RactiveJS can do much more powerful things that just replacing text like in this example. We could, for example, define event directives like on-click, on-blur etc. Also, we could map raw events to semantically more appealing proxy events. Something like <div on-click=”password-saved”/> . Within our scripts we could recognize a raw click-event as a “password-saved”-event.
Our Partial references to a list of elements. Therefore the entry we saw already…

acts like a for-each-loop. It goes over all the entries from PersonaModel assigning the same Partial to each of them. This is all the component does to properly display different object properties within the HTML structure it controls. Here we see the interactions of three key elements of RactiveJS components: style (css), structure (html) and logic (javascript). Regarding styling we aren’t using any extra styles for our VisitCard. But if we wanted to then a simple <style></style> with some CSS entries in it would do the whole work for us. The nice thing about component styles in Ractive is that their stay within the component and never poison the rest of the HTML document. Now the last part remains, the logic embodied in JavaScript.
RactiveJS Component Definitions
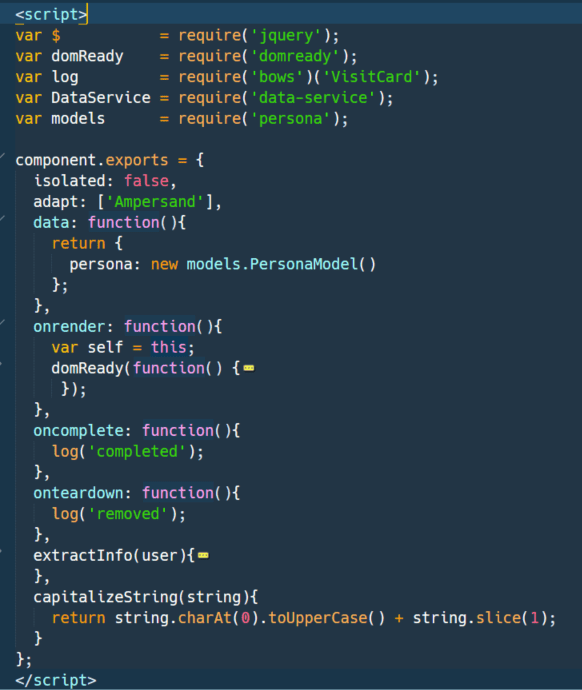
Similarly to Node’s modules RactiveJS defines a structure called component that exports its internal logic via the export property. As we already saw in the main.js file a RactiveJS instance contains several standard properties and functions, like el, template, data, onrender, oncomplete etc. A RactiveJS component is no different but uses a slightly different mechanism to make itself available to the outside world. This is achieved by putting the whole logic inside a script-tag and exporting the component’s API via component.exports.
Of course, nobody should expect NodeJS or any of the browsers to immediately understand what component.exports means let alone the require-statements above it. A mechanism is needed to parse such logic and translate it into a browser-understandable HTML. In our case we’re using WebPack and the ractive-component-loader to parse RactiveJS components. The file extension ract is not mandatory and just a personal preference of mine. Feel free to change it but do not forget to adjust component-loader’s settings in the webpack.config.js!

Component Structure
At the first sight our component resembles a typical RactiveJS object. There’s a data object and all the usual lifecycle on*-fuctions. But also we do see new members like isolated. This property is used to change component’s scope regarding its parent data. By default it is already set to false and I’m using it here only to show that it’s possible to create a component which would only see the data we give it. In fact RactiveJS components are just RactiveJS objects and are created by using the same Ractive.extend() API. But here we’ll use our component inside another RactiveJS object and therefore we’re not going to instantiate it directly but as an HTML-tag. If we look back into the main.html file we see the tag <visit-card/> This, of course, is not a well-known HTML element and therefore its definition must be located somewhere else. And yes, it is located in the main.js script.
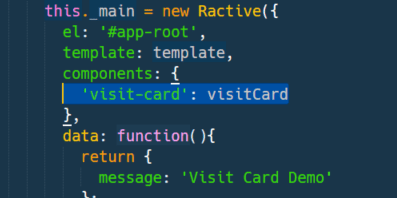
A RactiveJS instance can contain any number of subordinate components which are located within the component-property. A component entry has a name and a reference to its RactiveJS definition. In our case we’ve used NodeJS require to load the component. Here we call it “visit-card”. The same name we use for the HTML-tag inside the template of the same RactiveJS instance!
Now we can clearly recognize the pattern:
- A RactiveJS instance gets instantiated and loads its data and definitions
- It loads its template too.
- If there’s an entry in the template referring to one or more of the loaded components, then this/these component(s) will get instantiated, too.
- And the cycle begins anew, for each of those components. Until the whole structure is set.
This is the whole “magic”. 🙂
Office UI Fabric Style and Data Service
But our component is not only sitting there and doing nothing. Far from that. It utilizes a small data-service which queries data from a free RESTful service. To query this data the new fetch-API is being used. Of course, the whole styling from Office UI Fabric doesn’t get activated out of nowhere but by using the mandatory require’s in main.js and predefined jQuery plugins which are built into this framework. In the onrender-function of the component there’s a jQuery.plugin command which activates the nicely looking PersonaCard-plugin by searching for the ms-PersonaCard HTML class attribute. The fetch operation part of the DataService class in services/data-service.js script.
Building the Component Example with Gulp and WebPack
To build the complete example first make sure you have installed all the needed packages. Type in npm install and wait until the installation completes. After that type in gulp and wait for the build to finish. If you want to progressively build the example and reflect changes directly in your browser you can use gulp watch. In Gulpfile.js there’s already a watch-configuration with activated LiveReload. If you are on Chrome make sure you have the LiveReload plugin activated.
Alternatively you can directly use WebPack to build the example but make sure you have the latest scripts copied to the build folder. The build scripts in Gulpfile.js and webpack.config.js do never touch the original scripts from scripts folder. Gulp always copies them first to build and later generates a bundle in release directory.
Conclusion
RactiveJS components offer a brilliant and easy to understand mechanism for markup and behavior encapsulation. By avoiding complex rules and convoluted configurations RactiveJS concentrates on the important parts of the web: its markup, structure and behavior. By combining them into a coherent whole there’s no need to wrestle with fruitless complexities.
The Web is all we have. The Web is all we need.


