
16 minutes read
A few months ago I discovered a Project from Louisiana State University led by Prof. Kaiser that designs and develops a new execution model for future high performance architectures. It’s called ParalleX and its C++ implementation is named HPX (High Performance ParalleX). It supports operating systems like Linux or Windows and several Build-Toolchains (GNU, MSBuild, CMake etc.). In this article we’ll use Windows 10 x64 and Visual Studio 2015 to build up the base structure of HPX itself plus a small collection of demos showing some of the key aspects of it.
The sources can be found here.
Building HPX
Before we can use HPX in our applications we have to build this library first. There are some already available packages from their download page but not for Windows. The configuration of the HPX-Solution for Visual Studio is done with CMake. If you follow my instructions on preparing and building HPX under Windows you should get a complete HPX distribution under a path you provided in the CMake config, for example C:\bin. But before you try to build HPX make sure you have built the Boost-Libraries first as HPX relies heavily on them. This building process is described in the aforementioned tutorial as well.
Using HPX
Usually, HPX applications are executed on parallel computer systems like Beowulf clusters which I’m not running at home. However, there’s no reason to ignore such environments because massively parallel systems will more and more become standard. Just look at our smartphones. All of them have multi-core processors now. Or take a look at Smart-Home and the Internet-of-Things which are not far away from becoming ubiquitous. Interconnected systems are not only ‘connected’ together but also ‘massively parallel’ by default. The way we think about our world affects the way we code. Of course, we can try to ignore all these facts, as we did in the 90es, but sooner or later we’ll be forced to adapt our codes to new circumstances and this will provoke exceptional problems which are nicely described in the excellent HPX-documentation. We are in need of infinitely scalable applications that are fault tolerant, not wasting power, easily programmable, generalizable and performant. To achieve such sophisticated goals we also have to change our current development strategies that still rely on direct usage of threads, global locks & barriers, waiting-for-messages and other ‘GOTOs’ of the parallel world. However, we don’t have to learn to program anew. They’ll still exist libraries and runtime environments available for direct consumption. And still we’ll be able to load and import our own functionalities in such execution environments. Many things will certainly change but even more will stay the same. Despite the underlying complexity HPX remains very easy to use and comprises of several DLLs one can use for free. There’s actually less to learn because HPX doesn’t expect us to write threads by hand or fiddle around with direct memory addresses of our parallel components. There’s no need to manually move objects throughout our clusters and certainly no need to maintain any kind of ‘registry’ for our working objects. HPX achieves much more by wanting much less from us. Just try to use some other parallelization libraries like OpenMP or PPL and you’ll know what I mean. Additionally, HPX enriches the C++ standard facilities by providing its own extensions which live in the hpx-namespace. This also makes the adaptation of specialized HPX-code very easy. No matter how complex our individual solutions may be, all of them will be based on actions and/or components. These two are the building blocks for massively parallel systems. In this article we’ll build a small project comprising of several functions and two components. We’ll also see how we can extract our code into a separate DLL and load them later by our client application.
HPX Runtime
Before we start to use HPX facilities we have to instantiate the HPX-library itself. There are three ways to boot the HPX-runtime.
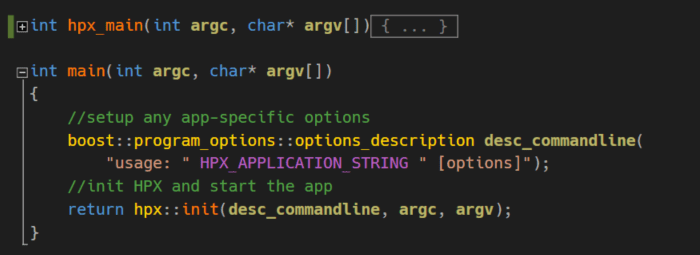
- Using the standard main-function
- Providing an alternative hpx-main that blocks the original main-thread
- Developing a separate HPX entry point that avoids blocking the main-thread
Which one you’ll use depends on your use-case. For example, if there’s a GUI-Application wanting to consume HPX services then blocking the main-thread would be a really bad idea. In such case you’d have to supply a new entry point. If you’re on the console, like in the examples below, then the option 2 is sufficient: just a separate main-thread. More detailed info on these three options can be found here.
This is how our alternative main-function invocation looks like. The additional argument handling is based on Boost-Libraries and is not mandatory. However, it’s of advantage to implement at least some basic argument handling because as the app grows the amount of possible options will also grow.
Actually, there’s much more power in HPX’ handling of arguments as it supports a very flexible INI-configuration handling. One can easily supply own INI-configuration files to control the system behavior. We’ll not use any additional INI-files here but you should be aware of it. Even a demo like ours already supports some standard options and flags provided by HPX itself. For example type in HpxTest_1.exe -v to get HPX’ version information:

To see all available options just use -h. 
To dump the whole configuration info of the app and execute it subsequently just use: HpxTest_1.exe –hpx:dump-config
Now, let’s go back to our hpx:main and check its signature. As we see we’re simply forwarding the arguments from standard main. In main we initialize HPX with hpx:init and halt the main thread until hpx::main calls hpx::finalize. To be able to use these facilities we have to add hpx/hpx_init.hpp into stdafx.h or any other file where we manage our includes. If we decide to use another available runtime configurations we’ll have to include their respective include-files. When re-using standard main we have to include hpx/hpx_main.hpp and for our own start-facility we’ll need hpx/hpx_start.hpp.
Using Actions
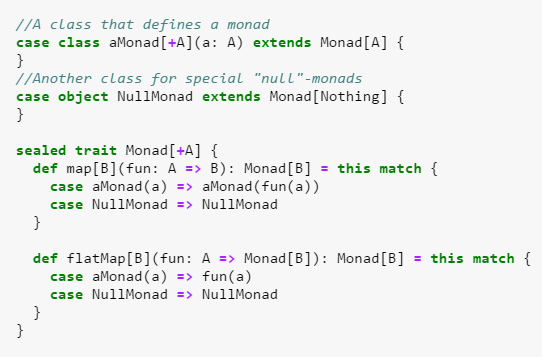
As HPX defines it Actions are special types that help to describe operations which can run locally and/or remotely. The locality itself is of no significance to the client as Actions help to shield away any specifics of the raw code inside the real functions. We could also describe Actions as wrappers mapping to functions. The functions itself can either be standalone-functions or class-member functions belonging to components. In both cases we have to properly make them visible at the global level. This is because HPX maintains only a single hardware-independent memory area. The underlying ‘metal’ doesn’t affect the location and execution of Actions as HPX uses its own addressing service called AGAS (Active Global Address Space). AGAS is used to build up a hierarchical namespace containing all resources that participate in a computation. With AGAS one doesn’t have to deal with memory boundaries. Everything is just one big flat memory area and the only thing we need to know is the Global ID of a resource we want to use (component, action etc.). AGAS takes care of mapping GIDs to global addresses. To define an Action we first have to define a standard C++ function. Alternatively we could also use member functions of classes but let’s begin with a simplest possible example.
Here we declare a few functions. Their definitions are in a separate cpp-file not shown here.
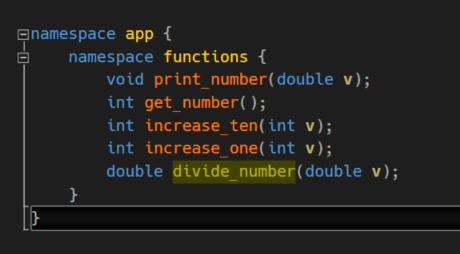
To make them globally available in HPX we have to use HPX_PLAIN_ACTION macro from HPX. In our case all of them are located in register.h.

This macro takes two arguments: a fully qualified free function, that is: a non-class-member function, and a globally visible name which’ll be used for location independent access. If we omit the global name HPX will automatically generate one containing the original function name with _action appended.
We can now access the function by applying the registered actions. In HPX lingo applying the action means invocation of globally available functions. In our demo we have a function called function_invocation_demo() that shows such an application.
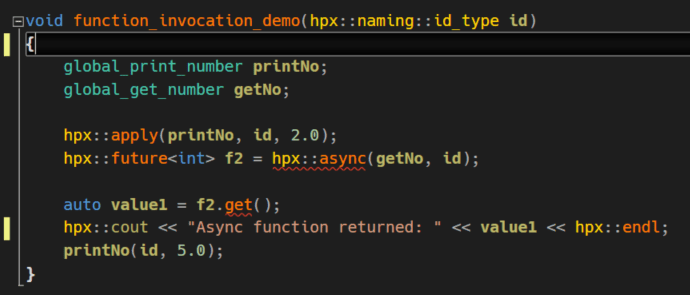
We define our two Action instances: global_print_number and global_gen_number. In the following code we decide to execute the first Action asynchronously and without any synchronisation (also known as ‘fire and forget‘). For this we use hpx::apply that expects the Action, the ID of the locality and any number of arguments defined by the original function.
The second Action is also asynchronous but returns a ‘handle’ to a future value. This future value can be accessed by using the get() method which can block the executing thread if the value wasn’t already calculated at the time of calling get().
Using Continuations
With HPX we can easily chain multiple actions together and forward returned valued down the chain. In this demo we find such an example in the function continuation_demo().
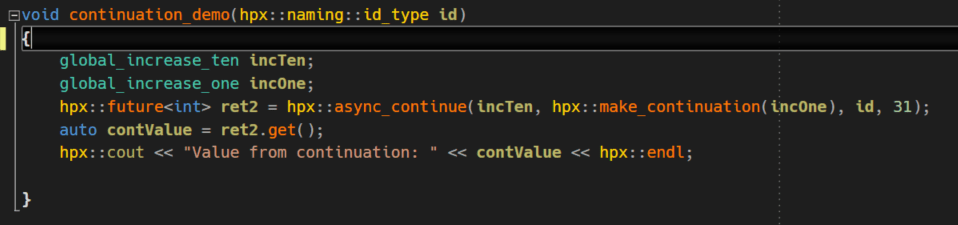
We use another two globally available Actions and combine them together by invoking hpx::async_continue. The API of hpx::async_continue is very powerful and versatile so, please, don’t take this small demo as something canonical. Here we’re basically calling the first Action incTen which receives 31 as its expected argument (see the definition of incTen in register.h above). After being completed incTen will forward its return value to the second Action in chain, incOne. This Action is the only parameter of the second parameter of hpx::async_continue, hpx::make_continuation. The execution of these two Actions is straightforward: Execute incTen by feeding it 31 and after it has completed forward its return value to incOne.
Error Handling in HPX
Using massively parallel systems not only provides parallelized results but sometimes also parallelized exceptions.
To make handling of such problems more easily HPX provides us helpful facilities that help to ‘strip away’ the parallel nature of such errors. In our demo we’ve built-in a small macro that throws an exception when someone tries to execute a Division-By-Null.

Executing the demo will deliver the following message:

The error handling is defined in the original function by using specialized HPX macros.

This, again, is just a small example showing only a fraction of the whole mechanism for handling exceptions in HPX.
Using Components
HPX provides a mechanism for managing remotely callable classes or ‘components’. A components is just a C++ class deriving from hpx::component_base. It usually exposes some publicly accessible member functions which are then declared and made globally available via specialized HPX macros. Here we define our component MyMachine that should deliver the answer to everything (the well-known number 42). Additionally, we want to be able to manipulate this very important number, so we define two publicly available methods: get_number and set_number.
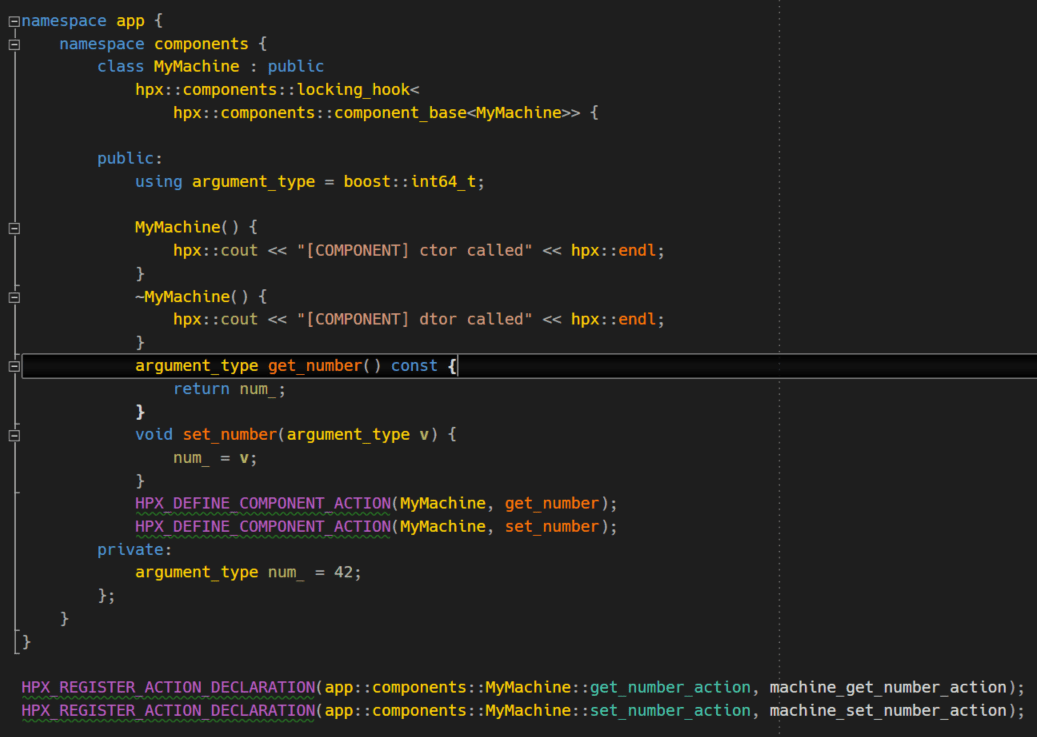
If we ignore the additional HPX macros this class definition looks like any other ordinary C++ class. No surprises here. But, we want our class to be remotely available. Therefore we have to declare our component’s methods which will be available to clients by using HPX_DEFINE_COMPONENT_ACTION. Just like we configured the non-class-member functions by using HPX_PLAIN_ACTION we do the same, only at the class-level, by utilizing a new type of macros. However, this isn’t sufficient as we have to register the action declaration by using another macro: HPX_REGISTER_ACTION_DECLARATION. This macro is needed to generate necessary boilerplate code we wouldn’t want to write by hand. And finally, we have to register our component and its actions:

The component registration macro expects the second argument to be globally unique. Therefore, take great care when registering multiple components to avoid any collisions. The macros registering actions contain the same arguments like in the HPX_REGISTER_ACTION_DECLARATION.
Accessing Components with Clients
As with any other sophisticated systems supporting components we’re not going to use them directly but instead access them independently of their locations and implementations. The only thing we want to know is if a certain component supports an Action we want to use. Everything else should remain transparent to us. To achieve such a level of transparency we decide to implement several additional classes wrapping our raw component. We have a client and a stub in our Project that’ll help us define proxies delegating access to the actual component. This is our Stub-Definition wrapping our component’s methods.

We’ve defined a new class that derives from hpx::components::stub_base and is a specialization of our components::MyMachine component. We then provide a bunch of additional methods covering asynchronous and synchronous calls of our component’s original methods. As we see our stub-class is an ideal place to define any special treatments of methods and other internal state that shouldn’t be made visible or in any way accessible to the outer world. For example, our clients don’t have to know how we manage async-handling. Therefore, our stub act as a ‘filter’ between our clients and the real component. However, this is only a simple demo and there are many other ways to define and utilize a component.
Component Client
Our component’s client now accesses the original functionality by deriving from the stub-class. This class will later be used to communicate with the component and execute its globally available methods.
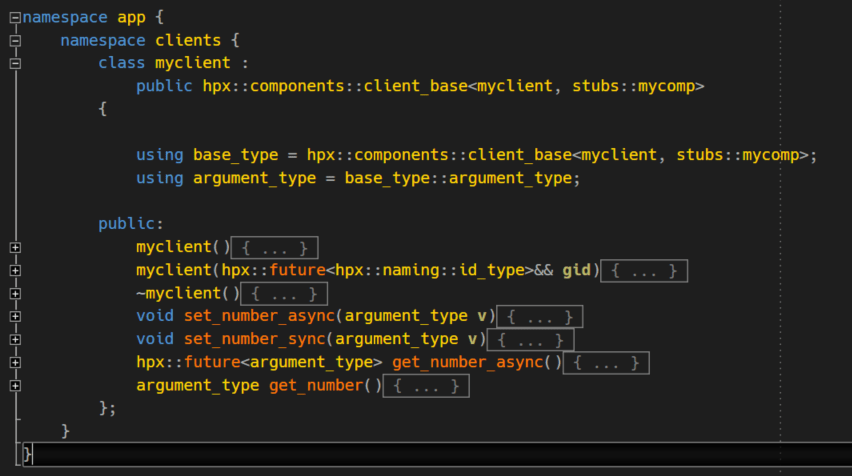
The most important part in the client are the using definitions as they point to the underlying component’s class which contains the original mechanics of exported methods (that is, the Actions). The client class itself is just a thin wrapper forwarding any (a)asynchronous calls to the real component’s class hiding beneath the surface.
Accessing the Component
After having defined the stub and the client we can now instantiate the component in HPX and use it in our client application. Of course, this is only one possible way of defining and accessing components and you should consult documentation and provided examples to learn about alternatives.
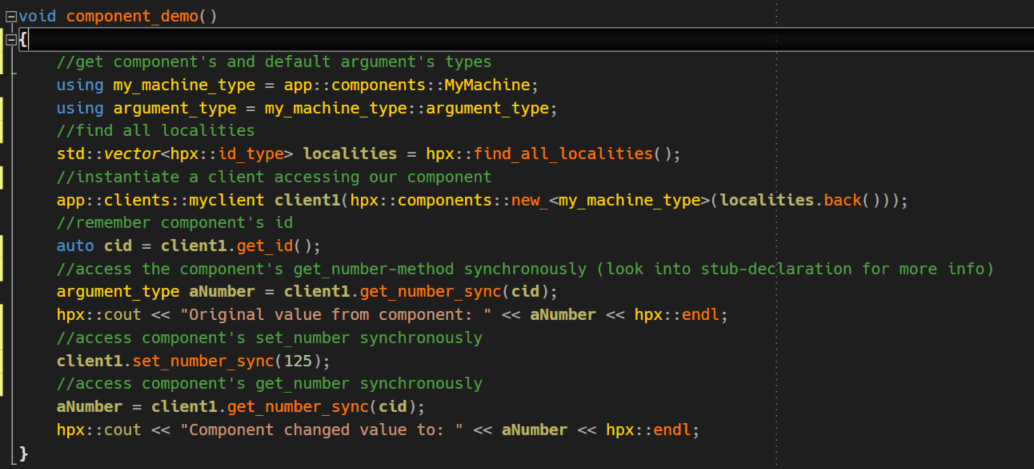
First, we define the type of our component and the argument we’ll use to feed our component’s methods. Then we get the ID of the locality we’re currently running on. Now, all we have to do is to instantiate a new component by using hpx::component::new_<TYPE> method which is the sole entry point into component management in HPX. Each and every component has to be instantiated with this special version of new. Now we can use the component by accessing the ‘forwarded’ methods in its client.
Components from DLLs
A component doesn’t have to reside in the same file where its consuming logic lives. We can also very easily define components in separate DLLs and import them via LIB-files. In our demo Solution there’s a Project named SmallServer that defines a DLL containig an HPX component. Its sole purpose is to print out a greeting message on the console. The original code is from HPX documentation and was adapted to compile under Visual Studio.

The component definition is straightforward and contains everything a proper HPX component has to implement.

The most important part is the location of the SmallServer.lib file which is needed by the client application to properly map to functions exported by this DLL. In the Project Settings under Linker/Additional Dependencies we insert SmallServer.lib. This is already done for the Project from GitHub and you should only change it if you rename this import library.

Now we can use this component in our client.
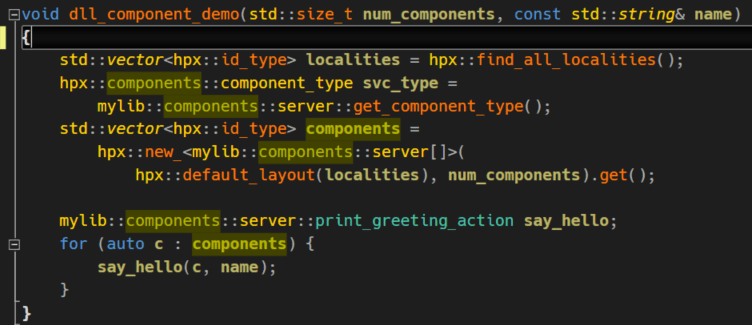
Again, we first search for any available localities and get the component’s type. Then we create several components and access the exported functionality on each of those. The amount of components we create depends on the value we provide by calling dll_components_demo. The second parameter name is used to print a greeting on the console. This is how it looks like:

Additionally, the component prints out a long alphanumeric value representing its GID.
Conclusion
HPX is a fascinating and powerful execution framework that can be used on ‘ordinary’ computers like my notebook, big clusters like Beowulf, or even on Exa-Scale hardware. The most important part, in my opinion, is the fact that one can learn everything about it on commodity hardware. Currently, there’s not much need to use a cluster at home but who knows what will be needed in a few years? Even our smartphones are already multi-core so we should at least mentally adapt to the upcoming parallelized world. The days of Free Lunch are definitely over and messing around with plain Threads and all this unwieldy ‘multithreading’ stuff aren’t gonna help us out. The sooner we begin to think ‘in parallel’ the easier we’ll adapt to the transition already happening around us.


