
12 minutes read
In this article we will learn how to deploy Keycloak with PostgreSQL on Kubernetes. We will first do everything manually with separate YAMLs and then later with Helm. Our k8s environment will run in Kind, which is an easy to use k8s variant for local expermentation. The sources are located here.
Keycloak
Keycloak is one of the most popular open-source Identity and Access Management providers. It can run in various environments, from small shops up to giant data centers. Although this article isn’t about IAM’s in general and how to use them, let’s provide a simple definition just to make sure we’re all on the same page.
An IAM is needed when there is a need to define and regulate identities and access rights within an organization. That is, when there are different parties with different interests and certain resources that should or shouldn’t be used by certain parties in certain ways. And to regulate this is almost always a really complex task, because you need a mechanism that defines groups, roles, memberships, access rights, authorization flows, and so on. But you also need a mechanism that can delegate access rights based on user rights. For example, you want to be able to allow a mobile app to access some data on a resource that you can already access directly. As the app in question isn’t you personally, you’d like to somehow “delegate” your access rights to it, so that it can work with your data on your behalf.
Simply spoken: in situations like these you have to deal with problems related to authentication (who you are), access rights (what you can do), and authorization (what can be done in your name). These questions are the reason why Keycloak and similar systems exist. They offer us an easy to use graphical interface where we can configure everything that’s needed to provide secure access to resources. But not only this. You can also extend Keycloak to match your individual security settings. By writing extensions you can inject pieces of logic into Keycloak that will be executed each time a certain security feature is accessed. But we won’t cover writing extensions here, so I’ll leave it for a potential future article. 😉
Our Keycloak instance will be running in k8s and will be using a PostgreSQL database which will run in k8s as well. This is not mandatory as we could also provide a DB that is running outside of k8s, but here I wanted to show how we can use PersistentVolumes and PersistentVolumeClaims to create durable storage solutions. But before we run any script in that direction, we need a proper k8s environment first. Here we will be using Kind.
Kind
Kind is one of the popular “local kubernetes” environments. You might have heard about minikube, k3s, k3d and similar solutions as well. Kind runs inside Docker and therefore we must have it installed and running before we fire up Kind. The easiest way is just to install Docker Desktop for your OS.
Depending on your OS you will use one of the options described in the official Kind docs. After the installation we will setup a new cluster that will run our Keycloak environment. Unless you have a specific requirements I’d recommend to use the config.yml from the “kind” subdirectory in the github repo. Also take into account that this config.yml contains patches needed to make the deployment accessible from outside. Please read the official docs from Kind.
kind create cluster hbr-cluster --config=config.yml

kubectl cluster-info --context kind-hbr-cluster

If you see an output like the one shown above then everything was successful so far. The last step is the installation of an IngressController, in this case it will be NGINX-Ingress.
kubectl apply -f https://raw.githubusercontent.com/kubernetes/ingress-nginx/main/deploy/static/provider/kind/deploy.yaml
Further info on the general usage of Ingresses can be found in Kind’s docs as well. But for now, we’re all set and can start with our manual deployment.
Manual deployments with YAML
In professional k8s environments you will be mostly using tools like Helm, Kustomize and similar to deploy and configure deployments. However, for local demos or learning purposes the manual application of YAMLs files is still recommended. Kubernetes is complex and it is therefore recommended to learn a few basics first. There are a plenty of very good docs out there and the official one is going into great lengths to explain every aspect of k8s. You should definitely read it on a daily basis. I prefer to enter some term that interests me and then let the official docs guide me through various options.
Out setup contains the following components that will be configured with their respective YAMLs:
This is how the YAMLs look like in the folder structure:

Namespaces
As we want to keep these parts of our system grouped together we create a new Namespace first.
kubectl apply -f 01_namespace.yml
Secrets
We will define several Secrets to maintain passwords and certficates that are needed to access our database, admin console of Keycloak, and deliver TLS certificates via Ingress. For this we apply the second YAML in a row:
kubectl apply -f 02_secrets.yml
Storage
Our Postgres instance will save its data somewhere in the k8s cluster. And because k8s treats everything as ephemeral (that is, forgettable in a millisecond) we want our data to be persistent so that it remains even after a deployment got destroyed or recreated. For this task we will use two new k8s classes: the physical storage itself, PersistentVolume, and a request of a piece of storage, PersistentVolumeClaim. Just like a Pod requests a piece of a Node’s resources the PersistentVolumeClaim requests a piece of storage from a PersistentVolume. This way we separate handling of (virtual or physical) hardware from the actual usage. If you can’t grasp this concept immediately, don’t worry, as it usually takes some time. Try to think about it the same way you think about Pods. Just like a Pod is a unit of computing, so is a PersistentVolumeClaim a unit of storage. Just like you can run a Node whose computing resources can be split up between many Pods, so you can have a PersistentVolume whose storage capacity can be split up by between many PersistentVolumeClaims.
kubectl apply -f 03_storage.yml
PostgresSQL
The next in line is the installation of the database. We have already defined the storage parameters so that our database can access the needed capacities. And to make it accessible from outside we will define a Service that provides a ClusterIP. Later we will see how we can use this Service to talk directly to the database.
kubectl apply -f 04_postgres.yml
Keycloak
Now it’s time to install Keycloak itself. This deployment is a bit more complex than others because it not only configures Keycloak but also connects with the database and executes readiness and liveness probes.
kubectl apply -f 05_keycloak.yml
Ingress
And because we want our Keycloak to be accessible from outside we need a proper Ingress. Here we’re using NGINX-Ingress, but you can replace it with any other that supports HTTP.
kubectl apply -f 06_ingress.yml
Kubernetes Dashboard
It is recommended to install Kubernetes Dashboard as it provides a nice web-based UI for managing k8s instances. This repo contains scripts located in “kube_dashboard” folder that will install deployments and setup ClusterRoleBindings and ServiceAccounts.
You only need to execute kubectl proxy in a separate shell afterwards to make it accessible from outside.

To login into the UI you’d need a valid token. Use the script get_token.sh from the same folder to generate one, then copy/paste in into the web form as shown below.

You’ll then be able to display and configure k8s.

Automatic deployment with Helm
A more comfortable and better configurable option is doing all of the above with Helm, with just a single command. As this is not a Helm tutorial I won’t be explaining it in detail. Helm is a tool for managing k8s installations. Think of it as some kind of “npm for k8s”. Just like you can use npm to install any NodeJS package for Node the same you are able to do with Helm for Kubernetes. And just like npm packages are organized in a certain way so are Helm’s “charts” too. A chart contains rules and settings that control how k8s deployments are executed. And just like any other package management tool Helm too can reference other charts to deploy them all in one go. There is some minimal configuration that must be present in every Helm chart, but apart from that you are free to configure charts as you like.
Any Helm chart contains a Chart.yaml file that defines it.
It also contains a folder “templates” that contains various YAMLs that will be used to apply changes to the k8s system. The only file that we keep from default chart definition is _helpers.tpl. All other files are our own.

To create a new chart we use: helm create CHART_NAME
However, as we already have a preconfigured chart in our repo there is no need to do that. Just in case you are about to create a completely new chart you’ll then need to execute the above command.
There is also a YAML called values.yaml that contains variables that will be inserted into YAMLs from “templates” folder. Instead of putting hard-coded values into every YAML, like I did in the manual variant, we use values.yaml to define variables that then will be referenced throughout the installation of the deployment. This is an example of 01_namespace.yml from the Helm chart:
The value for key name is referencing .Values.namespace. This is how we insert values into template YAMLs. The double curly braces are mandatory and you should keep in mind that numerical values should never be quoted unless you want to present them as strings. In the above example we’re referencing a string so the quotes are fine. If this was a numerical value we’d be writing it without quotes. There are other ways to deal with data types which you can find in the Best Practices section in the official Helm docs.
Below is the content of our values.yaml where we define values to be used in our various YAMLs. We are free to define any kind of variable, but it is recommended to group them according to their class and context. Also try to be consistent with naming. So, if you have “secrets.postgres.name” then you should also have “secrets.keycloak.name” etc.
Before we try to install our chart let’s do a dry-run first, shall we? Just to see if everything’s OK.
helm template keycloak-k8s-local keycloak-k8s-local
You should get an output like this.

If there is nothing for Helm to complain about the result will be a YAML file that contains all elements from separate YAMLs.
Now it’s time to deploy the system! For this we invoke the install command by referencing the chart name and giving the name of the deployment.
helm install keycloak-k8s-local keycloak-k8s-local

That’s it. That’s all it takes for Helm to deploy everything we did manually before. To uninstall the system you’d just need to issue an uninstall command referencing the name of the Helm deployment.
helm uninstall keycloak-k8s-local

And as promised, here’s how you can connect with the Postgres database inside your k8s environment. First, you need to query the name of the Pod that runs the database.
kubectl get pods -n hbr-keycloak

kubectl exec -it $POD_NAME -n hbr-keycloak -- psql -h localhost -U postgres --password -p 5432 keycloak

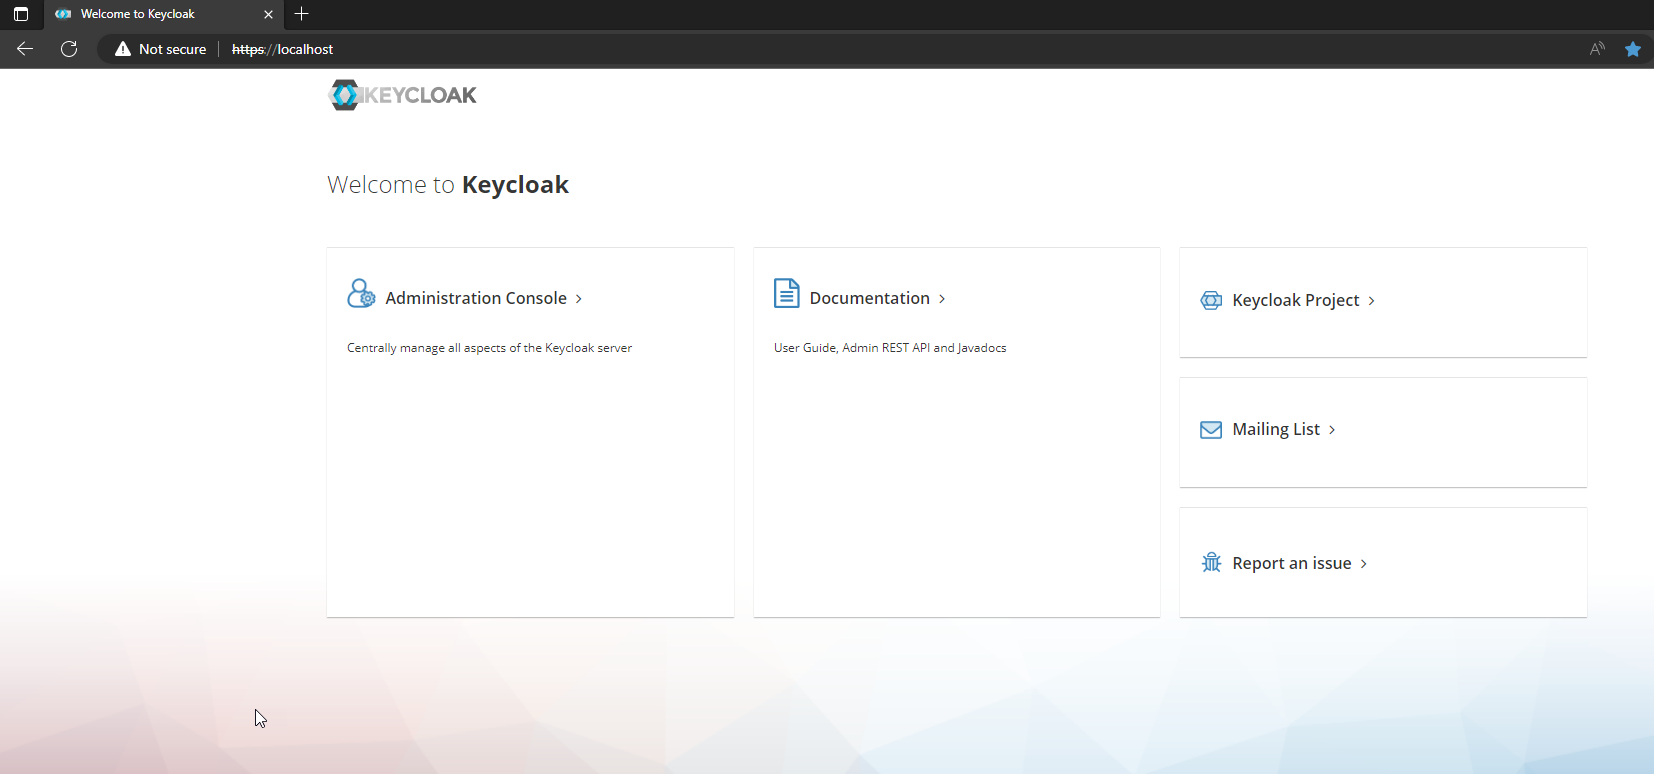
Keycloak Admin Console
Finally, we have arrived at a complete Keycloak system. Our deployment can be accessed by opening the https://localhost URL. The potential certificate warning can be ignored as we deployed a self-signed certificate in our Secrets object. To logon use “admin” as both user name and password.

That’s it for now! In the upcoming article we’ll be talking about Knative and how to make k8s easier to use.


