
20 minutes read
It’s been a while since I wrote anything here. But this blog isn’t dead or in ‘maintenance mode’. I’m just coming back from the trenches of web development and, as always, things are getting messier every day. So many new frameworks and ‘very-cool-best-practices one should follow’. However, with or without JavaScript fatigue let’s do something new and learn a few bits about the upcoming Angular 2.
And just to make a few things clear: I’m not an experienced Angular developer and everything I show and explain here is based on my 2-day experience with the current Beta (today’s my second day).
So, be warned 
The sources for this article are on GitHub.
A Live-Demo for testing is located here.
UPDATE (30.04.2016): structural directives like ngFor now use a different syntax for declaring variables. Instead of #, which is now only used to declare a reference, use the keyword let. Read this Changelog for more info on this and other changes in the current beta.
Installing Angular 2
For most of my web-projects I use Webpack and/or Gulp but in this case I decided to use a combination of <script>-Tags and SystemJS imports. I’m basically following the official Angular2 docs and including some additional scripts and configuration settings. My setup contains some additional SystemJS-settings for easier handling of npm-packages and individual components within the project tree. The whole structure is located in index.html.

I think that the best approach to learn new things is to learn them in combination with other things. There isn’t much value of learning Angular 2 for Angular’s sake. We should combine it with a concrete task. In this case I decided to take another library, the jQuery DataTables plugin, to create a small application that receives data from a real web service. Additionally, the app defines its own event handling by utilizing DataTable’s events and shows selected data in a separate area below the table. And just like any other good (bloated?) web-app this one has its own customized Loading Spinner. 😆

The project structure is as follows:

And this is how the complete app will look like:

Starting the App
The main entry point is the main.ts file that contains the call of the bootstrap function. The bootstrap function takes our main component AppComponent together with an array of providers. For those of you coming from Angular 1 the term “provider” should be nothing new (also terms like “service” or “factory”). A provider is an object that can be injected by the Angular framework into some other object that needs a functionality the provider, well, provides. For those of you completely new to Angular 2 there’s another term that’s more general and applies not only to Angular: Dependency Injection. So, a provider is nothing else but an object that can be injected into some other object without using any kind of direct instantiation within the consuming class. In our case we’ll use an external web service to get our customer’s data and therefore we’ll need a proper handling of HTTP. That’s the reason why we’d put an array of objects as the second parameter to bootstrap. We let Angular prepare a provider for us so we can use it later in any of our consuming classes.

Now let’s dissect a typical Angular component by looking at our AppComponent class.
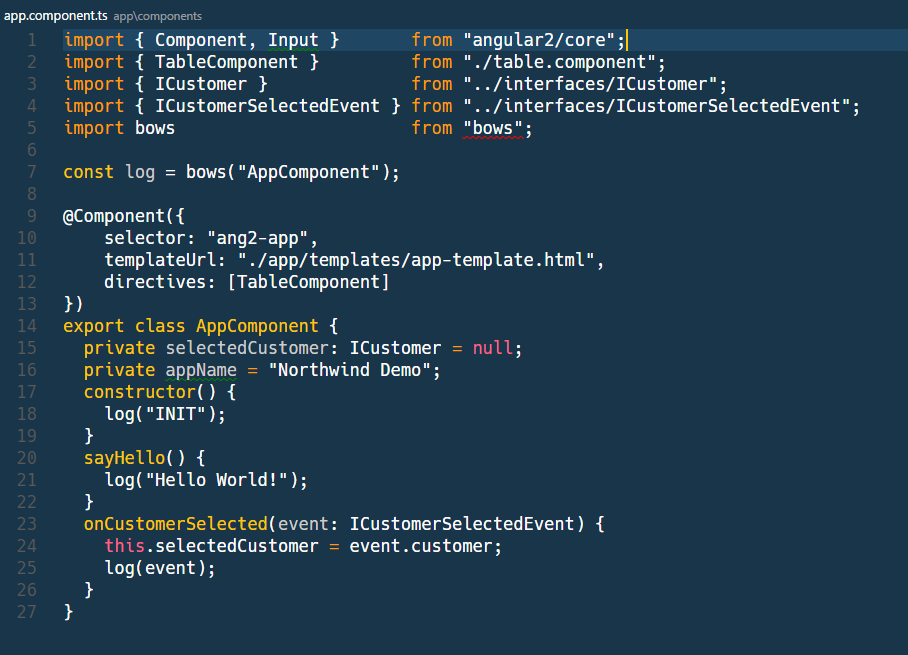
The first ‘new’ thing we see is the @Component keyword. We call those Attributes and there are several different available and some of them we’ll approach later. The attribute @Component describes the structure and behavior of the class AppComponent. Technically an attribute is just a function and we’re just calling it by providing a configuration object. There are many configuration options and in this case we define: selector, templateUrl and an array called directives. Below the attribute we find a relatively simple TypeScript class definition that comprises of a constructor and two functions. Now the question is: where’s the connection point between the attribute, the class and its functions? Let’s look at index.html one more time.

We see a new tag named <ang2-app> that’s within the body-tag. Of course, there’s no standard <ang2-app> tag and by default our browser would ignore it. But this is the connection point between the above bootstrap-call that ‘boots’ the AppComponent, the AppComponent’s selector-property that contains the value “ang2-app” and the <app2-app> tag inside index.html. It’s a simple chain reaction that initializes a class (AppComponent) by applying the values from its decorator (@Component) to a certain hook within browser DOM (index.html). That’s how Angular2 apps come into existence. Of course, there might be some other ways to start such an app but because I have no extensive experience with it (remember: today’s my second day with Angular 2) I don’t want to create any false impressions that this way of booting Angular2 apps is the only possible one. I simply don’t know about any other alternatives. Feel free to post your comments below. Thanks!
Directives
OK, we’ve booted the app so far and everything looks nice. But, this wouldn’t be a proper explanation on how this app works so we have to dig a little bit deeper. Let’s go back to the AppComponent’s @Component declaration and discuss the property called directives. Again, for those of you coming from Angular 1 the term directive may bring (fond?) memories about creating tags with properties like restrict, scope or templateUrl and a function called link. However, those directives are not present in Angular 2. To make the discussion about directives as simple as possible (but not simpler) I’d say that a directive is just a class with a decorator @Component on top of it. Any class that owns such a decorator can be a directive to some other class. In our case we let AppComponent contain a single directive called TableComponent which itself is: just a class with a proper decorator, @Component. So, directives are components which in turn are classes. Don’t believe me? No problem, let’s look at another property of AppComponent class: templateUrl. We open the file app-template.html:

For the beginning, just ignore the whole structural stuff that deals with setting proper panels and media-entries. It’s just Bootstrap. I’ve selected the line no. 10 that contains yet another ‘unknown’ tag named <nw-table>. Based on our previous experience with <ang2-app> we should anticipate yet another Angular2 component at its position in the structure. The question is: which component contains a selector property with the value nw-app? Let’s open the other component file in the app/components folder in our project: table.component.
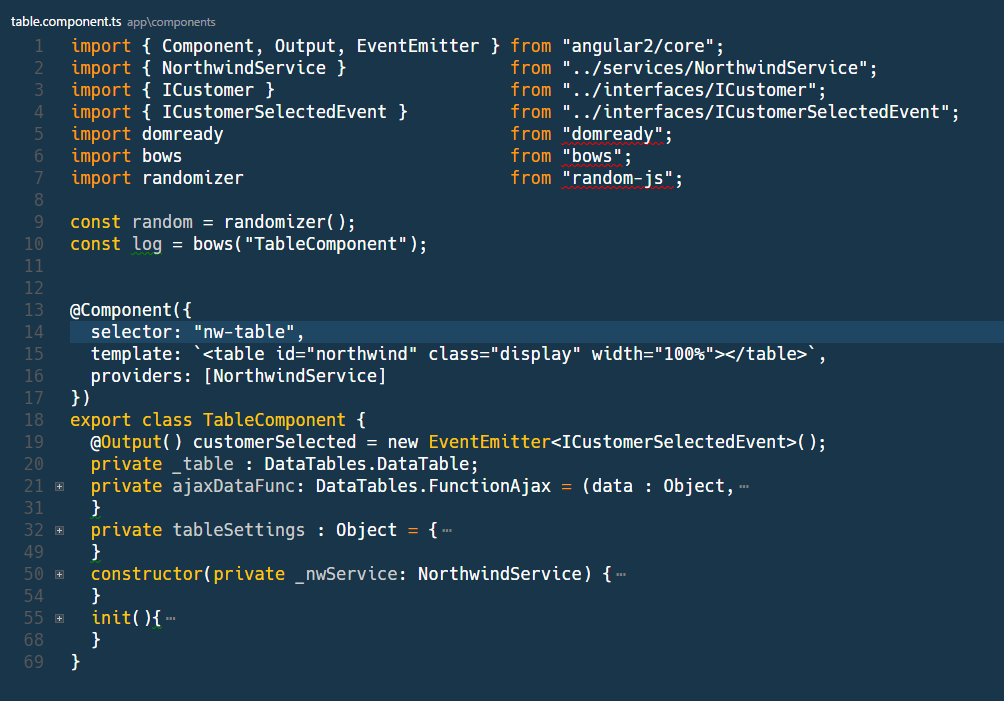
Yes, this is the ‘owner’ of the custom tag nw-table. Now we see that by using components in Angular 2 we can easily create applications of any kind of structural and behavioral complexity. When done properly this approach can lead to very clean and self-contained components that can be easily nested, tested, updated and replaced. Of course, I’m not saying that my approach here is such an example but I’m sure you know what I mean: don’t do it like I’m doing it here and go read the official docs. 😆
So, our AppComponent gets started by a bootstrap-call and during it’s own boot process it starts another component, TableComponent, that’s rooted in AppComponent’s template. This is, more or less, easy to understand as is goes top-down from one component to another. Well, as soon as we start dealing with events things get complicated very quickly. In our case we want to display a table comprising of several entries about our customers. And each time we select a customer we want it’s data to be displayed in a separate section below. Something like a master-detail-view.
Events & Event-Handlers, the easy way
No matter how simple the standards may be dealing with Events is always a complex thing. The usual examples with MouseClick-SayHello may look innocent and easy to grasp but we all know events are hard to control. Angular2 defines its own vocabulary for dealing with them and the best way to explain it is: to use a MouseClick-SayHello example.
For testing purposes we add a button into our app-template.html

This is just a simple button definition and except the (click) entry everything else looks pretty normal. What does this (click) mean? It’s just a click-event-handler declaration by using Angular2 lingo. Everything that’s inside a pair of () is an event in Angular 2. There’s also a similar approach to properties but by using square brackets []. Both of them are shorthands for on-* and bind-* prefixes. So we could write on-click instead of (click). After (click) follows the declaration of the event handler that’s the name of a function implemented by the component that owns the template. In our case the AppComponent class defines a function called sayHello() and this is the output when we click the button.

This is surely the simplest possible approach to process the events but there’s much more in Angular 2. We can also bind properties to our views and in our case we do it by displaying customer properties when we click on a row. Our template defines several <div> tags that contain entries enclosed in {{}} braces.

But before we touch any of these properties we should focus on a special directive at the top of this structure: *ngIf
*ngIf and another well-known directives like *ngSwitch and *ngFor belong to the group of structural directives because they manipulate the structure of the browser document. They change its visual appearance. In our case *ngIf will prevent the media-structure from being rendered if the result of its expression is false. In our case if there’s no value in the selectedCustomer variable (that is: if the variable is ‘falsy’). We know that selectedCustomer contains a value only when user clicks on some row. Of course, it makes sense to show the detailed customer info only when we’ve selected one. Otherwise the area shouldn’t be displayed at all. Now we know about two types of directives: our components which are basically directives containing a template and structural directives like *ngIf. The third kind of directives are attribute directives that affect the appearance or the behavior of a DOM-element. For example a directive that changes some CSS-styles. In the current version of this application I’m not using such directives but I’ll try to include them in follow-up articles. Let’s focus on all those curly braces and talk a bit about interpolation. And btw. the asterisk in front of these directives is a signal to Angular 2 to automatically use the DOM-structure where the directive resides as its template. Without the asterisk Angular would expect us to write a separate template and include the directive name (without the asterisk!) and for some directive even manually define all used variables in a separate *Of-attribute. For example we’d have to write something like this:
<template  [ngIf]="selectedCustomer != null">
... the whole structure from above here...
</template>
So, just in the case you wonder why we have to write all those asterisks.
Data-Binding
The simplest way to show some data in a view is to bind a DOM-element to some instance property. In the above case we take the object selectedCustomer and bind several of its properties to our document. We put each of the properties between double {{}} braces and when we select a customer an automatic one-way-binding from property to DOM will take place. That’s it. But there’s no way to manipulate the original value stored in a property. The interpolation is only useful when we want to show some read-only data. In other cases when greater flexibility is needed we have to use a more complex approach to ensure proper binding in both directions. Actually, it isn’t complex at all because when it comes to data binding Angular 2 is very different from Angular 1. There’s no two-way data-binding at all. Everything moves in one direction even if it looks like there’s some kind of two-way data movement. What Angular 2 really does is combining property and event binding together to achieve the same effect like the old-school two-way data-binding. And just like’s the case with other techniques this one has its own signature too: the Banana Box [()] 😆
For testing purposes we expand our app-template with these two entries, an input field and a label. The input field will refer to a new test-property (someValue) we temporarily include in the AppComponent class. The label will simply show the current value of this property.

In AppComponent class we insert a single string property someValue which we refer to in the above DOM-structure. We set its value to “default value“.

Now we refresh the document and play a little with the input field. We see that the value we insert is being immediately reflected in the label field.

This is how two-way data-binding works in Angular 2.
Services, Injectables and Observables
As we defined at the beginning of this article our app gets its data from a real web service. The format is JSON and the contents are based on the good-old Northwind database. Now we have to figure out how we can get such data from the net into our app. We remember that we’ve defined certain HTTP-Providers to for later use in our classes. The bootstrap call was given an array with HTTP_PROVIDERS variable which itself is an array of injectables that can be used to deliver Http-Services to consuming classes. Let’s open the NorthwindService file to analyze the ways we get our data and forward it to our table.

The two most important things we have to deal with are the @Injectable decorator and the private _http: Http variable dedinition in the constructor of NorthwindService class. The @Injectable is, again, one of the many decorators Angular2 provides and in this case we declare our class as something we can inject into other classes. This is basically the same functionality we utilized before as clients. Only this time we declare ourselves as being providers of certain services that can be used by other clients. Here we describe our class as a provider of certain data coming from ‘some external services’. This approach is also very helpful when testing such services because we don’t always want to define all those web services when testing functionalities. Here we could simply mocj a service and provide some dummy data instead of real server responses and the consumers of this class wouldn’t notice the change. Additionally, our injectable is not only providing a service but also acting as a client because it depends on another service that’s hopefully being injected into it before it starts delivering data: the private Http field in the constructor isn’t touched by us but by Angular itself. As we already know we’ve defined certain HTTP-providers at the bootstrap of our app. Now, we want Angular to inject such an instance into the instance of this class. So each time we create NorthwindService (which is an injectable too) Angular will first give it another injectable as a constructor parameter: the Http-Service itself. We see that Angular uses the same approach to handle combination of multiple services like it does with directives. Just like a directive can embed further directives a service can use the same strategy with other services. But we’re not done yet. The Http-Service isn’t just spitting out data but actually delivering a continuous data flow via Observables. Of course, this stuff is really, really big and I’m not even trying to discuss it here. There are already excellent sources to learn about Observables and RxJS (Angular2 uses RxJS). Just keep in mind that we’re not simply returning data back but actually a ‘looking into incoming data’ (hence ‘observable’). We subscribe to some upcoming events that’ll hopefully bring us data we want to consume and as soon as something arrives we can look into it, analyze it, parse it, transform it, react to errors etc. In our case we let Http-Service query the Northwind JSON-Service and as soon as there’s a response we take it’s JSON payload and map it to our internal ICustomer-structure. The definition of ICustomer is located in the directory app/interfaces. Now we go back to our class TableComponent and check the provider declaration. We see that there’s a single entry: NorthwindService. This was expected as we now know that NorthwindService is an Injectable too. So we can ask Angular to create a proper instance of it for our consumption inside the TableComponent class. The TableComponent itself is the most complex of the classes in this project because it contains not only the logic for accessing the web service but also the logic for communication with the jquery.DataTables plugin. This article is, of course, Angular2-centric so I’m not going to explain the inner workings of DataTables itself. There’s a plenty of excellent information already available and the plugin itself is really easy to use. In our example we define a special function of type DataTables.FunctionAjax that’s using the NorthwindService to get a list of customers and insert a certain number of rows based on this data. And just to make the whole stuff a little more funny we add to each of the entries an individual picture coming from a random-picture-generator. 😀

Component Communication
The last part of our journey deals with the selection of row entries and forwarding those information to the parent component. As we already know the TableComponent is located inside AppComponent. How can we let the parent component know if something has changed inside one of its child components? The answer is, yet again, rooted in another @–Decorator called: @Output. There’s, of course, an opposite of it called @Input but this time we’re not going to use it in our app.
We use @Output to declare custom events. To be able to emit such event we have to declare a property of type EventEmitter. In our case we want to emit a customerSelected event each time user clicks on a table row. And because we want to have strongly typed events we set the type of EventEmitte to ICustomerSelected.

Now let’s go to the template definition of the parent component AppComponent and try to spot the event handler declaration.

We clearly see that there’s a new, non-standard event called customerSelected bound to an event handler from AppComponent called onCustomerSelected. Also, we see the usage of the event object $event provided by Angular itself.
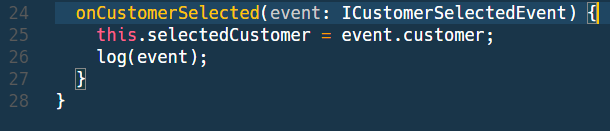
The event handler definition is rather simple but very effective. It changes the value of selectedCustomer variable which is being monitored by the *ngIf directive. As we already saw the detail view will not be shown if there’s no value in selectedCustomer. This, of course, is just a simple example but it shows how easily we can short-cut (custom) events and structural directives. And the last part in this chain is the logic for emitting such events. In this case the logic is located within the init() function of TableComponent class.

The DataTables plugin has its own events and event handling logic, of course. Our task here is to map those ‘externals’ to our internal structures. This example is just a very simple way of dealing with mappings like these. A much better and more intelligent way would be by providing certain pipes that transform original events to internal ones. But, this part of Angular 2 and many other we’ll hopefully approach in some of the follow-up articles.
Conclusion
I really don’t know if this article is of any value to others because I never was an Angular developer and, as already said, I know Angular 2 only since yesterday. I’ve never used it before. Some time ago, in 2014, I wrote a small tutorial series for Angular 1 but nobody showed any interest, so I think that the last thing the world needs is yet another tutorial on Angular 2 from me. However, I think the best way to learn things it by trying to explain them to others. In my case I’m surely talking to myself, so I’ll just pretend there are people out there reading my texts.
Have fun!


11 thoughts on “Introduction to Angular 2 – Part 1”
Thanks for this thorough post and the accompanying github repo. I’ve been thinking for a couple weeks now how to do this exact thing with DataTables and Angular 2. I had worked out a solution in the past couple of days, but it wasn’t as clean. Anyway, I found this article very valuable, so thank you!
Hi John,
Many thanks for your comment. I’m glad I could help you find a solution with DataTables.
I think I should write another article on Angular 2. 🙂
Kind regards,
Great Post
Thanks
I don’t have any experience in Angular Framework. This article is very helpful for me accelerate my learning. Can you share the code with us?
Hi Sures,
The link to the code is at the beginning of this article. Most of my articles have such links.
Kind regards,
Harris
How to make a table printing live-data with selection + sort + filter option in angular 2
data will come via node socket, every second.
Hi,
Sorry, but I’m not providing consultancy services here.
Try StackOverflow.
As a newbie to Angular2 I found this to be a godsend, many thanks for the effort and time.
Hi Don,
Many thanks for your kind words!
If you’d like to see Angular 2 running in a real-world application you could check out the sources of a project of mine:
https://github.com/brakmic/BiB
It contains the “usual suspects” like database access, user-management, state handling, tabular data management etc.
I’m continuously updating it with the latest Angular packages & other NPM stuff. The code from these articles can’t be updated that easily because of last year’s massive changes in Angular 2.
Have fun!
Good article. Very through. I wish I had seen it months ago when I was just starting into Angular and integration with DataTables. Looking forward to checking out the github repo for further tips on integrating the two.
The ability to create responsive interfaces is crucial for retaining users and ensuring satisfaction.