6 minutes read
Two weeks ago I wrote the first article for this series and I think it ended up being a chaotic bag of words filled with a myriad of different topics, examples and way too many screenshots. This happens when you learn something completely new instead of doing some more creative stuff on a weekend. 
Therefore, I’ll now focus this article on @Input, @Output and EventEmitter from Angular 2 rc1. Less is more and I’m planning to talk about other Angular 2 parts in further articles.
But to effectively learn how to use a framework is always a question of practice than everything else and this article can only serve as a (badly written!) guide to a few important concepts. However, I don’t expect my readers to go and set-up the whole system from scratch. Instead, I’ve created a complete environment with Angular 2 rc-1, TypeScript, Gulp, TSLint & HapiJS.
Just check it out and you’re all set. 😀
Input Properties
I assume you already know what Angular 2 Components are, because we saw them in the previous article. Now we want to communicate with such a component. From user’s point of view a component is a “thing” that consumes certain data inputs and/or generates new data which come back to the user, usually presented on the UI. Angular has a special syntax for dealing with this and of course, it’s a Decorator again, or more precisely, there are two of them: @Input & @Output. Just like in this demo here:

We have a button and a textbox and want them to communicate via custom inputs. More precisely, we want to declare and implement an API that exposes certain connection points to external clients, the textbox in this example. With such a strategy we can completely isolate our components and don’t have to care about who or what generates values of interest to our components. Of course this is just a contrived example. Nevertheless, let’s look inside:

We define an ordinary class with a single public property named mytext. But this time we add a new decorator @Input to it, which is just a function (notice the ()). The @Input decorator is located in @angular/core so we have to import it accordingly. In the template of our component we insert an <input> tag and bind its value property to our @Input property mytext. It’s now very easy to grasp what would happen to input’s value property when mytext changes. It’ll change too. Simply spoken: we just declared a new API for our InOutComponent. So, let’s use it in the parent AppComponent:
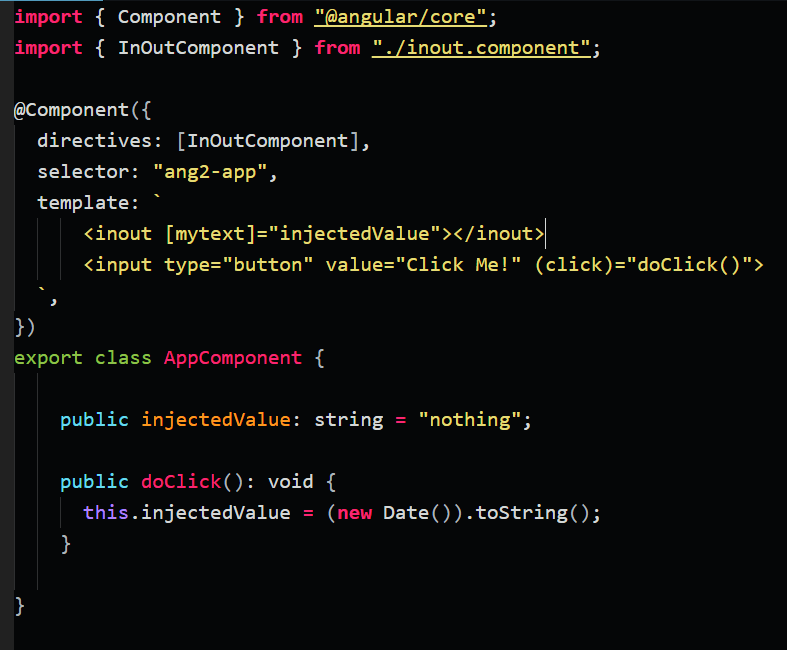
We import InOutComponent first, because we’ll need it inside the AppComponent’s template. The @Component decorator reserves a special array for such components: directives. Whenever we insert a new component into another one we have to insert it into this array too. Just importing a component source file isn’t enough.
We’ve previously declared InOutComponent’s selector to be called inout so we insert a new tag with the same name in the template. Also, we refer to the property mytext of the same component. In fact, we connect the API of InOutComponent with AppComponent’s property injectedValue. This means that any change to injectedValue will be propagated to mytext. And just to make this demo a little bit more realistic we insert yet another tag: a simple button whose click-event is bound to the method doClick. Inside this method we just assign the current Date value to injectedValue. The effect is clear: on each click a new Date value will be generated and our InOutComponent would assign it to its publicly exposed property mytext.
Output Properties
A component can not only receive data but also produce it for external consumption. Similarly to @Input-properties Angular 2 offers @Output-properties which are instances of the EvenEmitter-class from @angular/core. But let’s first start with a visual example which we’re going to dissect subsequently:

We have a component that contains a single button and when we click on it an alert window showing us current date appears. A silly example, indeed, but surely not written the way we wrote JavaScript in the 90es.
Now, let’s look inside the code (this is just the above InOutComponent, slightly changed):

Just like we declared an @Input property we do the same with its @Output comrade. First, we import the definitions from @angular/core and decorate a single member variable with it. But unlike @Input properties these have to belong to a certain type: EventEmitter. This is because we want to emit an event when something happens that’s of importance to our app logic. In our case we use the variable manipulate to emit a new event when the button gets clicked. Also, we send some additional values nicely packed in an object. Here I just send the originator of the event, sender, and some ‘important’ values belonging to this type of event.
In fact we chain two events together: button click event + our manipulate event. So, the next question is: who’s the consumer of this new event? Let’s look inside the AppComponent:

Just like we did with the standard events, for example ‘click’, we declare out interest on the exposed (manipulate) event from InOutComponent and connect it to wasManipulated-method inside the class. Additionally, we want to consume the $event object provided by the browser. Of course, I assume that you already know the meanings of [] and () but just in the case you ignored my chaotic first article on Angular 2, here’s a short intro to them:
You use [] when you BIND to some property, like ‘text’, ‘value’ etc. And you use () when you want to react ON some event, like ‘click’, ‘mousedown’ etc. There’s also an alternative way of declaring them: bind-* and on-*. You could, for example, write on-click instead of (click) and bind-value instead of [value]. This is just a matter of personal taste and has no additional effects on the processing of your code. Feel free to use the ‘best’ possible syntax from your point of view. Now, let’s go back to our code. We declared our interest in this new event called manipulate by connecting it to wasManipulated that’ll be called each time the browser generates a new manipulate event. Inside wasManipulated we just use a silly alert() window to present the data from time-property received via the $event-object.
This is how we can let one component know about changes in another one.
Conclusion
I hope this article was less chatty and more straightforward than the first one. I just covered one topic here but truth be told: Angular 2 is big and it makes little sense to describe the “most important” features in just a few paragraphs.
Have fun!


One thought on “Introduction to Angular 2 – Part 2”
How does the parent capture/listen to the child emitted event when the child is not declared via a selector in the template, but is dynamically inserted in the via the router ? I tried attaching the (listenerEvent)=”method($event)” onto the router-outlet…. but that doesn’t work.