
22 minutes read
There are many good tutorials on this topic so I’m not trying to write the next ‘best’ intro to assembly under Windows. Rather, I’ll try to explain certain concepts which I’ve found to be hard to understand. In this first installment I aim to describe the Stack and how it works in concert with important registers EBP, ESP and EIP. Of course, before we explore this territory we’d first have to explain the meaning of registers and movements inside of computer’s memory. Therefore, let’s first build up a working infrastructure for editing of assembly code.
The Setup
As the title already says I’ll be using FASM. There are other assemblers like NASM, MASM etc. and all of them are equally capable of assembling the x86-code. However, for general understanding of the Intel x86 architecture there’s no special requirement on which assembler one should use. As my editor I’ll use Visual Studio Code with a nice x86-x64-extension that provides syntax coloring of assembly mnemonics. For easy building of executables I’m using a small tasks.json Script that is located in my .vscode directory.
{
  // See https://go.microsoft.com/fwlink/?LinkId=733558
  // for the documentation about the tasks.json format
  "version": "0.1.0",
  "command": "fasm",
  "isShellCommand": true,
  "args": ["${file}", "${file}.exe"],
  "showOutput": "always"
}
Now I can press CTRL+SHIFT+B from VSCode to invoke FASM to assemble my code. The output looks like this:

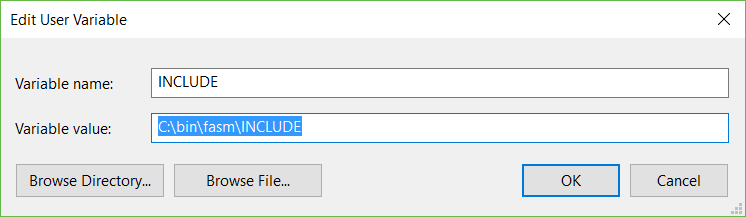
However, don’t forget to add the location of your FASM installation to the global PATH variable. Also add the location of the subdirectory INCLUDE from your FASM directory to a new global variable called INCLUDE. This directory will later be needed when dealing with Win32-API and C-Runtime functions.
Go to your System/Advanced System Settings/Environment Variables and create an entry like this:
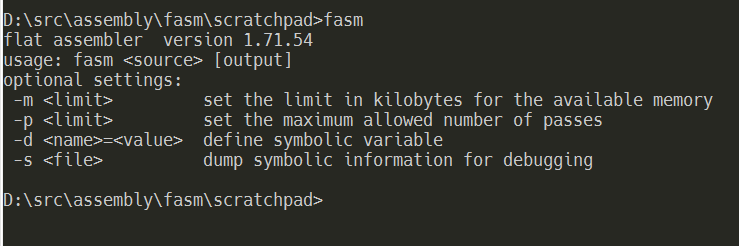
Now test your FASM installation from the console by typing in FASM. If you see an output like this one then you’re all set!
Some Basics
Before we start to write the actual code let’s present the most important players: CPU, Registers and Memory:
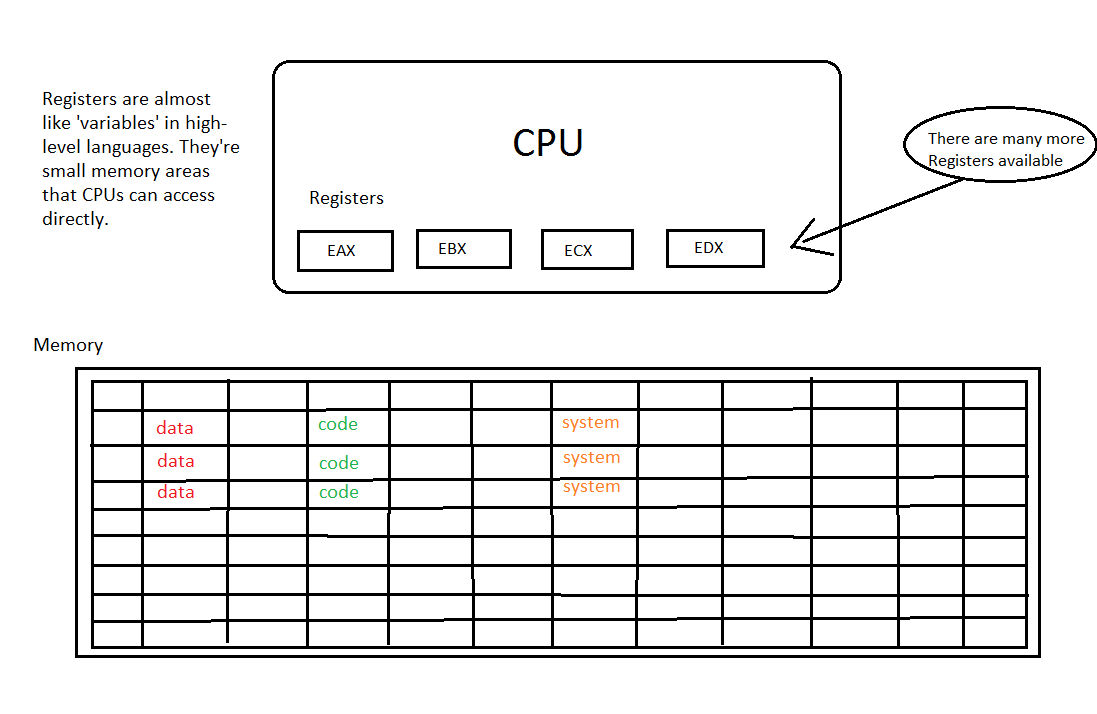
Although my painting skills are very weak I hope that the picture above shows the most important players. First, there’s a CPU that is at the center of the whole processing scheme. The CPU has access to the memory that looks like one big area full of addressable cells that can contain pieces of data and code. But the CPU has more to offer. Inside of it are several registers located that have cryptically sounding names like EAX, EBX, ECX, EDX and so on. This is because the Intel x86 architecture is extremely focused on backwards compatibility and therefore it retained the original register names by only changing the starting letter. In the 16bit-past there were only AX, BX, CX etc. registers and when the 32bit CPUs came out Intel added E to them (for “extended”). Now in our 64bit-present the register names have changed again, this time prefixed with an R. So instead of EAX and EBX you’d write RAX respective RBX to indicate that you want to access all of the available 64bits from the register. However, you can still work with ‘older’ registers just by prepending the ‘correct’ letter. In this article series we’ll work with 32bit versions but this doesn’t mean that you can’t compile or run this code on 64bit machines. Quite the contrary! On could run prehistoric assembly code from the 70es even on newest x64 processors. No joke! Now, let’s list the most important registers:
General purpose registers
The general purpose registers are, well, for general use and there are no strict rules on how they should be used. We can set their values as we like and there are no explicit restrictions on their usage. However, there are some ‘standard practices’ which one should follow. For example, the ECX register should be used for counting operations. EAX and EDX are for mathematical operations and the two work in tandem. Later we’ll see how the EDX performs as an extension of the EAX register when we need more space to save results that need more than 4bytes to be saved (32bits == 4bytes). Such values are, for example, division results with a remainder. The general registers can further be broken down into smaller halves that represent their predecessors, the registers from the 16bit respective 8bit era. If you break up EAX into two 16bit halves the outcome will be an unnamed area of ‘higher’ 16bits as well as the ‘lower’ 16bits named AX. As we already know, in the past there were only 16bit registers named AX, BX, CX and so on. Now, just by breaking down the 32bit registers we can still access them as if we’re working with an 16bit system. The same applies to those 16bit halves as well. We can break up them in two to get two registers representing ‘higher’ and ‘lower’ bit-areas. So an AX-register would decay into AH and AL. Please, take note that only the general purpose registers can be broken down into smaller parts. And just for completeness: the 64bit registers like RAX, RBX etc. can also deliver our 32bit registers if we break them up in two.
Here’s an example how we can break up the EAX register:

For better memorizing the registers are usually described as follows:
EAX: also called Accumulator, often used for IO-stuff, math operations, interrupts
EBX: also called Base, used as a Base-pointer for memory access
ECX: also called Counter, often used for loop-counting
EDX: also called Data, behaves similarly to EAX and works as its extension in math operations
Index and pointer registers
These registers maintain and control important memory addresses like stack pointers, next-instruction-pointers and source and destination addresses. Some of them can’t be modified directly while others serve to prepare and maintain memory for functions (like local variables, arguments etc.).
ESI: Source index: used in string and array copy-operations
EDI: Destination index: used in string and array copy-operations
EBP: Stack Base Pointer: used when creating a ‘stack frame’. A stack frame is a separate(d) area within a stack used by functions to maintain their local state (variables, addresses etc.).
ESP: Stack Pointer: points at the last element in the stack. This register shows the currently ‘visible’ piece of memory located at the top of the stack.
EIP: Index Pointer Register: contains the address of the next function that will be called. This register can’t be modified directly and is very often the preferred target of diverse malware.
Segment registers
These registers maintain important addresses of the running programs, the data their access and stack segments. They can only be changed via general purpose registers or by using special instructions. It’s obvious that any improper treatment of these registers can lead to severe problems and/or crashes. They only exist as 16bit-wide versions and can’t be broken down into smaller registers.
CS: Contains the segment of the running code.
DS: Contains the segment of the data the running code is accessing.
ES, FS, GS: These are additional segment registers mostly being used by the OS itself. Windows, for example, uses GS for pointing to OS-specific structures.
SS: Contains the stack segment of the running program.
Indicator register
EFLAGS
The EFLAGS-register holds various states of the CPU. The single bits (flags) inside this register act as indicators about the state of specific parameters from the last processed instruction. The bits inside this registers serve the following purposes:
Bit |
Label |
Purpose |
| 0 | CF | Carry flag |
| 2 | PF | Parity flag |
| 4 | AF | Auxiliary carry flag |
| 6 | ZF | Zero flag |
| 7 | SF | Sign flag |
| 8 | TF | Trap flag |
| 9 | IF | Interrupt enable flag |
| 10 | DF | Direction flag |
| 11 | OF | Overflow flag |
| 12-13 | IOPL | I/O Priviledge level |
| 14 | NT | Nested task flag |
| 16 | RF | Resume flag |
| 17 | VM | Virtual 8086-mode flag |
| 18 | AC | Alignment check flag (only 486 and newer) |
| 19 | VIF | Virtual interrupt flag |
| 20 | VIP | Virtual interrupt pending flag |
| 21 | ID | ID flag |
So, that’s a lot of stuff inside a single CPU, isn’t it? Well, to be honest, this is only an extremely simplified version of the whole structure. Due to the fact that I’m very bad at explaining complex stuff I’d recommend you to download the official Intel documents on x86 architecture and forget about this blog. 
First program
As far as I know most Windows-based Assembly tutorials begin with Windows-specific include files and some (easy to use) syntaxes. This isn’t negative per se but I think that a proper assembly tutorial should not immerse you into anything OS-specific, be it Windows, Linux, Mac etc. An Intel processor knows nothing about Windows or Linux. So, when I’m a beginner and searching for some material on how to program an Intel x86-CPU the last thing I need is to know how to program such a CPU from Windows or Linux perspective. Of course, sooner or later I’ll want to use OS-specific routines because my programs will grow bigger and want to communicate with the rest of the (software) system. However, to understand the CPU, the Stack, the registers and their behavior I don’t have to work with my OS from the very beginning. Therefore we’ll start with a completely bare-bones assembly code that isn’t even able to call the ‘exit process’ routine from the operating system. The program itself will run and the OS will have no problems with it but it won’t do anything ‘extra’ because we focus ourselves at the Assembly Language only. The most important task for now is to understand the rules of the game that CPU, Registers and the Stack are playing while the computer is on.
This is our code:

Our code begins with the declaration about the type of the binary we’re going to generate. Because we’re using FASM here we have to follow its rules on how to indicate what kind of binary should be generated. This, of course, is not part of any Intel x86 architecture but solely depends to the operating system used to produce the binary. In this case it’s an 32bit Windows EXE running as a Console-based program. Therefore we add format PE, for “Portable Executable”, and console. So, all other lines in the code are pure Intel x86 32bit Assembly.
push ebp
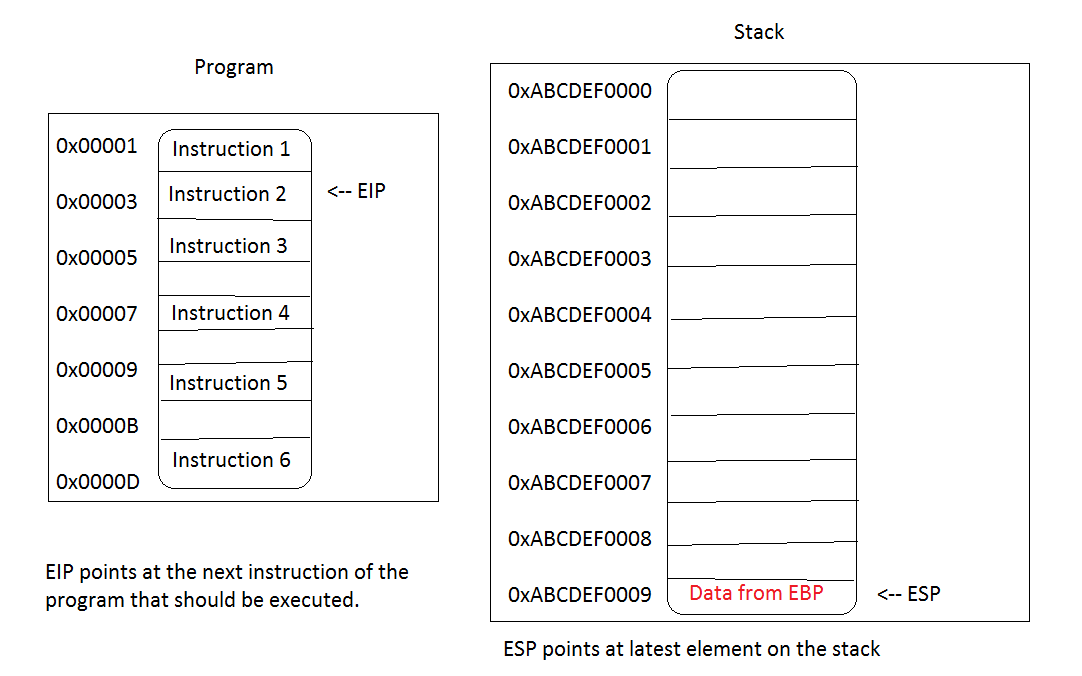
To understand this command (or better: mnemonic) we first have to understand the Stack. A Stack is a specialized part of computer memory dedicated for saving data. Intel documentation defines it as a contiguous array of memory locations. When using the flat memory model, like we do in modern operating systems, a stack can be created anywhere in the memory. Each function in a program has its own stack (frame) but also the program as a whole has its own stack too. In multi-threaded programs each thread gets its own stack and so on. Therefore, a stack is a mandatory part of any working logic. Without a Stack we wouldn’t be able to do many things taken for granted, like copying memory, reserving memory for variables, opening ports etc. A stack operates in LIFO mode which means that the last inserted element gets popped first (LIFO: last in-first out). Now, imagine a program that collects some data, let’s say memory addresses. How could such program temporarily save those addresses? With a little help from the stack, of course. It would take an address, let’s say a ‘pointer to a variable’, and PUSH it on the Stack. Just like in the example above. We take a value from EBP-register and push it on the Stack. Now, let’s visualize our program’s stack at the beginning of the program. As one can easily recognize, my weak painting skills are on par with my writing and coding skills, so don’t take the hexadecimal addresses too seriously. It’s sole purpose is to give you a first impression about the underlying mechanism that enables programs to run.

We haven’t started yet so the registers EIP and ESP point at the beginning of the program in memory respective the bottom of the stack. As we already know, EIP is the instruction pointer and shows the location of the next instruction to be executed. The ESP register shows the position of the latest element on the stack. Because we haven’t done anything yet there are no elements on our stack so the ESP points at its bottom. One important, and usually confusing, info regarding the stack is: the stack grows downwards! This is due to the fact that in the Intel architecture (and many others too) the stack begins at the highest memory address and grows towards the lower memory areas. Yes, I know, this is hard to grasp, because we’d usually imagine memory stacks to behave like ‘real world’ stacks but this is how the Intel x86 architecture world works. Do you believe me now that’s not of much help to start directly with any OS-dependent stuff when learning Assembly?
Ok, now it’s time to start our program. The EIP already points at the next instruction and so our program starts. And as we already know the first instruction is push ebp. What’s the outcome of this instruction? Well, let’s inspect the Stack and also the EBP, because we instructed the CPU to go and put the current content of EBP on the Stack. Also, we’ll check what happened to ESP and EIP after the instruction completed. This is quite a lot for a simple instruction, isn’t it? EBP content goes to the stack, ESP moves, EIP moves, Stack grows…quite lot happens, and in parallel. What does our ugly picture say about the current state?
We see some new data has landed on our stack. Also the ESP points to its locations indicating the ‘top’ of the stack. The instruction pointer, EIP, also moved downwards to show the next instruction to be executed. In this article we’ll ignore the content of EBP as our program is not in any way communicating with the OS or doing anything more complex that’ll, for example, require to maintain a separate stack frame. Ok, let’s execute the second instruction: mov ebp, esp
What does mov mean? Well, being a mnemonic it carries a special meaning to us, humans. It seems to be capable of moving data from one location to another. But before we go deeper into it let me explain a few very important things regarding mnemonics, register manipulation, op-codes and memory management in Intel architectures.
- First, a piece of memory can only be moved to a location of equal type. This is just like in high-level languages that enforce strong typing and do not ‘squeeze types’. If you copy an integer to a string or vice-versa you’ll make your compiler yell at you (if he’s your friend). The same applies to Assembly. Data from a certain memory location can only be moved to an equally similar location. For example, it’s not possible to move an 32bit value into an 16bit register. The sizes don’t fit. Well, I assume that some of you are now saying: but one could surely copy an 16bit value into an 32bit register? Sorry, guys/girls, but this isn’t possible with mov as it only MOVES a value without doing any additional work, like wiping out (or filling out?) the untouched bits. Assembly is extremely explicit and therefore we have to have two equal operands on both sides. And yes, there are additional move mnemonics like movzx and movsx which indeed do additional filling out of untouched bits but I think the current stuff is complex enough for the first article.
- Second, direct memory-to-memory data movement is prohibited. Period! You can only copy from register to register, from register to memory, and from memory to register. There is no way to directly move stuff from one memory address to another.
- Third, moving data to or from the stack automatically updates the value in the ESP-register.
- Fourth, executing instructions automatically updates the EIP-register (but this isn’t the only way to update it).
- Fifth, it’s not possible to directly update the value of the EIP-register. This can only be done indirectly, for example by using call/ret mnemonics.
- Sixth, every mnemonic (mov, push, call etc.) corresponds to a single operation code (called ‘op code‘) that directly maps to a binary value. This is why assembly code isn’t compiled but assembled as there exists an one-to-one equivalent. Of course, reading op-codes or raw binary is extremely hard so we program with easy to read mnemonics. 😈
So, we have executed our second instruction and I assume that some of you have expected to see some changes on the Stack. But nope, nothing has changed so far. Of course, the EIP (the instruction pointer) moved downwards to the next instruction in line but this has nothing to do with the stack. The EIP lives in a completely different world and uses its own addresses and locations. EIP could move a million times without any stack changes in between. The Stack only changes when we deliberately push data to it or pop from it. There are some additional ways to change the stack, like executing a ret mnemonic that’d automatically pop a value from the stack but in general: executing an instruction will only manipulates the EIP register for sure but there’s no guarantee that the Stack will change too.
The real change happened in the EBP register that received the current value of the ESP (the stack pointer). At the start of our program we’ve first pushed the original value of EBP to the Stack. Then we moved the current position (the address!) of ESP to EBP (this was a register-to-register copy). But why?
Well, imagine our program being started in a bigger context, with function calls, returns, passing of arguments and all other stuff taken for granted in high-level languages. In Assembly we’re extremely explicit. Therefore we have to take care of our environment at a level unknown to other languages. We must know where we have started from (push ebp) and where we’re now (mov ebp, esp). By pushing the original content of EBP we can ‘remember’ the starting point of our program (or the instruction that called us). By moving the initial position of the Stack Pointer (ESP) into EBP we remember where we (as a program, or a procedure) begin so we know how far we have to go up (yes, UP not DOWN as we grow downwards) to clean up memory and correctly exit the program, or procedure by going back to the initial location saved in the original EPB value. Also, by knowing where our own Stack FRAME begins (the moved value from the second instruction) we can be sure about our own private area within the Stack where we can put all of our local data (variables, addresses etc.). So, to sum up everything: the two instructions take care of keeping the original starting point and the newly created private area of the function being executed. We call them Prolog and you can find them in nearly every Assembly function definition. However, in many Assembly examples on the net there are other ‘initializers’ instead that are easier to grasp but I think it’s far better to learn all details about the Prolog just to keep you away from taking anything for granted. Assembly leaves no room for implicit handling. Even if there are some mnemonics that do things implicitly, like call or ret, this surely doesn’t mean you should take anything for granted and ‘it’s being done somehow and I don’t care as long as it works for me‘. The luxury of implicit helpers and shortcuts should be earned by doing lots of explicit stuff.
Now we go to the next instruction an move a value into the EAX register. And again, nothing happens on the stack. No data movement, no push, no pop. Pretty useless program, isn’t it? Well, it depends on usage and envisioned goals. At the beginning of the article I wrote that we’ll talk about some basics like registers and Stack. I think we’ve covered some pretty important topics. Therefore I don’t think we should do anything more complex, like division or boolean logic operations, for example. These things belong to more explicit topics when dealing with some real-world tasks. In the beginning we have to understand the basics: Registers and Stack.
Let’s execute the Epilog. What? Well, it’s simple, we had a Prolog now let’s clean up everything and go back to where we’ve come from. We move the EBP, which btw. remains the same throughout the execution of function it belongs to. By moving the EBP to the ESP (the Stack pointer) we simply jump to the highest point inside our function so we can leave it properly. After having landed at the beginning of our Stack Frame we take the value from it and put it back into EBP: pop ebp.
Final question: do we remember whose value was pushed on the Stack at the very beginning of our program? Yes, it was the previous EBP (the address of the Stack Frame that belongs to the function that started our program). Now we can go back to this function because after having jumped to it the function will continue its execution because its EBP has been successfully restored. Without restoring the original EBP this function would probably try to access wrong addresses in memory. I don’t have to describe in detail how dangerous such behavior could be.
The last instruction ret takes the last value from the stack (yes, it’s an implicit pop but you must explicitly know about its behavior) and puts it in the EIP (the instruction pointer) so the CPU can execute the next instruction after having left the current function.
This is it. For now. But, let’s be honest…our little program is somehow anti-social and not behaving like other Win32 console programs. Yes, it does start properly and contains everything a minimal console program needs to exist. However, it doesn’t end as expected. When you execute it your console hangs only a CTRL+C will bring back the prompt. However, this is not because Assembly in this article was wrong but simply because I’ve deliberately avoided any OS-dependent calls. Even calling the [ExitProcess] routine would expect us to include other files and reference additional DLLs. I this this is simply too much for a beginner article. The aim was to describe the basics like Registers and the Stack and some general rules of the game these elements are playing together. I don’t know much about my audience out there so I’ll simply wait for your comments and act accordingly.
Have fun. 🙂


11 thoughts on “Intro to x86 Assembly with FASM”
Hi, please write more about this,is good your tutorial.
Cheers
The second part is online.
Have fun! 🙂
Great tutorial. I skimmed through this stuff in college without really knowing what was going on, this filled in a lot of the gaps, heading now into part 2 very excited!
This article is so brilliant! Thank you for this! I am a little confused on one part that.
Could you elaborate (maybe use a little more metaphors) about the epilog. I’m kinda confused about how it works. but thank you so much! This is the best article i’ve seen on the topic!
Hi Damon,
Thanks for your kind words. Glad you liked the article.
Regarding the epilog the whole story could be described in a single sentence: The demo program from the article doesn’t return any value back to the system.
And this, of course, is something rather “anti-social” when you’re a program that does something without letting your OS know if, for example, something bad has happened. This is the reason why we often see the “return 0;” statement in almost any C or C++ main()-function. It’s simply the way to let the OS know that “everything went well”. If there was a problem one would return some other value, that describes the error in a greater detail, for example.
Here are the docs for ExitProcess from MSDN: https://msdn.microsoft.com/de-de/library/windows/desktop/ms682658(v=vs.85).aspx
Btw. I’m thinking about follow up articles for this series. Actually, I’ve planned to write more that these two, maybe four or five, but due to professional obligations where I don’t code in x86-asm I couldn’t find enough time to complete the series.
Kind regards,
Thanks!
The thing im more confused about is why do we do the whole ebp/esp thing at all? I always assumed the ebp and esp pointed to the same location at the start and the esp incremented automatically as you add to the stack. So that’s what got me confused. You just started the program and havent used any of the registers so i assume 1 of 2 things:
since the ebp containers a POINTER to the base of the stack by default, why push a pointer to the base of the stack, onto the base of the stack? wouldn’t that be like having an array of pointers in C++ and making the first pointer just a pointer to itself?
Again thanks for taking the time to respond!
And Every other tutorial is usually for NASM or MASM, and the ones for ASM assume you have knowledge of it already. Like I can understand WHAT things mean in the fasm documentation but never understand why i would use it in a program or how i would structure it. It’s like teaching C using a glossary of terms like “classes” and “polymorphism” but never showing basic tutorials like a “guess my number” game or things to practise. So yes, please make more of these if you can find the time because for people like me, absolute beginners, you are a god-send! I almost gave up looking for resources entirely until I found your article 🙂
To clarify, I can see WHAT the prolog is doing, i just thought this was automatically done for you (by the OS or the assembler or something). Am i wrong in thinking that? (sorry for the spam!)
When it comes to assembly most things must be done hand. One notable exception is the EIP (or just IP for 16bit) register that points to the next instruction. One can’t manipulate EIP directly. However, it’s possible to do this indirectly (malware, like viruses does this very often by tricking your machine to execute “something else” instead of the original code). They simply send your machine to some other place in memory.
Regarding the Prolog/Epilog sequences: we need them to setup/cleanup the stage where your function’s code gets executed. These things (prolog/epilog boilerplate codes) are invisible in higher level languages because people only see “arguments being passed around” without noticing that one needs a stage in the first place. A function doesn’t get executed in a vacuum! A machine is not a theoretical concept, so it too makes sense to see its memory as something concrete that one has to set up first before using it. Just like one needs a desk and at least one chair before taking dinner.
Kind regards,
Hi
I am very excited form Your first introduction in the Assembly Language. I have got a very clear understanding of dealing with STACK and REGISTERS.
a lot of thank.
I am reading this article after 500 days of its creation!
with best regards
M. Sasan
PS: now I go to learn the second Article of Assembly
Sir the extension of VS code you suggested is not coloring the syntax as yours. I am working with FASM. Any suggestions what can i do?
excellent tutorial