
14 minutes read
In the previous article, we explored the straightforward process of customizing Keycloak’s user interface. Now, let’s dive into the world of SPIs (Service Provider Interfaces) and discover how we can extend Keycloak’s functionalities by implementing our own. To accomplish this, we’ll need the following set of tools::
- Apache Maven
- Eclipse (or any other IDE that supports Java and Maven)
- Java SDK (download from here and install it before continuing with the article)
If you prefer, you have the option to run Keycloak instances using Docker, although it is not mandatory. To simplify the process, I’ve included a set of Dockerfiles and a docker-compose.yml file that I highly recommend using. Otherwise, you will need to manually build and run Keycloak on your local machine. It’s worth noting that when I refer to Keycloak, I am specifically referring to the Keycloak Quarkus edition, as the WildFly variant is no longer supported as of June 2022.
The sources for this article are available here.
Building Keycloak
If you want to run Keycloak locally, follow these steps to get a proper system running:
- Make sure you installed Java SDK
- Make sure your environment variable JAVA_HOME points at the root folder of your Java SDK
- Make sure you installed Apache Maven
- Clone Keycloak repository with:
git clone https://github.com/keycloak/keycloak.git
- Checkout version 21.1.1 with:
git checkout 21.1.1
- Enter subfolder quarkus of your cloned Keycloak repo and build the main codebase with:
mvn -f ../pom.xml clean install -DskipTestsuite -DskipExamples -DskipTests
- Finally, build Quarkus distribution with:
mvn clean install -DskipTests
The resulting packages will be located under $YOUR_KEYCLOAK_REPO/quarkus/dist/target. Two of them are zip and tar.gz files. Unpack one of them into a new folder, let’s name it “keycloak-21.1.1”. Enter this folder and try to start Keycloak with: ./bin/kc.sh start-dev
You should see an output like this:

Developing Extensions in Java
Keycloak is a very flexible system that allows us to modify almost all aspects of its internal structure. There are many interfaces available for implementation. To get a first impression, open the Provider Tab in your Keycloak’s master realm and keep scrolling:

Keycloak offers many SPIs (Service Provider Interfaces) that we can use to inject our own logic into Keycloak. This can be for example a novel way of authenticating users, or a specific event processor, or an additional email handler. We could even extend Keycloak’s data base schema to create our specific user/group/whatever handling mechanisms.
Keycloak runs its own SPI implementations that compose the core of the system. All the many options and configurations you see in the administration UI are based on SPIs. When you open the tab “Authentication” of your realm, a list of predefined authentication flows will be shown. These flows rely on SPI implementations that are used to create various authenticators.

When you look into the “clients” flow you see several steps that can be used to authenticate a client. And everyone of them, an authenticator, is an implementation of an SPI.

This of course means that we too could implement a new authenticators, or update existing ones. This is what we will be shown in this article. The above “clients flow” will serve us as a starting point in the development of our own provider that will be integrated as a new step in our “custom clients flow”.
However, as Keycloak doesn’t allow default flows to be modified, we must first duplicate an existing one by using the menu “Action” and selecting “Duplicate”. In the modal window we then enter the name of the new flow.

Now we are ready to modify create a new authenticator. But to make Keycloak use our custom flow we have to bind it to an authentication flow type.
Therefore, we go again to menu “Action” and select “Bind flow”. Then we select “Client authentication flow” in the modal window.
Of course, this selection depends on the type of the flow you’re using. For example, when you’re developing extensions for a “browser flow” you will need to start with the default “browser flow”, duplicate it and then bind the new one to “browser flow”.
It makes no sense to develop SPIs belonging to a certain flow type and then try to somehow inject them into a “wrong” flow. And it’s totally senseless to select a wrong binding type for a flow itself (like trying to bind “browser” with “client authentication flow”).
Every flow has a different kind of clients/users/etc. in mind and it therefore expects different credentials and ways of authentication to be executed.
Always make sure first that you are working with the correct flow.

Having said that, we can now open the demo extension from the simpleauth folder in the companion source code of this article. The README inside this folder also contains a video showcasing the creation of a “custom clients” flow. Check it out before running into configuration problems.
I would recommend to use a Java IDEs like Eclipse but you can also develop and build it from the console as well. Just use the provided “mvnw” scripts which take care of downloading and executing Maven binaries.
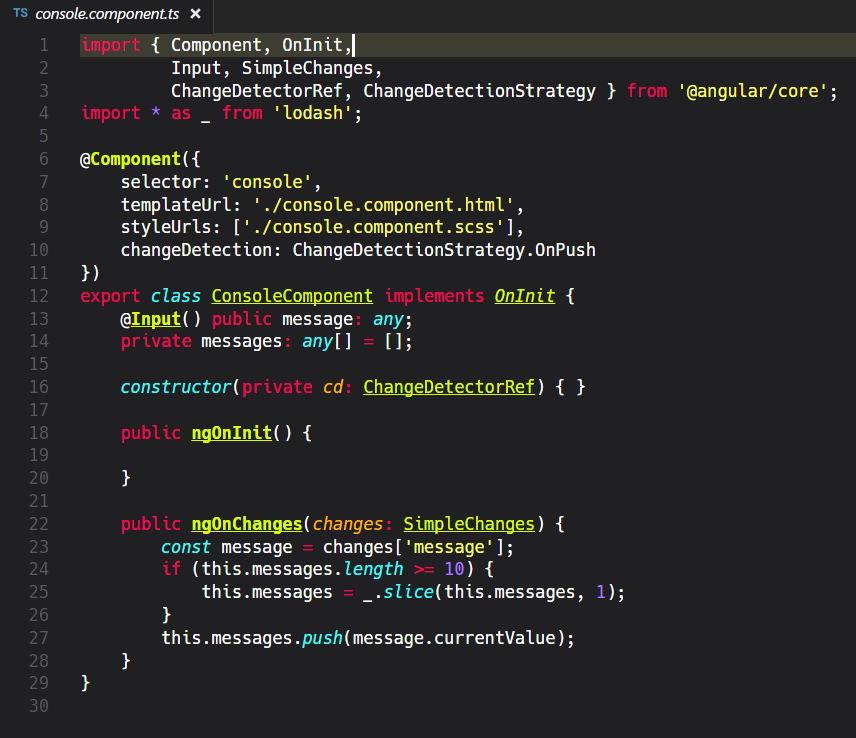
The demo SPI implementation is located in a Java project that uses Maven as its build tool and it looks like this in Eclipse:
The two main source files are:
- SimpleClientAuthenticator.java, where our extension’s implementation code is located
- SimpleClientAuthenticatorFactory.java, that defines a factory to instantiate the extension
Their companion tests are:
Our extension implements one of the so-called “internal SPIs” which are not guaranteed to be stable and could change anytime. You will see a warning from Keycloak when you later start it with the extension enabled. This is not a reason to worry, jut keep coding. 😉
Every SPI brings a few method declarations that must be implemented. In our case, the most important method is authenticateClient where the actual authentication will take place. Other SPIs might have similar methods, but every SPI type varies in different ways from others. Therefore, every implementation is unique.
In the above code we see the following operations:
- We extract client information from the current Session
- We get Realm information and print out all Realms our client belongs to
- We check if the client is enabled
- We check if it uses the expected protocol (in this case it’s OpenIDConnect)
- We check if it provides a ClientID and password (and we print them out, which is not recommended, but we are learning basics here)
- Finally, we set context.success() to indicate that our extension completed its work successfully. This has an impact on our “custom client” flow. An authenticator that failed, for whatever reason, could lead to cancellation of the whole flow. This depends if the authenticator was set to Required, Alternative, or Disabled. When the executor is “alternative” its failure wouldn’t stop the flow but instead the next one in line will be executed
An alternative would be to use context.attempted() which means that its execution neither was a success nor a failure. This, however, depends on your individual authentication flow strategy. It is also important to know that when multiple authenticators are set to “alternative” the first one that succeeds also stops the execution of others. This is what “alternative” means. All that’s needed to make a flow succeed is that one of the alternatives returns context.success(). This is also why in our example the SimpleClientAuthenticator is the first one in the list, because all others are alternative as well. And we want to make our authenticator always execute.
To make our extension available for Keycloak we also need to implement a factory interface which must implement these two create methods:
Additionally, we want to give administrators the option to change the execution requirement. This is done in getRequirementChoices method.
The methods that could (or must) be implemented vary from extension type to extension type. Another important information that comes from the factory is the Provider ID. This ID can later be seen in the Provider list of the master realm. Every SPI has its own unique ID.
Further down the factory code we find these two methods:
getprotocolAuthenticatorMethods returns supported authentication methods for this particular protocol “language”. In our case we’re “talking” OpenIDConnect. Therefore, we support processing of Client Secrets sent via “Authorization: Basic” headers or as a request parameter.
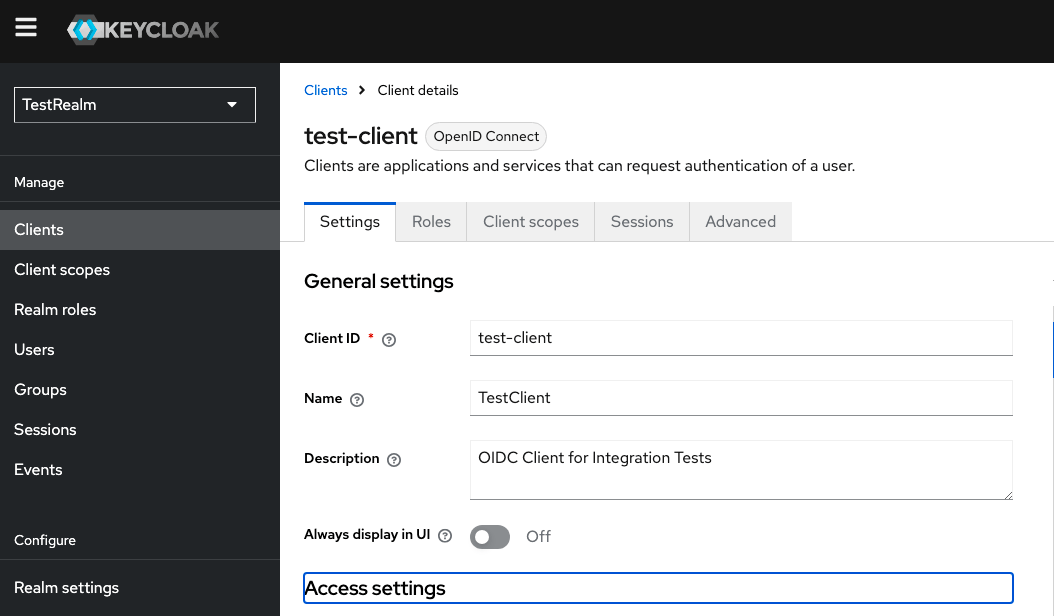
getAdapterConfiguration returns information that needs to be used in Keycloak adapter configuration (keycloak.json). In our case it’s the Client Secret. The expressjs server used in this article represents such a client, but it’s not the only way of configuring them. Feel free to experiment with different implementations. To get an adapter config, go to your client settings in Keycloak and select “Download adapter config” from “Action” menu as shown below.


The information in your adapter configuration depends on the type of the client you’re using. In our case it’s an “OpenIDConnect” compatible client that uses “Client ID and Secret”-authenticator that is configured in the tab “Credentials” as show below.

This tab is only visible to clients of that type, because in “Client ID and Secret” the client gets authentication information from Keycloak and must secure it locally. Other authentication flows demand different strategies. If you have imported a realm, you’ll have to regenerate the Client Secret as this piece of information isn’t included in the import data. Also, don’t forget to update the Client Secret entry in .env that will be used by the backend. This file must contain the same secret as the configuration in Keycloak.
The factory also contains init-methods but as it’s not doing anything extra we’ll leave them empty. The first one, init, can be used to receive the current object Scope that provides access to configuration that can be used to change extension’s behavior. Here’s a simple example.
postInit allows to execute any additional tasks after the factory has completed its initialization. A possible implementation could look like this.
Service Discovery
Another important piece we have to take care of is the process of discovering and registration of custom implementations.
In Java, the META-INF/services/ directory is a standard location where service provider configuration files are placed. For Keycloak SPIs and extensions, this directory is used to specify the implementations of various SPI interfaces.
Hence, it is necessary to include a file in this directory that corresponds to the SPI (Service Provider Interface) interface we are implementing. The name of the file should align with the fully qualified name of the specific SPI interface being implemented.
The content of the file should include the fully qualified class name from the implementation class. Each implementation class should be listed on a separate line within the file. In our case there is only one, so we put this line into the file org.keycloak.authentication.ClientAuthenticatorFactory
com.brakmic.auth.SimpleClientAuthenticatorFactory

During the Keycloak server startup, the SPI subsystem scans the META-INF/services/ directory of the deployed extensions. It reads the files within that directory and discovers the available implementations of the SPIs based on the information provided.
Deploying Extensions
Once you have successfully built the extension using either:
mvn clean package
…or with your preferred IDE, the resulting JAR file must be moved to the “providers” folder inside Keycloak’s root directory. The next step will be to introduce the extension to Keycloak by executing:
./bin/kc.sh build
This will lead to creation of a new distribution of Keycloak, incorporating the integrated extension. The final step is to initiate the updated Keycloak distribution by executing:
./bin/kc.sh start-dev
To facilitate the development and testing, I have incorporated a few configuration settings into the container/conf/keycloak.conf
log-level=DEBUG
log-console-color=true
log=console
log-console-format=%d{yyyy-MM-dd HH:mm:ss,SSS} %-5p [%c{3.}] (%t) %s%e%n
By incorporating the aforementioned settings into the conf/keycloak.conf file located in the root directory of your Keycloak installation, you will be able to enable debug output for the custom extension, which will be displayed in various colors. This is particularly useful when working with your own Keycloak installations.
Keycloak Clients
In order to conduct testing of the custom extension, we require a client that utilizes OpenID Connect for communication with Keycloak. Such a client is available in the “hbr-backend” folder. This client is a simple express.js backend server that relies on the information provided in the .env file to populate the client_id and client_secret, which are then transmitted to Keycloak.

The server operates by safeguarding a resource located at “/protected.” When a client is able to furnish a valid token, the resource will respond by presenting a straightforward page that displays the token data. On the contrary, if the token is invalid or absent, the server will reject the request with an HTTP 401 status code.

This example may be minimal, but it demonstrates how you can create a backend server that acts as an intermediary between authorized clients and Keycloak APIs, keeping Keycloak hidden from direct exposure. In the extended backend server example, we provide an alternative solution that utilizes Keycloak’s Administrative API. Additionally, we’ve included a straightforward OpenAPI page that allows you to easily execute queries against Keycloak’s API.

The middleware presented below exports the function keycloakConnectionCheck. You can register this middleware in Express.js by including it in the main app.ts file. By doing so, you ensure that valid Keycloak connections are always available for your API clients.
However, you will also have to make sure that your client has sufficient permissions set in Keycloak. After you have setup a new client in the “master” realm (if you want to be able to query all other realms), you will also need to assign it the “admin” role under “Service account roles”. Only then you will be able to query information about other realm users.

Also don’t forget to give your client the needed capabilities which are located under the “Settings” tab in your client’s configuration.

Scripts & Dockerfiles
In the “scripts” folder, you will find two bash scripts designed to automate the setup of Maven and Node.js projects. These scripts aim to assist you in swiftly establishing the fundamental structure required for building extensions.
In the “container” folder, you will find three Docker files and a docker-compose.yml. The Dockerfiles cover the following use-cases:
- Dockerfile runs a Keycloak instance (User: “admin”, Password: “password”)
- Dockerfile.providers is like Dockerfile, but it also imports providers (put JARs into “providers” folder)
- Dockerfile.import is like Dockerfile.provider, but it also imports a realm from “imports” folder
The docker-compose.yml is configured to run Dockerfile with realm import.


