
10 minutes read
- Intro to Semantic Kernel – Part One
- Intro to Semantic Kernel – Part Two
- Intro to Semantic Kernel – Part Three
- Intro to Semantic Kernel – Part Four
- Intro to Semantic Kernel – Part Five
- Intro to Semantic Kernel – Addendum
In this piece, we delve into crafting ChatGPT Plugins using a nifty tool named Chat Copilot. This utility facilitates testing our plugins in an ambiance akin to ChatGPT, alongside the luxury of injecting custom plugins. Not merely a sandbox for local tinkering, Chat Copilot doubles as a conduit to align our plugins with industry norms. While the AI domain remains in flux, certain standards are inching towards ubiquity. A case in point is plugins delineated by OpenAI, the entity behind ChatGPT amongst other AI offerings. Microsoft, the force behind Semantic Kernel, has embraced OpenAI’s plugin blueprint, which forms the crux of our discussion here. This adoption catalyzed the transition from the term “Skill” to “Plugin” in recent Semantic Kernel iterations, underscoring its adherence to this standard. The code featured in this article is available here and marks a departure from previous examples by including a web server, rather than just a console application. This web server, constructed using ASP.NET, hosts a RESTful API, allowing third parties to load a ChatGPT plugin. Utilizing several API controllers, the server delivers information in accordance with the OpenAI Plugin standard, a topic we’ll delve into in the following article.
A disclaimer is warranted here: the narrative eschews cloud providers, hence the absence of Serverless Functions like Azure Functions. A common thread in plugin examples is the reliance on cloud behemoths like Azure, GCP, or AWS, underpinned by Serverless Functions. Though a standard in its own right, Serverless Functions entail tethering to a cloud provider, a deviation I wished to avoid herein. For individuals interested in local deployment without going through the hassle of configuring remote services unrelated to Semantic Kernel, this cloud-centric approach might be excessive. Absolutely, the professional pathway often leads to the cloud, and I’m on board with that. However, our main focus here is on the basics, with the combination of Chat Copilot, a web server, and our custom plugin code already offering a fair bit of complexity. Introducing a cloud provider into this mix can hold off for now.
Unpacking AI Plugins
The official SK document casts an AI plugin as a vessel, bundling capabilities into a singular functional unit, orchestrated by the Kernel. A plugin’s identity can either be semantic or native; it’s shaped by config.json and skprompt.txt template, or it takes form in supported programming languages: C#, Python, or Java. If you’ve been trailing this series from the get-go, you’ve witnessed these plugins in action. Now, we’re upping the ante, not just running these plugins but flinging open the doors to the public, making them accessible to third parties. This endeavor demands adherence to the standard laid down by OpenAI, with the following components as prerequisites:
- A JSON-formatted plugin description (a manifest file dubbed “ai-plugin.json”)
- HTTP endpoints articulated through OpenAPI (a separate entity from OpenAI)
In essence, our plugins become accessible via a RESTful API appended to them.
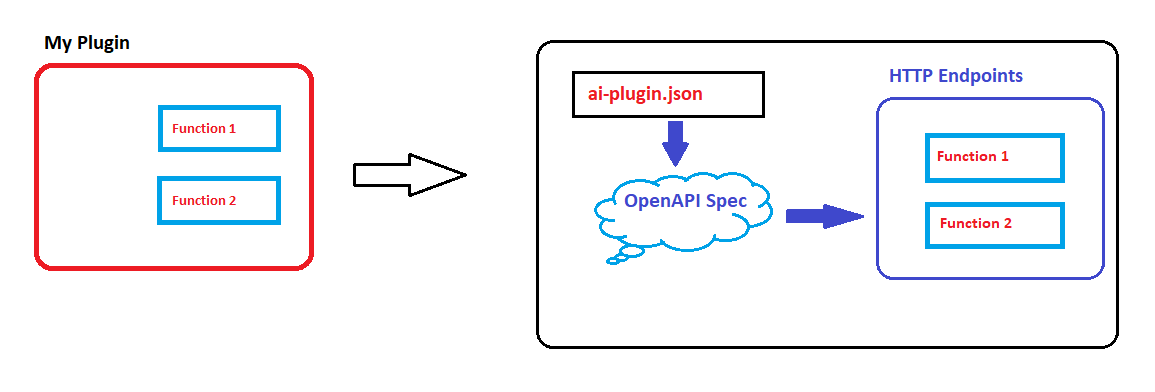
Each plugin is mandated to unveil a file named ai-plugin.json under the URL .well-known/ai-plugin.json
This JSON harbors the blueprint of our plugin, catering to both the model and the human. The model-centric info is pivotal as it underpins the automatic selection orchestrated by the Planner, a spectacle we’ll delve into later. Additionally, it lays down access rules for third-party entities and furnishes developer and legal insights.
The OpenAPI definition illustrated below will subsequently be utilized by third parties to discern the capabilities of the plugin. Additionally, the information gleaned from the OpenAPI will be employed by the Planner, operating within Chat Copilot, to select the appropriate method for addressing a user-given AI task.

Web Server
To broadcast this file and the method of our plugin to the world, a web server is requisite. The common route would be to hitch a ride on a cloud provider, deploying a slew of Serverless Functions. However, we’re veering old-school, setting up a local ASP.NET web server that houses several API controllers. The SKPlayground project unveils a folder dubbed ‘webserver’ with the following innards:

A peek within reveals ai-plugin.json nestled in the “config” subfolder, alongside three controllers:
- CryptoController, the custodian of cryptographic methods our plugin offers,
- ImageController, the bearer of our plugin’s logo image as cited in ai-plugin.json,
- WellKnownController, the dispatcher of ai-plugin.json via the .well-known/ai-plugin.json URL path.
The remaining classes are backstage crew, orchestrating plugin logic (cryptographic functions) or engaged in model bindings, formatting, and the ballet of request/response flows.
The heartthrob of our web server, the RunWebServer method, resides in Program.cs.
The web server’s configuration is straightforward:
- Create a Builder, integrating two formatters to convert incoming strings from Chat Copilot into our internal model instances,
- Augment logging capabilities with Serilog, an optional yet rewarding endeavor for a robust logging facility,
- Engage the Swagger Generator from the Swashbuckle package to conjure OpenAPI (formerly “Swagger”) definitions.
To ignite the web server, simply engage the VSCode launch option “WebServer”.

Controller Chronicles
The crux of the operation lies in the Controllers, which serve as conduits, relaying plugin information and logic to third parties. Our mission is to present the ai-plugin.json to Chat Copilot for plugin import, a task relegated to WellKnownController:
Upon a client’s query to the path .well-known/ai-plugin.json, the local ai-plugin.json is summoned, with the placeholder {url} morphing on-the-fly to reflect the current web server’s URL and (optional) port. This dynamism ensures the plugin’s availability across diverse environments.
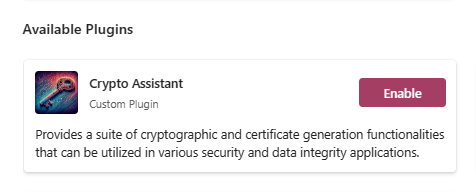
ImageController steps into the spotlight to deliver the image logo, destined for the plugin list display.
The limelight then shifts to CryptoController, the nerve center of our plugin, offering a suite of cryptographic functionalities like hash and certificate generation. The essential point here is to provide clear OpenAPI descriptions for these methods, as they guide Chat Copilot in selecting appropriate methods. Here’s a glimpse of the GenerateSha256Hash method definition as a case in point:
Utilizing Plugins in Chat Copilot
I presume you’ve already got Chat Copilot up and running. If not, make your way to their repository, clone it, and then install the necessary packages using the scripts from the “scripts” folder. Once you have all the required packages installed, kickstart Copilot with “start.sh” or “start.ps1”, based on your OS. This is how the Copilot main window will appear when you navigate to http://localhost:3000.

Implementing Custom Plugins
To introduce our plugin to Chat Copilot, click “Plugin” in the upper right corner to launch the plugin window. Here, click on “Add” under the “Custom Plugin” option and type in the URL of our plugin, which in this case is http://localhost:5000.

Next, click “Find manifest file” to query for ai-plugin.json under this URL. If all goes smoothly, the following info box should greet you:

Your plugin is now primed for use.

Revert to the Chat window and type something that could prompt the internally running Planner to suggest a function from our plugin. For instance, upon entering “I need an SHA256 hash for the phrase: hello, world!” Copilot presents this solution:

We observe that Copilot (Planner) is directing us to our method GenerateSHA256Hash from our CryptoController. However, the controller isn’t shown here, instead, the plugin “CryptoAssistantPlugin” which we defined in ai-plugin.json is. Thus, the function’s location doesn’t matter as long as the definitions align and the manifest file is accurate. The plugins and their functions are handled just like any others we’ve explored in previous articles. To finish our task, click “Yes, proceed” to see the following outcome:

Certainly, our plugin executed its task successfully and returned an SHA256 hash. Awesome! There are additional functions available, as seen on the OpenAPI webpage displayed earlier. Give it a whirl and encourage the Copilot to propose another functionality from the CryptoAssistant Plugin.
A Brief Discussion on Data Formatting
While experimenting with this plugin, I encountered some issues concerning the correct formatting of function arguments. For example, the input value sent to hashing functions was an unquoted string, and the only workaround, without altering any code, was to manually adjust the “payload” the Copilot provided before function execution. This, of course, is not ideal as it assumes the user has knowledge about “quoted strings”, and it also interrupts the interactive flow between AI and human users. Hence, I’ve introduced two formatters, one for unquoted strings and the other for the CertificateInfo DTO, used to pass arguments to the GenerateCustomKeyCert function, which expects an argument of this type.
Since Chat Copilot is oblivious to our DTO (data transfer object) type, it’s imperative that we ensure the incoming data, which may contain a JSON structure, is deserialized into a valid instance of the class shown above. To accomplish this, we create a CertificateInfoFormatter that inherits from the abstract TextInputFormatter, capable of reading an object from the body of the HTTP request.
Now, when Copilot sends its payload to our web server, the formatter will kick in and deserialize the content of the request body to CertificateInfo, which is the argument type expected by GenerateCustomKeyCert.
Another formatter featured in this project is the InputDataFormatter. Its role is to transform unquoted strings originating from Chat Copilot into quoted ones, enabling our plugin’s functions to process them effectively.
Both formatters are introduced in the RunWebServer function shown at the beginning of the article. It’s crucial to maintain them in a specific order and also to configure them to respond to certain media types. In this case, InputDataFormatter reacts to text/plain and application/json, as it’s possible that Chat Copilot might propose creating a request using either media type.
Name Casing
Chat Copilot operates with a convention of using snake_case when handling JSON arguments that encompass properties. This is a common practice in many programming environments to ensure readability and clarity. However, in the .NET realm, the convention swings towards PascalCase, especially when defining classes and their properties. This disparity in casing conventions necessitates a bridge to ensure seamless communication and operation between the Chat Copilot and the .NET classes. Here’s a practical illustration using CertificateInfo:
Concluding Remarks
We’ve navigated through integrating a custom ChatGPT plugin and aligning data formatting between .NET and Chat Copilot. The steps outlined here aim to ease your journey into exploiting the potential of Chat Copilot while working within a .NET environment. As you tinker with these insights, the pathway to seamless interaction with Chat Copilot becomes clearer. Feel free to share your thoughts or queries in the comments below. Until our next coding escapade, happy coding!


