
24 minutes read
Our little program from the last article was sufficient enough to explain the most important players like Stack, Registers, MOV & PUSH but in the end we didn’t have anything working “for real”. Computer programs should do meaningful things. It doesn’t have to be a 3D graphics or some complex math but at least some kind of result should be given back to the user. Of course, we’re dealing with Assembly here so there’s actually no shortcut to some nice ‘Hello World’ output messages like in other languages. Many tutorials & books on Assembly start with lots of information about Hexa-Dec-Binary-Conversions, Bit Rotating, Bit Shifting, Flag Manipulation etc. All this, of course, is important but, in my humble opinion, it’s just too much and too complex to start with. Teaching a language should be funny and enjoyable to readers.
There’s no need to excessively show what else is required to master the language. No matter how hard one tries to teach others the most important things people gonna learn will be done by themselves. Don’t be a teacher is my most important motto. Rather being a teacher or some other kind of “institution’ one should be someone who knows how to show the funny parts of the language. And we all know that there’s no greater fun than seeing the machine giving you something back. Just like in the good old days of C64 or Apple ][. You typed in something like
PRINT "HELLO"
and the machine dutifully responded back with
HELLO
People communicate with everything not just people. Do not drown your readers into endless discussions about all the different possibilities of Bit-Shifting, Data Converisons or Binary Arithmetics. Better show them how a function can be programmed or what does it take to pass an argument to a function and receive it back for further processing. After such an enjoyable experience your readers will teach themselves all the complexities lurking in the Assembly language. Funny things lure people into learning more about them. Personally, I think that learning Assembly is not much harder than learning any other language. The problem is, in my opinion, the wrong way of describing things you could do with just a few words from Assembly. Don’t believe me? Well, only 14-16 mnemonics of x86 Assembly account for more than 90% of all Assembly code written to this day. Pretty impressive, isn’t it?
Therefore, in this article we’ll learn how to write a program that contains two functions. One function will call the other by passing it a single argument. The other function will manipulate this argument and return it back to the caller. Upon program completion the caller function will then print out the result on the console.
The source of the program from this article is on GitHub.
Defining output format
In the last article we’ve used only a few so-called FASM directives to define the output format of the assembled file. As our little program wasn’t very interested in communicating with the system and/or other programs there wasn’t much to do for us. We merely declared that the output binary will be a PE console executable without anything extra. By executing it the machine just read the commands top-down and stopped without any return value or otherwise notifying the system. Well, now we want our program to explicitly start somewhere in the file, use external functions provided by the system and call another function inside the binary. Surely, we’re not going to achieve this with some brainless top-down approach like in the first article. We will need additional directives, especially entry, include & section. This is how the header of our source code looks like:

Entry Directive
We’re still a PE console binary but this time we define an entry point for our program to execute. The entry point is defined with directive entry followed by a label. A label is a name followed by a colon. It can be anywhere in the code-section of the program. The meaning of “code section” will be discussed later. Just memorize that there’s an area inside the binary where all of its executable parts reside. And in this very area we’re gonna place a label so the machine will know where it should start the program from. There could be many labels in the code and indeed we’ll be using two of them. One for our entry directive and the other to call the second function.
Include Directive
The next directive is called include and its duty is to bring in some predefined code that is located inside the file name we give it as an argument. In this case we include some OS-specific definitions. Of course, if you’re using a non-Windows system you’d include completely different files but the include directive itself would remain the same. This is the moment when dealing with Assembly quickly becomes OS-specific as there’s no possibility to write to a system-specific console without using system-specific commands to manipulate it.
Constants
We all know about variables and constants and in the last article we’ve learned that CPU’s registers behave like ordinary variables in higher-level languages. We’ve also seen that we can put the values from Registers on the Stack for further processing. But what about constants? How do we define those? It’s quite simple, we just use another kind of directive to define a named value of a certain type. Here we want to print out some textual information including a placeholder for a value that’ll be known during at runtime. Constants defined like this are called Symbolic Constants. It’s important to know that symbolic constants will be replaced by their values before the Assembler starts to process the code. However, this is just one of many different ways to define constants but because I’m not going to teach you the whole torrent of options we’ll now stick to this single symbolic constant. The directive db means define bytes and the 0 after the comma marks the end of this “string” value. It’s just a zero-terminated C-string. There’s also a possibility to define Unicode-Strings which allocate two bytes by using du directive. And of course, there are other data definition directives to define words, double-words, quad-words etc.

Sections
Although this is not a tutorial about file formats one simply can’t learn Assembly without knowing at least a few bits about them. Regarding Windows we have the old and proven PE/COFF (Portable Executable / Common Object File Format) that traces back to Windows NT 3.1. Every binary in Windows, be it an EXE, DLL, OCX etc. is structurally organized as an PE file.

If you forgive me that I’m still using MS-Paint to draw images you clearly see that there’s a whole lot inside even a simplest executable. All PE files start with a legacy MS-DOS stub. This is the area where the standard info “This program cannot be run in DOS mode” is located. It always begins with the magic number MZ. The PE part of the executable begins, well, at the magic number PE.
Here’s the hexadecimal view of our executable:
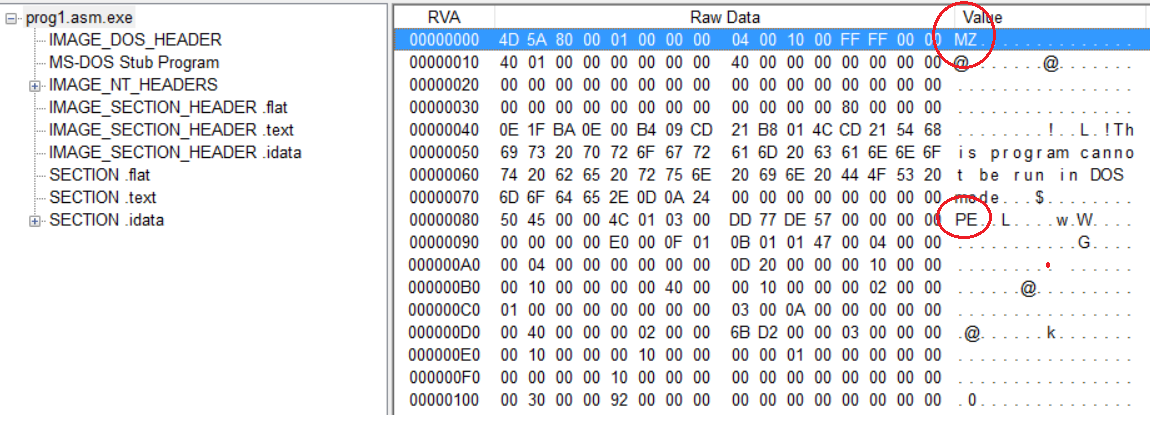
On the left we see a list of different sections found inside the binary. These sections can be configured with FASMs directives. On the right we see the two magic numbers that denote the starting points of their respective blocks. In our case we declared our code to belong to the .text section. It sounds very awkward to name executable parts of the code “text” but this is the place where everything that should be executed has to go. Simply spoken, all these sections have the purpose to inform the Image Loader what it will have to load into computer’s memory. The Image Loader is an integral part of the operating system and its duty is to take an Image (e.g. EXE or DLL), read its sections and map them to certain blocks in RAM. If the Image Loader finds out that some parts are already available, like OS-specific DLLs for example, then it’ll simply relocate specific memory addresses to prevent unnecessary memory allocation. But, this is just a simplistic view of a very complex area. However, for our purposes it’s sufficient to know that we’ve defined a section containing read-only executable code.
What should our program do?
We want our program to take a value and call another function by giving it this value as a single argument. This function will then change the value, let’s say by adding 1 to it and then return it back. Ultimately, the value should be presented on the console by using a preformatted text defined in the symbolic constant from above. Our program should behave like this:

Entry Function
As already defined in the header our program begins at the label _start:
Therefore we decide that this is the right place to prepare the variable which’ll be the argument for the second function _incr. Of course, in Assembly we always begin our functions with the mandatory Prologue. We save the current EBP and define our local Strack Frame by copying the value from ESP to EBP. The last known EBP will later serve us to jump back to the last position the machine was before it executed our code. Following the Prologue we put a value of 10 into EAX and subsequently push it on the Stack. But why did we do this?

As you surely know passing function arguments in higher-level languages looks something like this:
my_function(10);
We’re used to combine the actual call together with the variables the function has to process. Not so in assembly. There’s actually no concept of passing values around or calling a function with an argument (or more). Basically, the only thing Assembly knows of is jumping to an address in memory and continuing execution there. I must admit that I’m now talking about things not presented yet as I’ve avoided to talk about JMP, JNZ, JE and other jump mnemonics but just keep in memory that a machine can only jump to an address and continue its execution path there. That’s it. But of course, this isn’t nearly sufficient to do anything more complex than producing unnecessary CPU-cycles and heat.
Therefore, instead of having language-level functions in Assembly we use Concepts. We already know that a machine only knows about the state of its registers and the current stack position. Now let’s use them to emulate a function call. The first part of it is already shown in the screenshot above. We define a new “variable” EAX (Registers behave like variables, we know that already) and put some value in it. The next thing to do is to call a function to manipulate EAX. But how should we do this? Well, the answer is very simple but it’ll surely take some time until it becomes part of your “muscular memory”. We call a function by using a label that denotes where the “function’s code” begins and at the same time we write down the address of the next position after our call-mnemonic so the machine can later continue the execution of our code after the function has returned. In fact, a call in Assembly is basically:
- saving the address of the next mnemonic after call by pushing it on the Stack
- jumping to a certain address (in our case it’s the address the _incr label points to)
When dealing with functions we take care of two addresses at the same time. This is the most important aspect. The address we save for later execution will later go into EIP and this register can’t be manipulated directly. This is why we can’t simulate such a function call by using any alternative mnemonics. However, many malwares explicitly try to manipulate the EIP indirectly by using techniques that corrupt the stack and therefore let some “other” address go into EIP. Now the question is, if we can’t directly manipulate EIP how does the saved address land in EIP? The answer is: RET mnemonic. This mnemonic is the opposite of CALL. RET takes the value from the top of the Stack and puts it into EIP. The CPU then continues the execution from where the EIP points to. This now may sound a little too complex so let’s go over it step by step:
CALL
- Put the address of the next mnemonic after the CALL on the Stack [this address will later be used by RET to populate EIP, so the CPU will know where to go back to]
- Jump to the address where we want to execute some code from (this is only temporary because we saved our current address, so we’ll go back to it later)
Inside the Function
- [Prologue] After having jumped to the new address we save the last EBP from where we came from to the Stack.
- [Prologue] Then we put the current address the Stack Pointer points to into EBP, because this is the start of our new Stack Frame.
- >>> Now we do certain things inside our function, change values, do PUSH/POP with the Stack, whatever…
- >>> OK, our work has been done, now we want to go back. But first we have to clean up everything from the Stack that’s not needed anymore (local values etc.).
- [Epilogue] We put our “local” EBP into the stack pointer ESP (this is effectively “purging the stack” from all “local” values, because we go down the stack, leaving the rest in Nirvana)
- [Epilogue] Pop EBP from Stack (after having jumped down the Stack the value we’re pointing to is the first one we’ve pushed to it at the beginning: the saved EBP of the caller-function).
RET
- Take the current value from top of the stack and put it into EIP
- Jump to the address now being pointed to in EBP

Our second function’s label is called _incr but where’s its argument? If you go back to the first source code screenshot you’ll see that we’ve already manipulated EAX by putting a numeric value of 10 into it. In Assembly there’s no concept of local variables and the Assembler doesn’t enforce any rules on accessing those as the compilers from higher-level languages do. Everything we “pass around” is actually globally available and we could access any value at any point in time by using certain mnemonics (of course, some memory areas are protected by the system but that’s not important now). Now let’s see what happens inside _incr.
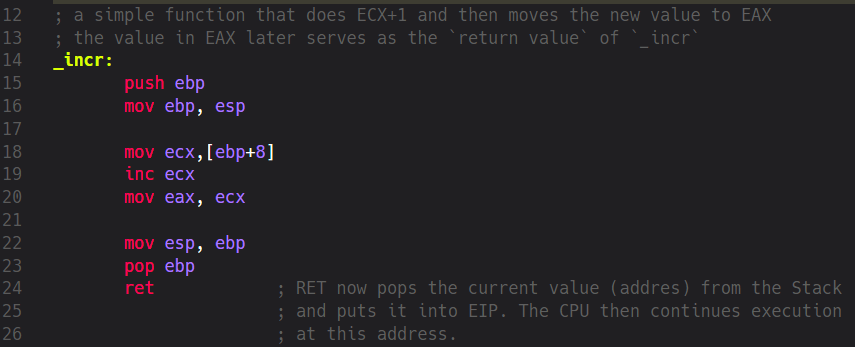
At the beginning we have the obligatory Prologue where we take care of keeping the address to where we’ve came from and create our local Stack Frame by moving the current ESP to EBP. Then something completely new to us happens: we move a special value to ECX by using this mnemonic:
mov ecx, [ebp+8]
What does this expression inside [] brackets mean? Well, as a general rule we should almost always interpret such values as addresses (LEA mnemonic being an exception to this rule, but that’s not important for now). The value inside [] brackets expands to an address, in this case this is the address of our current EBP plus the offset of 8 bytes. Effectively, this means that we have to take the address stored in EBP, add 8 bytes to it. We then use this calculated address to get the value stored at it. The value itself is then copied to ECX. Now the question is: what’s the value at position Address-Of-EBP+8. Let’s visualize our Stack.
This is what it looks like when we enter _incr:

So, it’s pretty obvious why we have to recalculate the address of the value we want to use as our argument. Or more precisely: we must recalculate the address from the Stack because it’s not located at the top of the stack, so a simple POP mnemonic wouldn’t deliver us the needed value. We’ve prepared and pushed the value 10 on the Stack in our _start procedure. Additionally we’ve saved certain values like the previous EBP and the return address for RET. Therefore, our argument is now located below them and to get to it we have to take our current EBP (_incr‘s Stack Frame) as the base address and calculate the offset from it to get to value 10. Also take into account that we’re adding a value to EBP thus moving up the Stack. As we already know Stack grows downwards but the picture above is showing us the opposite direction. This is just to make the visual understanding easier.
Because we want to access a value being created in a memory area not belonging to our Stack frame (the 10 was created in _start procedure, that is: inside some other Stack Frame) we have to “go back” by using a relative address that is a combination of _incr‘s Stack Frame and an offset reaching into previous _start‘s Stack frame. This is why we can’t say that we’re passing values to functions because such a concept would imply that we can somehow access some future Stack Frame. All we can do is to temporarily go back to a certain location, copy a value located there and then continue working with it inside our Stack Frame. Of course, this is not the end of the story and Assembly offers many cool ways to do memory manipulation but I think this example is sufficient enough for some serious experimentation. So, what happens next inside _incr?

The copied value in ECX gets increased by 1 and subsequently moved to EAX. By convention the return values of functions are located in EAX so we try to be nice and therefore do a MOV eax, ecx. The remaining mnemonics restore the previous Stack Frame and the last of them, RET, takes the current value from the Stack and puts it into EIP. Now the CPU knows where it should continue its work from. So, let’s continue our article at this memory location:

The first mnemonic does something very important: it gives back memory that’s not needed anymore. As we remember we’ve used 4 bytes on the Stack to pass the original value in EAX to _incr. Later, inside _incr we’ve done certain things with it. Now we’re back in _start and there’s no need to keep these 4 bytes allocated so we give them back by going up the stack because: if the stack grows downwards then it clearly shrinks upwards 
This is not only important because of memory consumption. At some point in time we’ll maybe want to calculate another relative address location and not giving space back is a clear recipe for a disaster. Again: malware authors very often misuse such programming errors (improper usage of malloc/free, new/delete etc.). Hopefully, our little program is careful enough so after we’ve cleaned up everything we push two new values on the Stack: EAX and str_fmt. Well, we know for sure that EAX is 11 because _incr added 1 to it but what’s this str_fmt? This is the constant from the beginning of our code. Here we’re preparing two arguments for the next function to be called: printf. Or more precisely: call [printf]
But what does [printf] actually mean? Is this an address? And if it is where does it come from? Well, to understand it we first have to understand another very important part of FASM: the Imports table. Another assemblers, of course, have similar tables too.
Imports
Our little program isn’t doing anything special but even simplest programs often depend on some external functions and libraries. Assemblers are very good when it comes to low-level programming but sometimes we don’t want to reinvent the wheel. Defining a print-function from scratch may be an interesting learning experience but writing it again and again is anything else but funny. Tedious and repeating stuff should be centralized and boxed behind well-defined APIs. Like include files and DLLs, for example. We’ve already included the basic win32.inc source that defines the publicly available Win32 API. Now we want to access its compiled code. I assume that we all know that Win32 API comprises of several DLLs located inside the SystemRoot (mostly C:\Windows). Those DLLs are named like user32.dll, kernel32.dll etc. Additionally, we’re in need of certain functions provided by the Microsoft’s C-Runtime library. Therefore we import them from two libraries:

As with our code section from the beginning we first define a new section named .idata that should be read-only. Then we name the libraries which should be located inside globally known paths (like C:\Windows, for example). We complete our imports by naming the exported functions that these DLLs provide and how we want to name them inside our code. Here we simply reuse the original names of ExitProcess and printf but we could also use any other names. However, I’d recommend to stick with the original names. Effectively, we mapped the appropriate addresses of exported functions into our code. Now we can call them at any time. The printf function accepts any number of arguments (it’s a variadic function) but in our case we want it to deal with two of them: string format and an output value. This is why we’ve pushed str_fmt and EAX because we know that printf, by definition, will automatically look for a string format definition, if any, and the value in EAX.
And just to make it clear: we pass values from right to left. If, for example, a C-function from some DLL expects three arguments:
function(arg1, arg2, arg3)
inside Assembly we’ll push
push arg3
push arg2
push arg1
However, this is not the whole story for printf and many other functions but it should be sufficient for this example. Later we’ll see different calling conventions like stdcall, cdecl, fastcall etc. Using call [printf] actually means to go to a certain address in memory where the printf-code is located. At this location our two parameters will then be used to execute the function. After the function returns we again give back the space we’ve used to save str_fmt and EAX (8 bytes this time because of 2 “variables”). Now the last function we want to call is ExitProcess and this one expects a single variable, the return code. Therefore we push a 0 on the Stack (this means: our program completed without any errors). Ultimately, we clean up everything and restore the Stack Frame of the procedure that called us (mostly one of the operating system-dependent main-procedures). This is the moment when we give the control back to the system.
Conclusion
I hope this article could be of some value to some people out there. Assembly’s actually not that hard to learn but explaining it in detail is very error-prone because sometimes you simply don’t know where to start from and how much you should explain about a certain topic. This is one of the reasons why I’m still avoiding to elaborate on Dec-Hexa-Conversions, BitShifting, Logic Operations and the like. Of course, all of them are important and soon we’ll encounter them. However, I think we should better start with something more meaningful before we touch such abstract stuff that can’t be directly mapped to real life. It’s already very hard to explain the meaning of Prologue/Epilogue and how to “pass values to functions” that I really don’t think my readers want me to explain them how Dec-Hexa-Binary-Conversion works, for example. I think people don’t need tutorials explaining such stuff. There’s enough material out there. First and foremost, a tutorial should be fun to read and easily reproducible. This is the only way one can test if the writer was telling something of value or not. You get nothing out of things that you can’t reproduce because you simply can’t falsify other people’s claims. And behaving that way is an unforgivable mistake, in my opinion.
Have fun! 🙂


10 thoughts on “Intro to x86 Assembly with FASM – Part 2”
Thanks for these two FASM tutorials: they are really good starters, and well written.
I’ve starred your GitHub repo with the source code.
Hi Tristano,
Many thanks for your comment (and the star on GitHub!).
I hope I’ll find some time to write another article on assembly.
Regards,
Harris
How to debug and trace the program … Bochs? Or … wonder
There are different, very good debuggers. I prefer this one: http://x64dbg.com/
Again, an amazing tutorial! I understand so much more than when i commented previously!
about the conclusion: i agree that you should keep the complex stuff for later! I know its important to know but learning it at this stage would be very difficult memorization only, but if you teach how to do some basic programs and “move around” in asm first, when people learn the complex stuff they then already have the knowledge of how to test that stuff in their own code and experiment with it, learning far more than just memorizing!
I’m definitely wanting a part 3 now! Maybe make it into a 5 part and then sell as a batch on gumroad 😉 i’d certainly pay for this info!
Is creating a new stack frame in the _incr function really necessary since you don’t affect the stack in any way other than copy a value from it? I see a reason to do it when it comes to more complicated functions, but I don’t see a reason here… Anyways, these two articles are awesome! I hope you would write more : )
– Miika
hello, very nice tutorial it’s the first time I knew something about assembly 🙂
well anyway, does this thing have part 3?
🙂
I forgot about this, I know I’m not really in a good position to ask you about this but, can you make projects? you know the one that has step-by-step instructions about assembly? thanks 🙂
Isn’t this part incorrect:
push 0
mov esp, ebp
pop ebp
call [ExitProcess]
Shouldn’t it be:
mov esp, ebp
pop ebp
push 0
call [ExitProcess]
?
Thank you for the article; it was fun to follow along with Parts 1 & 2 this evening!