
7 minutes read
- Intro to Semantic Kernel – Part One
- Intro to Semantic Kernel – Part Two
- Intro to Semantic Kernel – Part Three
- Intro to Semantic Kernel – Part Four
- Intro to Semantic Kernel – Part Five
- Intro to Semantic Kernel – Addendum
I am writing this article to correct some of my previous assumptions and also to provide a perspective on using Plugins with the real ChatGPT. As some of you might have already learned, the Plugins developed with Semantic Kernel can be used both locally and when deployed as OpenAI-compatible plugins accessible by external clients. One option is to make these plugins available via Serverless Functions, like Microsoft’s Azure Functions, Google’s Cloud Functions, and the like. However, I have opted to use a more basic technology to avoid the hassle of configuring (and paying for) additional cloud services. That’s why my example from Part Five utilized a simple ASP.NET web server which ran a few controllers. But no solution is completely free from complexities, and this tiny web server was no exception. After playing around with Chat Copilot and the web server, I discovered some issues with setting the correct content-type for the incoming message and also with parsing (and mapping) of incoming JSON data. It became even more challenging when Chat Copilot sent raw strings without any JSON structure. For such cases, I wrote a few formatters to handle these problems. But this was still not enough, because when I tried to use the plugin in ChatGPT, I encountered further issues also related to the mapping of incoming JSONs into models written in C#. ChatGPT, being the de-facto standard application for testing OpenAI-compatible plugins, became for me the ultimate decider on what should be an acceptable implementation in my web server. So, I removed all those little formatters and also got rid of a model binder which I had used to manually map between incoming (Chat Copilot) data and the plugin. If ChatGPT was indicating that something was amiss, I tried to cater to ChatGPT, and only when I got everything right there, I returned to Chat Copilot to understand what extra modifications, if any, I would need to make my plugin compatible there as well.
All you need is Middleware
In essence, the solution to all of this boils down to a single middleware that processes any incoming data by attempting to map it to types this plugin can handle. In this case, the types are HashRequest and CertificateInfo. If not, the middleware assumes that the client has sent a raw string value, which will be inserted into the “input” property of a new HashRequest instance. This way, the plugin can communicate with both ChatGPT and Chat Copilot.
All that’s needed to activate this new middleware is a single command:
We can now restart the Web Server and load it again in Chat Copilot to test its functionality. In the previous article, I already described how this is done. With this new code, any message sent from Copilot will be processed, and you won’t encounter errors where Copilot was triggering Http errors 500 or 400.
Configuring the Web Server
I’d also like to share a few words on configuring a web server, should you wish to run your plugin the same way I do. If you are using any cloud provider, this section, obviously, is not for you. I am utilizing IIS (Internet Information Services) on Windows here. First, you’ll need a routable domain for your plugin. Let’s assume your plugin is hosted at myplugin.mydomain.com. You would then log on to your server and start the web application code from the project. By default, the application listens on port 8082, but you are free to change that. Just check the code of the RunWebServer method in Program.cs. Now, this port is out of reach for external clients, and I assume you’d prefer to route this application through a real web server like IIS, wouldn’t you? To achieve this, you will need the URL Rewrite module for IIS, which you can download and install from here. After installing it, open your IIS Console and create a new Web Application, naming it, for example, “myplugin.mydomain.com”. In the tree view of the application list in the IIS Console, select the application you just created and search for the URL Rewrite icon. It looks like this:

Double-click it to open, then select “Add Rule” in the upper right, followed by “Blank rule” in the newly opened modal window.

Now give your rule a name, for example, “plugin”, and in the first half of the newly opened window, do the following (using your real domain name, of course).
- Enter requested URL pattern: (.*)
- Add a new Condition named {HTTP_HOST} with the regex matching your plugin’s domain as shown in the screenshot below. Ensure you enter all regex operators correctly.

In the lower part of the same window, you will enter the address of the locally run web server where your plugin resides, as well as check the two checkboxes for “append query string” and “stop processing of subsequent rules”.

In my case, the local web server instance is running on 127.0.0.1:8082, but you might be using a different port, so ensure you enter the correct data. Also, don’t forget to append the selector {R:1} to ensure all paths belonging to the root domain are processed as well.
Once done, click “Apply” in the upper right corner and exit the IIS Console.
Using the Plugin with ChatGPT
Now, attempt to reach your plugin with ChatGPT. I presume you are using the paid version of ChatGPT.
- Select Plugins variant in the list shown below.

- Select Plugin Store in the dropdown menu:

- In the new window, click “Develop your own plugin” located in the bottom right corner.

- Enter your plugin’s URL that you defined earlier in the IIS Console.

- ChatGPT will validate the plugin, and if any errors are found, they will be presented. Otherwise, proceed with “Next”.
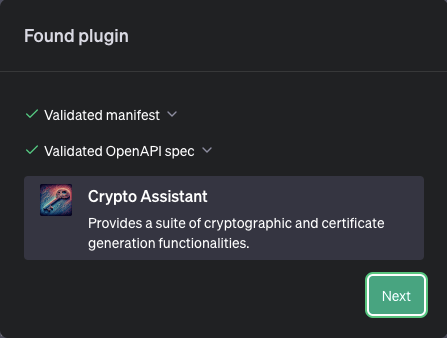
- Your plugin is now ready for installation. Unverified plugins can be installed on 15 different developer machines. This is very useful for teams or when there’s an audience testing your plugins. In our case, we’re doing it for ourselves, so select “Install for me”.

- As this plugin hasn’t been vetted by OpenAI, this warning will appear. Select “Continue” since it’s your plugin anyway. Be cautious when installing plugins from the internet.

- You’ll see the plugin details again. Click “Install Plugin” to finish the process.

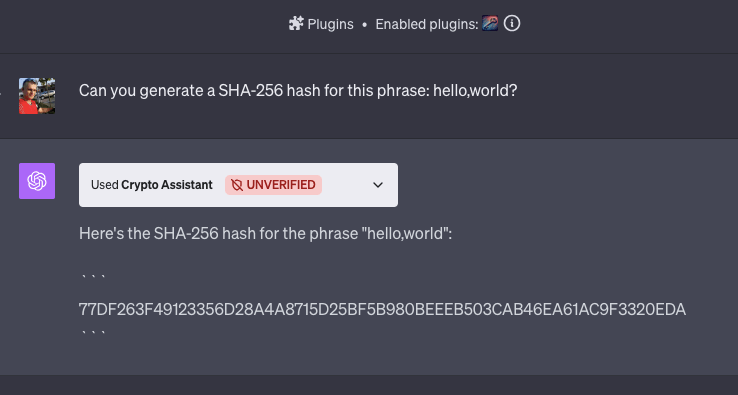
- Your plugin is now ready to be used. Try to engage ChatGPT in doing something that might be done with the help of your plugin.

If you are using the current code from the repo, enter a question like this: “Can you generate a SHA-256 hash for this phrase: hello,world?“. Observe what ChatGPT is doing. 🙂
Final Remarks
I hope this short addendum has clarified a few things I may have missed in the previous article. Given that the whole new world of ChatGPT, Semantic Kernel, and Plugins is a moving target and very new to me (among others), some misses and errors are to be expected. I am quite sure that all these texts I have written so far will one day only be of archaeological importance. But for the time being, I hope I have been able to help someone out there understand and use this exciting new technology.
Enjoy exploring Semantic Kernel, Plugins, and AI in general.


