17 minutes read
A few years ago, I discovered an interesting Microsoft Research Project called “BOSQUE” (back then, it was in all caps). The aim was to develop a programming language that promoted the regularized programming paradigm. Just like structured programming and abstract data types in the ’70s freed software developers from the underlying intricacies of the hardware, regularized programming promises to free us from “computational substrates.” Although this article is about my experiences with building extensions and kernels for JupyterLab, I think it’s important to explain the advantages of Bosque and why you should learn it. Since this language is still evolving, the following explanations are based on my own experience and reading of the relevant documents and reports. I strongly encourage anyone interested in Bosque to read available documents and run some of the code available (for example, in JupyterLab with Bosque support).
Going a Step Higher
Dealing with “machine words” (chunks of memory defined by hardware vendors) in the ’70s was just as common as dealing with loops these days. Imagine yourself looking at machine words and writing programs that interpret some of them as “printable text,” “non-printable escape sequences,” “float numbers,” “double floats,” etc. Abstract Data Types freed us from dealing with such vendor-specifics. The same can be said for functions, loops, and statements in general. Instead of writing programs that dealt with machine addresses, base pointers, stack pointers, jumps, and other hardware specifics, we went a step higher and invented Structured Programming. Our software could now be structured in terms we could think about instead of thinking in accidental hardware intricacies. We, so to speak, added an additional layer of indirection to free ourselves. Just as we invented loops to eliminate dealing with registers, addresses, and jumps, Bosque is now going a step higher by removing loops and restricting recursions. Instead of handling loop structures, we move to a higher level and focus on intents. When I loop over something, I am actually expressing an intent toward a structure that should be handled in some way, like “iterate over this list and multiply each of its elements by 2.” The structure that performs the looping is not that important. That’s why we don’t need loops in Bosque—because we focus on the programmer’s intents rather than on structures like for, while, do-while, etc.
Mutable State
The same applies to (shared?) mutable state, which is still pervasive in today’s programming. Whenever we take someone else’s code or want to extend our own, one of the first questions is: If I add this one little piece of code, will the rest still be running smoothly? Programming is still not “a practice of monotone reasoning,” as we still need to carry the full burden of accidental complexity in our heads. We freed ourselves from the hardware and gained all these nice structures and later “objects,” but we still must bear the weight of accidental complexities introduced by mutable state. Most often, we simply don’t have enough time or the required skills to digest these complexities mentally. As a result, software development becomes a grueling marathon through the rainforest, just on another level. It seems that the additional layer of indirection we created earlier has introduced its own complexities. That’s why everything in Bosque is immutable by default.
Verification
In Bosque, we can define functions that execute verifications before they start. This eliminates a whole class of errors based on invalid or incomplete data. In most languages, programmers usually employ checks based on if-else statements or various macros. This works, of course, but it feels more like a crutch, as people are using constructs from one area to ensure the functionality of something in a completely different area. In Bosque, such checks have their own semantics and can be reasoned about, with the compiler helping us prevent runtime errors. An additional aspect of this kind of verification is that it can be used for so-called SemVer (semantic version) verifications. In regularized programming, we can define the minimum acceptable versions (major, minor, patch) of certain parts of the program, thereby eliminating yet another class of errors. Instead of hunting for reasons why a certain API call failed, we can preemptively eliminate the errors by defining the lowest acceptable API version.
Integrating Bosque into JupyterLab
One thing I want to admit before writing anything about JupyterLab and kernel/extension development: I had never before written anything regarding JupyterLab and the framework beneath it. I never needed it until I started experimenting with the current Bosque compiler environment. Previously, the Bosque compiler could be started with a simple “make-exe” script (defined in package.json). But the current version is a bit more complex, as it’s being done in two steps: first, the compilation to JavaScript (since Bosque compiles to JS), and then the execution of this code by NodeJS. Doing this manually is possible but a bit tedious, as it involves switching from the IDE to the console. Yes, it could be mitigated, and I’ve even created a DevContainer for VSCode that you can find here. But why shouldn’t we have all the nice features of JupyterLab? Web-based development and instant execution of code snippets? JupyterLab is an awesome environment for testing new things, and as Bosque is still a moving target, it would be much better to experiment with it there instead of switching from the IDE to the console and back. So I decided to integrate it into JupyterLab. But I had no clue how to do it. And, honestly, I still doubt that the resulting Kernel and Syntax Colorization Extension, which I am now going to present to you, are really well-crafted. But they work, and they can be extended, for example, when the language syntax changes or a new compiler comes out. If you are interested in improving the code, feel free to open a PR. Thanks in advance!
Writing a Kernel for JupyterLab
JupyterLab is highly extensible and supports various types of extensions. Although I am not sure if I have grasped them all, from my experience with it (that is, the last 10 days or so), JupyterLab can be extended by writing so-called Kernels in Python or extensions in TypeScript. A kernel is a piece of software capable of executing external code, for example, a compiler, and then returning the result to JupyterLab, which then presents it in the UI. This is what basically happens when we press SHIFT+ENTER inside a code cell. The code is sent to the kernel, which then creates a temporary file, feeds it to the respective compiler (or whatever else), and then waits for it to return the result. Ultimately, the result is then returned to JupyterLab and presented to the user. Quite a simple concept, isn’t it? Well, yes in theory, which is mostly gray, while practice is always pitch black. I had significant problems orienting myself at first. Just like any other component, JupyterLab Kernels must follow certain rules to be accepted as kernels.
- They must be specified in a “kernel spec.”
- They must be installable by pip (the Python package manager).
- They must derive from the Kernel base class.
- They must provide certain information about the language they represent, the MIME types, the file extensions, and the Lexer they use.
I am not going to write a tutorial on these rules and how to implement them, as JupyterLab is already doing excellent work in describing them and also provides many good examples you can reuse in your code. I was quite successful at leveraging the basic code and mostly needed to focus on the extras demanded by Bosque (the aforementioned separation between compilation and execution of code). This is how the Bosque Kernel is structured:
The kernel.json file defines the arguments that JupyterLab will use to launch it.
This is the bridge between JupyterLab and, in this case, our Bosque environment. Whenever we send Bosque code to be run, the arguments defined here will be used to execute the BosqueKernel class defined in kernel.py. Apart from the Kernel, we also have our own Pygments Lexer, which is located in lexer.py. We need the lexer to tokenize the syntactic rules of the programming language we use. Most importantly, lexers are needed for:
- Error Messaging by providing syntax-highlighted error messages or tracebacks.
- Static Analysis through features like syntax checking or code linting on the server side.
- Documentation Generation by assisting in generating well-formatted documentation or help messages.
However, one thing should not be confused with Lexers: they cannot be used for syntax colorization on the frontend. This was initially what I thought when I ported the syntax definition from the official Bosque repository. Lexers and Kernels, in general, are server-side components.
Bosque Wrapper
As already mentioned, Bosque source code must first be compiled to JavaScript and then run with NodeJS in a separate step. To abstract away these peculiarities (and also to prepare for future changes), I added a small wrapper that handles all this internally. I expect this behavior to change in the future, so the wrapper is already equipped with a currently unused method compile_bosque_future. The entire operation between the Kernel and Wrapper is as follows:
- The Kernel executes _compile_and_execute, which calls the Wrapper’s own compile_and_execute method.
- The Wrapper calls both the Bosque compiler and NodeJS, then returns the result back to the Kernel.
I am not sure if this is the best way to utilize the Kernel, but it works. I’m not even sure if it’s “pythonic” enough, but again: it works. Feel free to open a PR if you have a better solution. In any case, expect this “duality” to disappear one day when Bosque is able to compile itself. All in all, this is what the Kernel is doing here. To install it, you need to run the usual pip install . inside the kernel folder. This is not necessary if you are building the Dockerfile provided in the BosqueDev-Jupyter project. All you need to do is run your Docker container to access the extended JupyterLab UI.
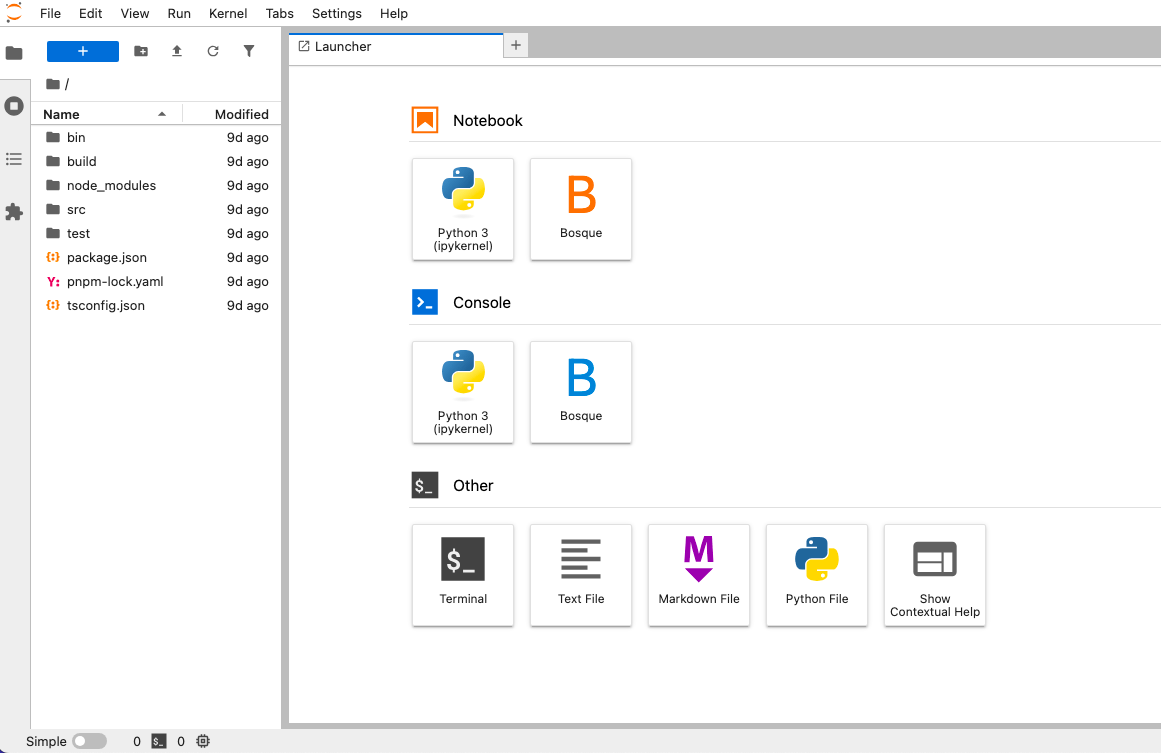
Just select the “Bosque Notebook,” and the Kernel will start for you. However, the Kernel alone won’t be enough, as you will be missing the nice syntax highlighting we know from other JupyterLab environments. That was the second task to be completed when I started working on the whole thing.
Writing a Syntax Highlighting Extension
Unlike Kernels, frontend extensions in JupyterLab are written in TypeScript. At least, this is what I assume to be the default, but who knows—maybe there are some frameworks that allow writing the extension in Python or another language and then transpiling it into JavaScript. However, I consider this overkill and didn’t even try to find such solutions. Instinctively, I went the TypeScript way. But hold on—before even trying to do anything manually, you should follow the rules laid out by JupyterLab and set up the project correctly. That is, you should run pip install copier in the console to install the project generator. copier uses a predefined extension template that helps you set up the properties of your extension project. The data you enter in the copier dialog will be saved in .copier-answers.yml.
Copier will then create the initial structure for your extension. All sources will go to src, all styles to style, and so forth. It’s just a normal TypeScript project. However, do not try to build and manage it with npm or any other package manager. Instead, a separate package manager based on Yarn will be used: jlpm (JupyterLab package manager). In any case, check the package.json of your project to learn a bit about it. Whenever you compile the project, the results will land in the “lib” folder, and the final extension will be in a subfolder with the same name as your project. In my case, it’s src/jupyterlab_bosque_syntax. Inside this folder, you will see some Python files that are needed for the extension to be properly installed. In general, do not modify these files. Focus on TypeScript only and leave the Python stuff alone. At least, this is what I have learned during my adventures with the development of this extension.
The sources of the extension are located in src:
Generating Parsers with Lezer
Before we focus on the logic behind syntax colorization, I want to mention the importance of the Lezer Parser. Since our code will be running in a code editor based on CodeMirror 6, the use of the Lezer Parser is unavoidable. The code we enter cannot be highlighted without the code editor understanding its structure. So, we need to write a grammar first, which will then be used by the lezer-generator to build a parser for Bosque source code. This parser, of course, is something you should never touch directly. Just let the generator do the work for you. Focus on the grammar (and you can be sure that the current grammar I created is still not complete). The parser code below is a heavily shortened example, as the data in “states,” “stateData,” and “goto” is much longer.
The parser generation is done automatically during the build process. But if you need to parse the grammar manually, just run lezer-generator src/grammar/bosque.grammar -o src/parser/bosque-parser.js.
Activating the Extension in JupyterLab
JupyterLab, of course, offers an extensible platform that developers can use to add their own components. In our case, we needed to register the extension for both the new language (Bosque) and the new file extension (.bsq).
There are many ways to register an extension, and all of them depend on the use case. Some extensions will be visible, like menus or new widgets. Others, like this one, are for syntax highlighting and do not need to be activated manually. I think one could write entire books on how JupyterLab can be extended. So let’s leave it here, as I don’t consider myself an expert in this matter. The next piece of code that is important to know about is the actual language definition that configures the parser we just generated. This is done in src/bosque-language.ts. The keywords we defined in our grammar are being mapped to Lezer Tags (either standard ones or custom ones we define ourselves). This way, we can group certain keywords and highlight them differently from others. As our grammar changes and grows, we can update the grammar, generate a new parser, and then update the groups.
Parallel to Tags, we also define the HighlightStyles that associate CSS classes with those Tags.
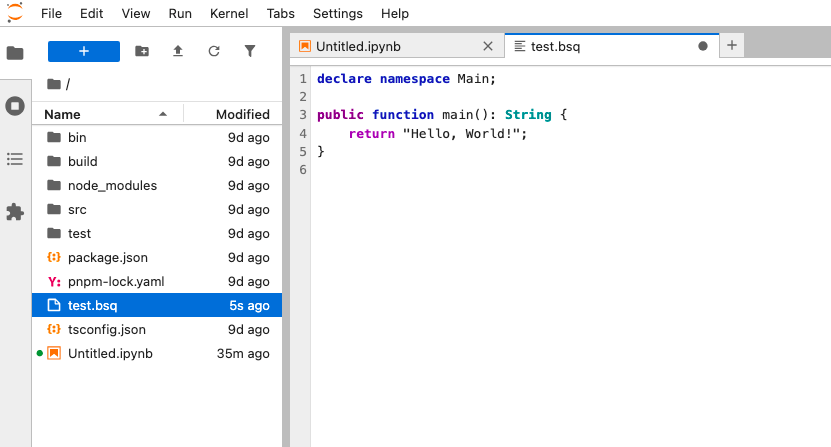
However, during development, I encountered problems regarding the highlighting of elements in a single line of code that I wanted to be colorized differently. I wanted to distinguish function and method modifiers from keywords and names. For example, “public function main()” would be highlighted in three different colors. The same should apply to concept and entity methods.
No matter how precisely I defined and grouped the keywords, they either ended up being highlighted together or had no color at all. After some troubleshooting, I realized that the problem was not “wrong grouping” or “invalid CSS classes,” but the fact that the parser lumps those keywords together. The parser recognizes them separately, of course, but the end result that goes through the highlighting extension is just a single line of code that often cannot be highlighted at all. So, I had to add an “overlay” to process the code lines in chunks.
The Overlay essentially loops over visible “ranges” (this comes from CodeMirror) and extracts text from them. Then, it loops over these strings in search of any known keywords. Whenever it finds one, it assigns a CSS class to it. I know it looks a bit excessive, maybe even superfluous, but I simply wanted to know if there is a way to highlight different keywords in the same line. My initial impression was that I only needed the parser to consume the keywords and that the rest would be “somehow” applied by CodeMirror. But it seems that this wasn’t the correct strategy. However, I am still unsure if this is really a good way of highlighting individual keywords. In any case, if you don’t want or need this kind of highlighting, all you need to do is remove the instantiation of the overlay in src/bosque-language-support.ts, which wires everything up.
The CSS classes used for highlighting are located in style/base.css, which is the recommended file for custom CSS. To change the colors, you basically only need to modify base.css. The rest can remain the same unless you want to change the grammar or introduce new Tags. If you want to experiment with the extension, I recommend using a script that compiles, installs, and then rebuilds JupyterLab in one go. Each time you make a change to the extension, you will need to reinstall it and then rebuild JupyterLab.
I recommend using the prepared development environment that you can clone from here. Just follow the instructions in the README, and you are good to go.
Conclusion
I had no idea what was waiting for me when I started thinking about using Bosque in JupyterLab. I used Jupyter (without the “Lab” suffix) a few years ago and thought it would be “cool” to experiment with an evolving, still not “production-ready” language in an environment designed for rapid prototyping, experimentation, and instant feedback loops. But nobody told me it would involve writing a kernel and an extension in two different languages, using new package managers, and even writing grammars and lexers. Although I am still not sure if the code I wrote follows common conventions and good practices, I surely hope it will be of some use to other developers interested in Bosque. And if some of you even decide to try out Bosque because there is now an easy way to do so, I’ll be more than happy. Thank you so much for trying out Bosque (and your PRs regarding my code are still very welcome).
Have fun with Bosque!


