35 minutes read
It’s been a while since I last played around with HPX. Some time ago, in February 2016, I wrote an article about this excellent parallelization framework. Back then, I did everything on Windows, just to showcase that it’s possible to run it there. I even wrote a small tutorial on how to compile HPX binaries, which later got included in the official repo docs. That was it. I never looked back because I didn’t have much time to tinker around. Most of my time was spent working on .NET/C# (backend) and Angular/TypeScript (frontend) projects because, let’s face it, everyone wants to keep their fridge full and the industry doesn’t care much about one’s (non-existent) C++ skills. I still do some C++ stuff, but mostly for myself. There are a few GitHub projects of mine that use C++ in some way. Feel free to check them out. Ok, enough about that—let’s talk about HPX.
The repositories containing the source codes used in this article are located here.
What is HPX?
HPX is a runtime system that supports asynchronous, parallel, and distributed computing. I also see it as a way of thinking about software. These days, no sane person can expect an application, no matter how big or small, to “only need one CPU” or always run on just one machine or node. Nope, this is not how modern software should be conceptualized, let alone developed. Asynchrony, Parallelization, and Distributed Computing must be there from the very beginning because, as we all know, no one can predict the direction a software product will take. I’ve seen way too many projects that started with a narrow focus, only to be scrapped later as the software began to grow—often in multiple directions at once. Sooner or later, we faced the usual problems: poor or nonexistent caching strategies, too many conflicting component names, and increasing latencies everywhere. Add to that the fact that most teams change members over time (leading to knowledge loss that needs to be rebuilt), and you find yourself in the world of “modern software development.”
Therefore, we need to think about many things at once. We need a strategy to make our software parallel by design. We need a solution that ensures our components can be (re)used regardless of where they are in our system—whether it’s a different core, node, or even network executing the logic. We need a framework that helps us not only craft those things but also teaches us discipline in how to view software as a whole—as a product people use.
Installing HPX
This time I will be using my good old MacBook Air that runs the last and soon unsupported macOS Monterey v12.7.6. It’s a fairly weak machine (8GB RAM and a dual-core Intel i7 CPU) and I should maybe buy a “better” one, but I think that showcasing HPX on such a machine by compiling HPX by hand and writing example code for it could be good evidence that parallelization frameworks can be learned without resorting to fancy hardware, expensive GPUs, or even a fully assembled multi-node network. It’s not about massive hardware. It’s about sending messages between components.

Installing GNU C++ v14
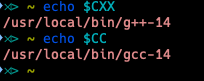
So, before starting with HPX compilation we must make sure our default compiler is GNU C++ v14 and not the default one coming with macOS, clang. There is nothing against clang and the whole article could also be used with it, but I simply prefer GNU C++ over other compilers. So, we first install the compiler with brew install gcc@14.
The compiler and its binaries, libs, and includes will be installed under /usr/local/opt/gcc.
The C++ & C compiler binaries are g++-14 and gcc-14, respectively. Now make sure the environment variables CC and CXX are set in your preferred shell. Both must point to the full path of these two binaries. I myself use fish shell, so this is what I have here:
Now you can test your installation with this one-liner:
echo 'int main() { return 42; }' | $CXX -x c++ -std=c++23 -o /tmp/test_exec - && /tmp/test_exec; echo $status
If you get an error regarding invalid paths, make sure you have correctly set the two compilers.
Compiling HPX
The first thing to download is the source code of HPX. Of course, one could simply execute brew install vcpkg and then use this package manager to install HPX with vcpkg install hpx, but this would be too easy, wouldn’t it? Additionally, the HPX libraries couldn’t be used by GNU C++ because vcpkg compiles them with clang, and I really don’t want to fiddle around with their CMake settings. I also don’t want to just install some software, but to actively control where it gets installed, what gets installed (HPX has a LOT of different settings), and above all else: I don’t want to use clang but instead GNU C++ v14 with C++23 activated. So, because of all these things, we will clone HPX with git clone --recursive https://github.com/STEllAR-GROUP/hpx.git.
Boost Libraries
Next, we will need to install Boost C++ libraries as HPX makes heavy use of them. This time we simply use brew install boost because I really don’t care much about Boost as it’s completely internal to HPX and we’ll only use HPX’s facilities anyway. The only thing from Boost I really need is its location as we will be referencing its headers and libraries. In my case, it’s /usr/local/opt/boost@1.86.
Asio Networking Library
We will also need a separate Asio package to be installed. HPX offers to fetch Asio automatically, but I’d rather avoid this option as it changes paths of local systems that could conflict with some already existing packages. For more information, check HPX configuration option HPX_WITH_FETCH_ASIO. Instead, we just let brew install asio do everything for us. Of course, if you happen to have already installed Asio, you can set its path by using CMake’s ASIO_ROOT variable.
Hardware Locality
The next important library we must install is hwloc. hwloc stands for Hardware Locality, and it provides a portable abstraction of hardware topology. This is needed to help software understand and optimize the hardware it runs on. As HPX is a parallelization and distributed runtime, one can expect to deal with lots of different hardware in terms of type (CPU cores, NUMA nodes, Sockets, Cache Levels, GPUs, Network Interfaces, and so on). To be able to pin threads and tasks for specific hardware, HPX needs hwloc. But this is just one thing hwloc provides. To manage hardware topologies, HPX needs to know how many CPU cores, GPUs, Nodes, Network Interfaces, etc., are out there. This helps HPX utilize all those hardware parts more efficiently. And because HPX offers developers the option to assign specific tasks to particular hardware, hwloc is needed here as well. So, to sum it up, hwloc is needed by HPX to:
- Discover hardware topology at startup
- Pin threads to cores according to the hardware layout
- Distribute tasks across NUMA nodes efficiently
- Handle devices like GPUs, I/O devices, or network interfaces for specific high-performance scenarios
Quite an important library, isn’t it? So, let’s install it with brew install hwloc. On my machine, I find it under /usr/local/opt/hwloc. We will need it later.
High-Performance Allocator
We will also need one of the supported high-performance memory allocators. This could be jemalloc, tcmalloc, or mimalloc. They all have their individual pros and cons, but before I start pretending to know everything about each of them, I’ll simply opt to install jemalloc: brew install jemalloc.
Without any allocator, HPX would handle memory allocation without them, which is much slower. Not that I would notice that much of a performance gain on my tiny machine, but it’s surely important to know about allocators when one later goes to use HPX on really powerful hardware. All in all, the jemalloc package got installed under /usr/local/opt/jemalloc, which I will be using later when configuring HPX with CMake.
Thread Building Blocks
You will only need TBB to to compile certain performance comparison tests provided in the HPX repository. If you are specifically interested in running those, you can install TBB with brew install tbb.
Configuring HPX with CMake
The first thing to know is that HPX uses CMake to build, so we need to go into the cloned HPX directory and create a new build folder with mkdir build. We jump into it and run CMake with these options:
cmake -DCMAKE_INSTALL_PREFIX=/usr/local/hpx -DBOOST_ROOT=/usr/local/opt/boost@1.86 -DHPX_WITH_MALLOC=jemalloc -DJEMALLOC_ROOT=/usr/local/opt/jemalloc -DHPX_WITH_PARCELPORT_TCP=ON -DHPX_WITH_EXAMPLES=ON -DHPX_WITH_TESTS=OFF -DHPX_WITH_COMPRESSION_ZLIB=ON -DHPX_WITH_TOOLS=ON -DHPX_WITH_DEFAULT_VISIBILITY=ON ..
-DCMAKE_INSTALL_PREFIX=/usr/local/hpx: Specifies the directory where HPX will be installed.-DBOOST_ROOT=/usr/local/opt/boost@1.86: Defines the location of the Boost installation.-DHPX_WITH_MALLOC=jemalloc: Configures HPX to use the jemalloc for improved performance.-DJEMALLOC_ROOT=/usr/local/opt/jemalloc: Specifies the installation path of jemalloc.-DHPX_WITH_PARCELPORT_TCP=ON: Enables TCP parcelport, allowing communication between HPX localities over TCP for distributed computing.-DHPX_WITH_EXAMPLES=ON: Builds the HPX example programs to help test and learn HPX features.-DHPX_WITH_TESTS=OFF: Disables building HPX’s internal tests, speeding up the build process.-DHPX_WITH_COMPRESSION_ZLIB=ON: Enables ZLIB compression for parcel data to reduce network traffic in distributed environments.-DHPX_WITH_TOOLS=ON: Builds HPX tools, such as performance measurement utilities and diagnostic tools.-DHPX_WITH_DEFAULT_VISIBILITY=ON: Ensures symbols have default visibility, which can improve link times and reduce binary size.
Now, press enter and wait for CMake to complete generating all the makefiles. The start and end of the whole process will look like this:


Ok, so far so good. We seem to be able to compile the whole thing. But beware, if you are running on a weak machine like my MacBook Air, expect a series of lengthy compilations. No pain, no gain. Type in make or alternatively make -jX, with X standing for the amount of parallel executions your CPU should be doing.
Ultimately, we want all this to be installed. Type in sudo make install to put everything into the path of your choosing. On my machine, it’s /usr/local/hpx, but this is not a must. As we have activated the compilation of examples, the bin folder of HPX contains many interesting binaries to try out.
Writing a Hello-World in HPX
Ok, let’s check if our HPX installation can be used with our C++ programs. We have the compiler, we have HPX installed, and now we need a simple binary to try them out. Here’s a very simple code:
Compiling with GNU C++ v14
Usually, we would write a new CMakeLists.txt and then follow the ritual of creating a build folder, executing cmake in it, and then finish it with a make command, but let’s try it directly, without the help of any tool except the compiler itself:
g++-14 -std=c++23 -I/usr/local/hpx/include -I/usr/local/opt/asio/include \-I/usr/local/opt/boost@1.86/include -I/usr/local/opt/hwloc/include \-L/usr/local/hpx/lib -L/usr/local/opt/boost@1.86/lib -L/usr/local/opt/hwloc/lib \-L/usr/local/opt/asio/lib -L/usr/local/opt/jemalloc/lib \-lhpx_iostreams -lhpx_wrap -lhpx_init -lhpx -lhpx_core \-lboost_thread-mt -lboost_context-mt -lboost_atomic-mt -lboost_chrono-mt \-lhwloc -ljemalloc -pthread -Wl,-rpath,/usr/local/hpx/lib -Wl,-e,_initialize_main \-o simple_hpx simple_hpx.cpp
Here’s a breakdown of the flags we just used:
g++-14: Specifies the GNU C++ compiler version 14 to use for compiling.-std=c++23: Instructs the compiler to use the C++23 standard.-I/usr/local/hpx/include: Adds the HPX include directory.-I/usr/local/opt/asio/include: Adds the Asio include directory.-I/usr/local/opt/boost@1.86/include: Adds the Boost 1.86 include directory.-I/usr/local/opt/hwloc/include: Adds the hwloc include directory.-L/usr/local/hpx/lib: Adds the HPX library directory.-L/usr/local/opt/boost@1.86/lib: Adds the Boost library directory.-L/usr/local/opt/hwloc/lib: Adds the hwloc library directory.-L/usr/local/opt/asio/lib: Adds the Asio library directory.-L/usr/local/opt/jemalloc/lib: Adds the jemalloc library.-lhpx_iostreams: Links against the HPX iostreams library, which handles I/O in HPX applications.-lhpx_wrap: Links against the wrap library, responsible for wrapping certain HPX runtime components.-lhpx_init: Links against the HPX initialization library to handle starting and initializing the runtime.-lhpx: Links against the core HPX runtime library.-lhpx_core: Links against the core HPX library containing essential runtime functionality.-lboost_thread-mt: Links against the Boost multi-threading library to handle threads.-lboost_context-mt: Links against the Boost context library, used for managing execution contexts.-lboost_atomic-mt: Links against the Boost atomic library, which provides atomic operations.-lboost_chrono-mt: Links against the Boost chrono library for time-related operations.-lhwloc: Links against the hwloc library, which handles hardware locality information.-ljemalloc: Links against the jemalloc memory allocator library.-pthread: Enables multi-threading support using the POSIX threads library.-Wl,-rpath,/usr/local/hpx/lib: Tells the linker to embed the HPX library path in the executable, so it can find the required shared libraries at runtime.-Wl,-e,_initialize_main: Sets the entry point to_initialize_main, which is necessary for proper HPX initialization.-o simple_hpx: Specifies the output filename of the executable to besimple_hpx.simple_hpx.cpp: The source file to compile.
Phew! This is very complex for such a small program. But the complexity doesn’t lie inside our program but in the HPX runtime that gets instantiated transparently. However, I still think that it’s a good practice to at least once compile a program with all the mandatory flags and paths. It’s always about sending a message. So, let’s see what our program will say to us:

Compiling with CMake
After we have tested the compilation with pure GNU C++, it’s time to go to the next level and use CMake. Yes, CMake is incredibly complex (at least for my miniature brain), but it’s still the number one build tool in the C++ world. I know, there are several others, and I have also been playing around with Meson for a while, but because the HPX itself relies on CMake, I think it’s wise to use the same toolchain as they do. What we need for our small program is to place this CMakeLists.txt into the same directory where our source code is.
Here’s what this CMakeLists.txt is doing:
cmake_minimum_required(VERSION 3.15): Specifies the minimum version of CMake.project(hpx_example LANGUAGES CXX): Defines a new project namedhpx_exampleand sets the language to C++.set(CMAKE_CXX_STANDARD 23): Enforces the use of the C++23 standard for the project.set(CMAKE_CXX_STANDARD_REQUIRED ON): Ensures that only C++23 is used and no lower standard is accepted.find_package(HPX REQUIRED): Finds the HPX library and ensures it is available for linking.add_executable(simple_hpx simple_hpx.cpp): Creates an executable namedsimple_hpxfrom the source filesimple_hpx.cpp.target_link_libraries(simple_hpx HPX::hpx HPX::wrap_main HPX::iostreams_component): Links the necessary HPX components to the executable: core HPX library (HPX::hpx), wrapper for themain()function (HPX::wrap_main), and I/O streams support (HPX::iostreams_component).
The settings for the C++ language standard are not mandatory. It’s just because I prefer to use the latest available standard GNU C++ supports (sure, not every part of the standard is currently supported but still). The important parts are later settings like HPX package resolution and linking of HPX libraries. We now create the build directory inside our little project with mkdir build and from within it run these commands:
cmake ..
make -jX (again, it depends on your core count)
Ultimately, we execute the binary with ./simple_hpx

Excellent! We have just used a very powerful parallelization and distributed runtime to write text to the console. How cool’s that! Well, not cool enough. An ordinary thread based on standard C++ facilities would make more sense. We need more to see what HPX can really do for us. If I were to persuade you to try out HPX, I would list these functionalities (and you’ll have to provide fitting hardware for that, of course):
- Asynchronous Programming Model: HPX uses futures and continuations to enable fine-grained parallelism and concurrency with asynchronous function calls.
- High-Performance Scalability: It offers parallel computing on both multi-core systems and distributed environments.
- Unified API for Local and Distributed Computing: The same API can be used for both shared memory (local) and distributed memory systems, meaning developers don’t need to write separate code for each.
- C++ Standards Conformance: It is designed to closely follow the C++ standard library, meaning that users familiar with modern C++ can leverage HPX without learning a whole new programming paradigm.
- Task-Based Parallelism: It promotes task-based parallelism where work is broken down into small units (tasks) that can be run asynchronously and in parallel. No thread pools, never!
- Distributed Futures: HPX’s futures work across distributed nodes, not just within a single machine.
- Global Address Space (AGAS): It provides a Global Address Space, allowing objects to be accessed uniformly across nodes in a distributed system. No manual message passing!
- Highly Configurable Scheduling Policies: It includes several scheduling policies that let users optimize task execution for various workloads, from round-robin to priority-based scheduling.
- Fault Tolerance and Resilience: It includes mechanisms for detecting and recovering from node failures, making it suitable for large, fault-tolerant distributed systems.
- Performance Portability: It can be used across a variety of hardware platforms, from desktops to supercomputers, without having to significantly alter code.
- Advanced Debugging and Performance Tools: It offers a suite of tools and libraries that help with performance tuning, tracing, and debugging distributed applications.
However, as my laptop is abysmally weak and I also don’t have any other fancy hardware lying around, I’ll try to showcase a very nice feature of HPX: components. Yes, components, the granddaddy of buzzwords. However, HPX components have some really nice traits. They can run transparently on any hardware without you, the developer, knowing anything about it. They can be moved around a distributed system, again without the developer needing to manually do anything. They can be (de)serialized automatically. And they react to remote calls the same way they’d do to local ones. This in turn means developers can design components that offer publicly accessible interfaces to any participant in the distributed network. And this is what the article intends to show next.
Writing HPX components
But before starting to write any component let’s revisit the demo code we compiled above. As we already saw, it’s pretty much like any other C++ code except the hpx namespace that provides us its own cout. This is something HPX does for many parts of the C++ standard. As mentioned before, HPX is closely following the C++ standard by providing similarly named variants. And just like we encountered hpx::cout that resembles std::cout, we will see other things like hpx::future (similar to std::future), hpx::async (std::async), hpx::mutex (std::mutex), hpx::parallel:for_each (similar to std::for:each but operates in a parallel context), and hpx::parallel::reduce (like std::reduce but performs a parallel reduction)…and so on. There are many, many examples throughout the HPX library and I advise anyone learning HPX to check if there are maybe similarly named or even parallel variants of the standard C++ facilities. And just like HPX has its own reimplementations of standard C++ classes and functions, the same applies to the standard main() function. HPX has its own main that automatically integrates custom code with the HPX runtime system. The standard C++ main knows nothing about HPX, of course, so when we were using it in the demo code above, a separate include <hpx/hpx_main.hpp> was needed to make sure the HPX runtime was set up before the standard main touched the line with hpx::cout. This include is basically a wrapper that makes sure our standard C++ code still gets executed inside the HPX runtime. Sure, it’s possible this way, but there is another way that is to be preferred.
In this variant of our demo program, we define a separate HPX main function that receives the forwarded arguments coming from the standard main. We don’t use them right now, so they’re here just to showcase how the transfer between those two main functions could look like. The standard main contains a single call to the hpx::init function of HPX, where the runtime gets initialized and control of the future program gets transferred. In the next step, inside the HPX main, we execute our code and also call hpx::finalize so the HPX runtime knows it’s time to tear down resources. In essence, this approach enables a more explicit startup and shutdown of HPX and should be preferred over the standard C++.
Useful HPX console flags
HPX offers many useful flags for querying the runtime. One can use them together with their own programs. Here are a few examples (use --hpx:help for a full list):
--hpx:print-counter – prints the value of a specific performance counter
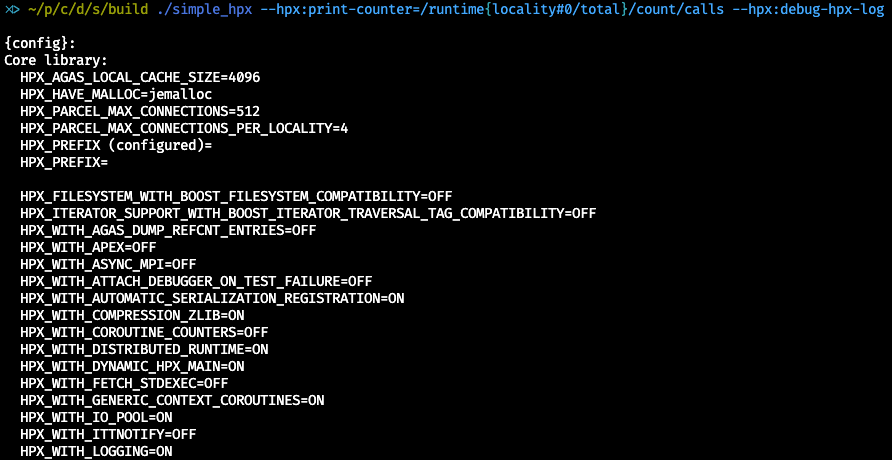
--hpx:print-bind – prints the binding of HPX threads to cores

--hpx::list-parcel-ports – lists available parcel ports, which are responsible for message passing

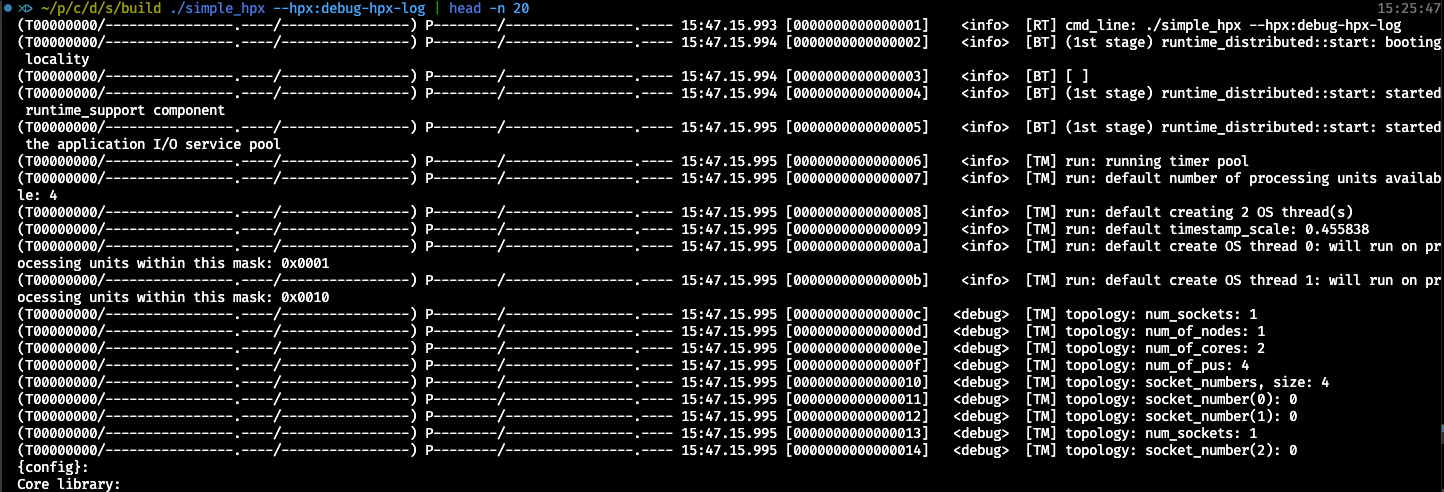
--hpx:debug-hpx-log– prints all available HPX runtime debug information
What is an HPX component?
HPX components are building blocks within its framework and are designed to represent distributed objects that we can access and manipulate remotely across the network. One can say that HPX components are C++ classes that inherit all the traits of C++ classes and extend them to support distributed systems. So, we inherit encapsulation, type safety, public and private code blocks, and add to them the support for distributed systems. This of course makes writing and using HPX components much easier than it would be through some completely new paradigm. But because HPX closely follows the C++ standard anyway, nothing else would be acceptable, I think. And because the best way to learn something in programming is by programming something, let’s try to create and run a simple yet working component example in HPX.
A simple HPX component
In the header file above, we declare an HPX component that inherits from the hpx::component::component_base class. Our new class gets passed as a template argument to this base component class. For more experienced C++ developers, this strategy is called CRTP (Curiously Recurring Template Pattern), and it helps our class to derive from the template instantiation of its base class. This in turn allows the base class to access methods and properties of the derived class (hello_component). This is important because with our new component we introduce new functionalities and behaviors that, without CRTP, would remain unknown to the HPX runtime. Additionally, CRTP allows the compiler to create more efficient code, because the exact type (hello_component) is known at compile time.
But not only is our component providing HPX with new information. It goes the other way around as well, as the component_base makes our component manageable across different nodes. Without component_base, we would basically need to provide our own allocation and tracking facilities, which is…impossible? Another set of functionalities provided by component_base are Action Management (so we can access public component methods remotely and asynchronously) and Lifetime Management (so we don’t have to manage their lifecycles manually…would be funny in a distributed environment, wouldn’t it?)
We then use two HPX macros to define our class member function as an HPX action and register it in HPX. By convention, HPX actions get the suffix _action appended to the function name. This way, our get_42 function becomes get_42_action. This naming convention can be tricky in the beginning, but you will get used to it. Just keep in mind that the HPX_DEFINE_COMPONENT_ACTION macro takes the class name and the original function name to generate hello_component::get_42_action internally. This means that programs that run in HPX must use the registered action under its new name. The other macro, HPX_REGISTER_ACTION_DECLARATION, declares the action to be available across different translation units or nodes in a distributed environment. This means that future clients can access this action regardless of where the current code is running (same process, machine, other node, etc.). The two arguments of this macro represent the previously defined action under its new name and the user-friendly alias for it. This alias will then be used by HPX to register the action. From now on, the action can be invoked asynchronously within the HPX runtime. But this is not the whole story, as we also need to program the behavior of our new component and register it as well. Let’s, therefore, look into the implementation file:
In this rather simple code, we see the definition of the method get_42 and two more HPX macros. The first one, HPX_REGISTER_COMPONENT, allows HPX to create and manage instances of hello_component across nodes. The other macro, HPX_REGISTER_ACTION, enables asynchronous remote invocation of the get_42_action.
It might take some time to grasp everything, but the root concept should be easy to understand. We want HPX to use our own logic within its environment, and for that we must adhere to certain rules. One of them is to inherit from component_base to be well-grounded inside the runtime. Another important part is to follow the rules on how to define and declare certain methods as remotely and asynchronously invokable throughout the distributed environment. Let’s now look at the main.cpp to see how our new component can be used.
Finding the Locality
The code above looks rather simple but it utilizes some very powerful concepts and utilities HPX provides. First, we create an instance of the previously registered hello_component on the current locality (our own machine, but this doesn’t have to be that way, of course). And before we go any further, let’s explain the concept of localities in HPX. As HPX is a distributed system with the capability of managing thousands of different objects (both physical and logical ones), we need a way to address them. A Locality is a basic unit of distribution and computation. And each of them can hold instances of components that can be accessed both locally and remotely. So, in our case, the locality we used is our own machine (my tiny MacBook Air, to be more precise). And this is a good thing because our hello_component was registered on this locality (machine), so we can instantiate it from there, but this is not a must. One could also just as easily instantiate a component registered on some remote locality.
Relying on AGAS
But this is not the whole story, because localities deal with things like processes, machines, CPU cores, and similar. A component is something that runs on a locality. And to be able to query the identity and location of our component (we created its identity with the macros before), we must use some kind of register where we can look up the exact location of a certain identity like hello_component. This responsibility belongs to AGAS (Active Global Address Space), which is used to manage those identities and locations of all objects in HPX. AGAS works like this: whenever a component is created, AGAS keeps track of where the new instance is located. The returned value (the handle) of type hpx::id_type points to this object, and AGAS is capable of resolving this identifier to the actual physical location of the component. Basically, the handle is an alias to a location (like my laptop), and AGAS keeps track (like a key/value store) of those handle/location mappings. In our case, it was a rather simple lookup as everything happened on a local machine. However, AGAS can do much more. Would someone try to access our component from a remote machine, AGAS would make sure the request gets routed to the right place. And this is truly awesome, as we, developers, don’t have to deal with these things. All this has been done transparently for us.
Invoking a remote action
Our next step is now to call the get_42_action our component provides. For this, we use the registered action to declare a local function of the same type. The only parameter needed is the locality we queried before. This in turn means that we expect the given locality to be able to execute the function. We, of course, know that most of the work will be done by AGAS, so we don’t care where the locality really is and how our calls and variables get (de)serialized. HPX takes care of this. Ultimately, we print out the ultimate answer to everything.

A bit more sophisticated component example
One of the more important things when explaining something is the selection of good examples. So far I have not given you anything that at least resembles real-world software. That’s why we will now be talking about chaining the execution of two components that depend on each other. The application we build is a simple “Weather Service” that is capable of resolving city names to longitude/latitude coordinate pairs, which it then uses to access publicly available weather data. To achieve these goals, we rely on two external libraries that will be included in our project’s CMakeLists.txt: nlohmann/json for processing JSON data and cpp-httplib to execute HTTP GET calls. To be as realistic as possible, we also support HTTPS, and therefore we will need OpenSSL to help us consume such calls. This can be done easily with brew install openssl.
The two components (for city name resolution & weather data) will be chained together with hpx::future and hpx::async to make the whole process non-blocking. We’ll see later how this strategy is implemented. The city_resolver_component defines its API as follows:
We see that a single action takes a string reference and returns a std::optional<coordinate>. The coordinate class contains the following members:
Apart from the typical getter methods and the default constructor that must be present so that HPX can automatically manage the instances, we see the templated function serialize. It is needed by HPX to (de)serialize objects so that they can be transmitted between nodes or threads in the distributed system. It is also needed to capture the state of objects for recovery or migration. And last but not least, we need it to transfer only necessary data, thus minimizing bandwidth usage.
One more thing: make sure you implement serialize directly in the header because template functions require their definitions to be visible in all translation units that instantiate them. HPX must ensure that the compiler can generate the serialization logic for any specific types used in different parts of the distributed system.
The next important part is the implementation of the resolve_city_to_coordinate function that takes a city name and returns its coordinates:
The method uses the cpp-httplib to execute an HTTP GET call against the OpenStreetMap API. The data returned then gets converted into a nlohmann::json object, which we treat like an array to query certain fields. As we are only interested in querying populated areas, we filter by the addresstype field provided in the JSON response. Ultimately, we either return a valid coordinate instance or std::nullopt packed in the std::optional. This data will then be processed by the weather_component whose API declaration is as follows:
This component takes a single std::optional argument and returns a std::string result. Its implementation is somewhat longer as we execute two separate HTTP GET calls to query standard weather data like temperature and additional data like humidity, pressure, and visibility. Here we also use some of the modern C++ features like lambdas and if statements with initializers.
The whole implementation is rather unimpressive as we mostly deal with “correct selection” of many different fields we get from the OpenMeteo API.
Now it’s time to run and use the new components in HPX. This is the logic in the main.cpp:
We begin with the declaration of the resolve_action that will be used to access the city_resolver_component. This time, however, we execute the action inside hpx::async, which returns a hpx::future representing a std::optional<coordinate> that may become available at some point in the future. This means that the std::optional we expect won’t be immediately available, but depending on various other things (latencies, length of the computation, or any other side effect), it may become accessible later. What we get instead is a “handle” to the future value (hpx::future<std::optional<coordinate>>).
The definition of the hpx::async(resolve_action, city_resolver_id, city_name) task can be written this way:
- Run a new async task that will execute
resolve_actionwhile passing the parameterscity_resolver_id(the component’s ID) andcity_nametoresolve_action.
But we don’t stop here and instead chain the future result of resolve_action with the later execution of get_weather_action from the other component. This way, we make the second execution dependent on the hpx::future from the city_resolver_component. We do this by using the then continuation function that allows chaining of our actions. This in turn means that when the first action is resolved, the next function in the chain will be executed automatically. This, of course, avoids blocking as our program doesn’t need to wait for the city resolution before starting the next step, getting weather data. The then-continuation uses a lambda that takes a future of type hpx::future<std::optional<coordinate>>.
Inside this asynchronously executed lambda, the continuation then waits for the hpx::future coordinates result by executing f.get().
This is the moment when we block the execution and wait for this computation to complete. However, since the blocking happens inside the continuation, the program doesn’t halt prematurely—it waits only within the async flow, ensuring non-blocking progress elsewhere in the system. This is important to highlight: the hpx::async call itself starts the task immediately, it’s not lazy. The real “lazy” execution happens inside the then continuation, where the next action only fires after the previous one completes.
The received coordinates will then be passed to the weather component that itself returns the second future object of type hpx::future<std::string>. For this object, we then wait in the main() function where we call the second get() function.
We have now successfully chained two component function calls together by using hpx::async and hpx::future. This, of course, is just a tiny example of what is actually a very sophisticated mechanism. There are many more functions that not only can wait for a single future value. There are functions like hpx::wait_any, hpx::wait_all, hpx::wait_some, and many others. You should definitely check out the HPX docs for further inspiration.

Conclusion
I hope that I was able to showcase some of the important features and building blocks of HPX. I must admit that I have forgotten most of the things, so writing this article actually helped me remember them. The best way to learn something is by writing about it. So, the best way to use HPX is by writing code that will run on it. Therefore, grab the HPX sources (or just install the package) and try it out. And most importantly: have fun with it!


